
This post may contain affiliate links. Please read my disclosure and privacy policy.
This post may contain affiliate links. Please read my disclosure and privacy policy.
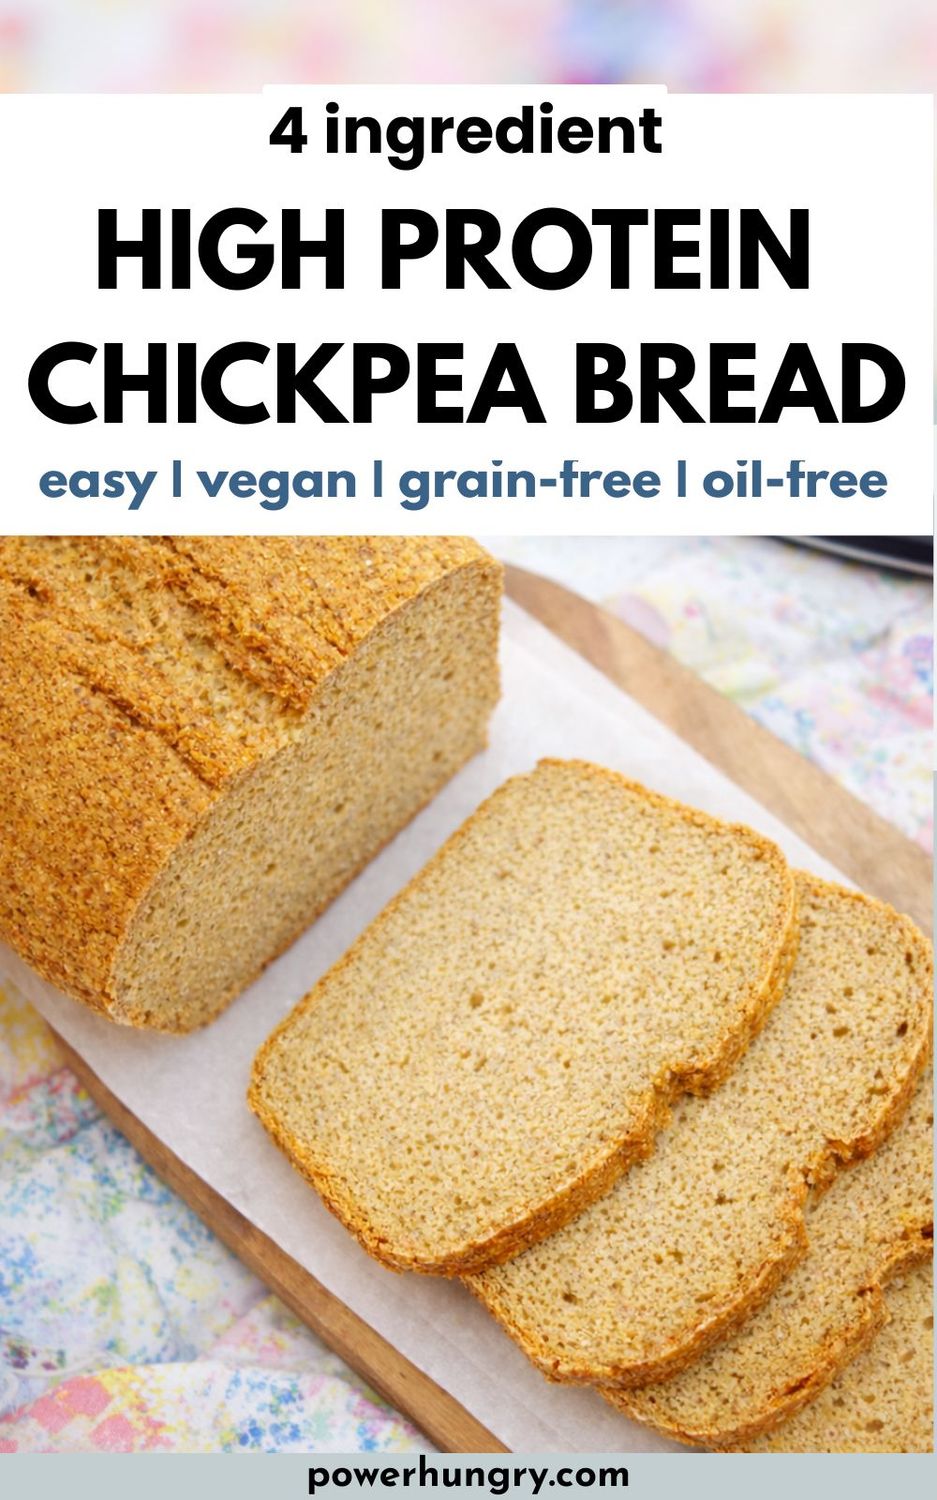

Table of Contents
- A Naturally High-Protein Vegan Bread
- Ingredients for Chickpea Bread
- How to Make Canned Chickpea Bread
- Texture & Flavor
- How to Store Chickpea Bread
- Troubleshooting Chickpea Bread
- Ingredient Substitutions
- Flavor Variations
- Frequently Asked Questions
- More Chickpea Flour Bread Recipes
- High-Protein Chickpea Bread (4 Ingredients, No Yeast) Recipe
A Naturally High-Protein Vegan Bread
If you have a can of chickpeas in your pantry, you can turn it into a hearty loaf of high protein chickpea bread with just a four ingredients. I created it using baking powder instead of yeast, so it works beautifully as a simple yeast-free sandwich bread.
This unique bread uses three forms of chickpeas—canned chickpeas, chickpea flour, and aquafaba—to create a satisfying, sliceable loaf that contains 9 grams of protein and 6 grams of fiber per slice.
Despite being completely yeast-free, gluten-free, oil-free, and vegan, the bread bakes into a firm, golden loaf that works beautifully for sandwiches, toast, or savory toppings like hummus and avocado.
Unlike many high-protein breads that rely on protein powders or specialty ingredients, this recipe uses just four simple pantry staples to create a nourishing, whole-food loaf.
Why You’ll Love This High-Protein Chickpea Bread
- 9 grams of plant-based protein per slice
- 6 grams of fiber per slice
- Made with just four simple ingredients
- Completely vegan, gluten-free, oil-free, and grain-free
- Yeast-free (no rising time required)
- No protein powder
- No starches or gums
- Soy-free and nut-free
- Easy to mix and bake
Ingredients for Chickpea Bread
The exact amounts of each ingredient are indicated in the recipe card at the end of the post. Toggle between US Customary (volume) and Metric (weights) for preferred measurement option.
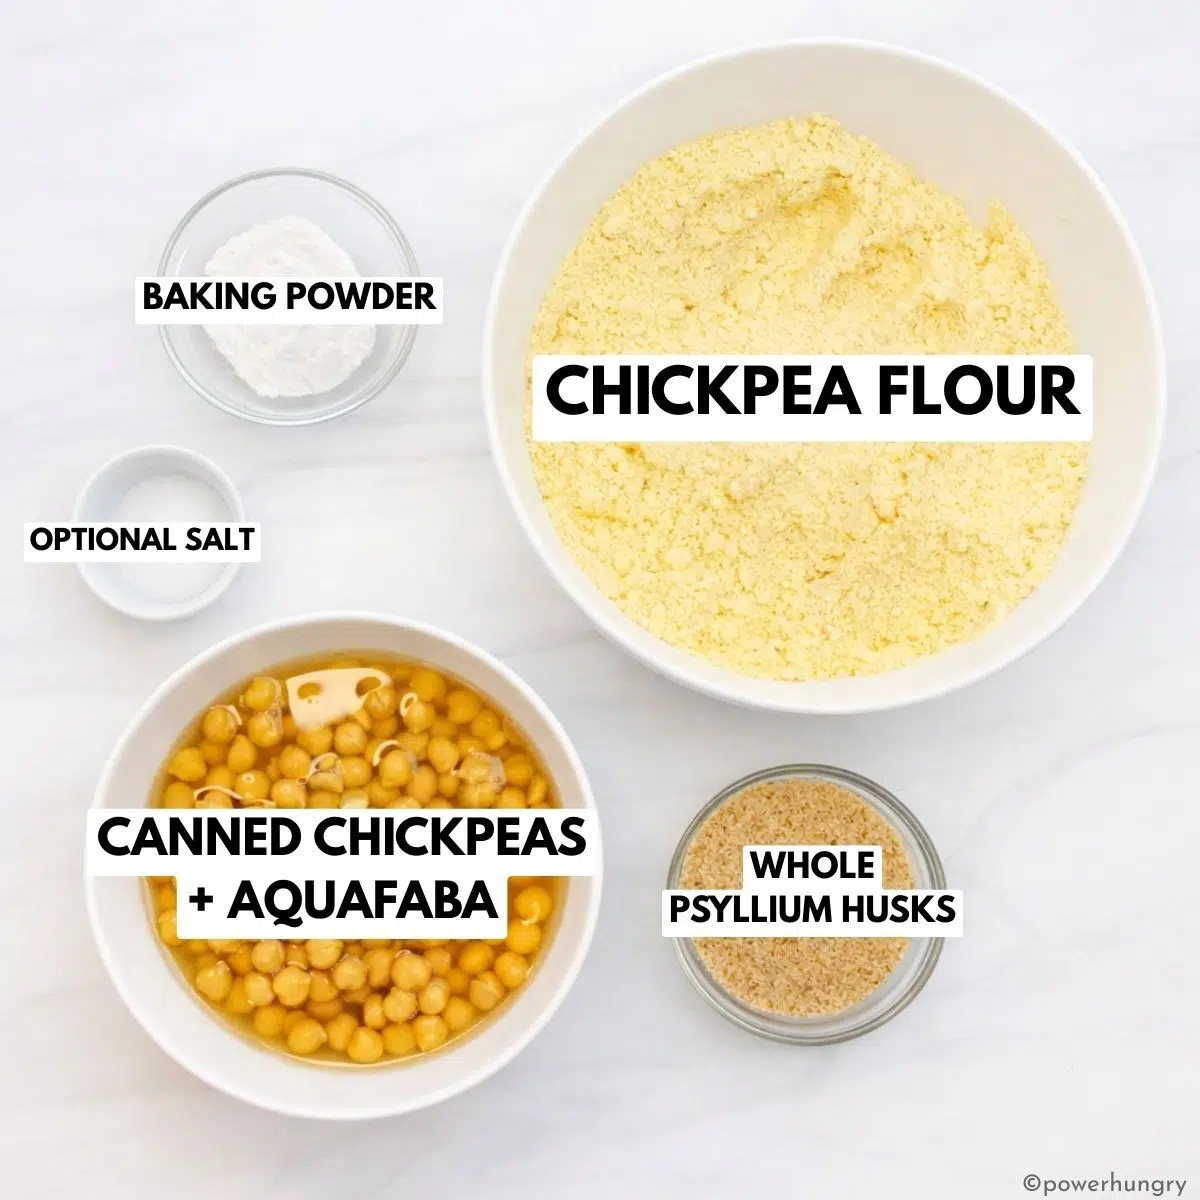
- Chickpea flour
- Canned chickpeas, plus the canning liquid (aquafaba)
- Whole psyllium husks (be sure to read my adjustment notes if you have psyllium powder)
- Baking powder (certified gluten-free, as needed)
You will also need some water (I use filtered water from my tap) to make the dough. Salt is optional, but I recommend adding it, if you eat salt.
Tip: Grind Your Own Chickpea Flour
If you have a high-speed blender, you can grind your own chickpea flour from dried whole chickpeas. Place the dried chickpeas in the blender container. Blend on high until ground into a fine flour. Note: regular blenders and food processors will not work for grinding chickpeas into fine flour. The chickpeas are too hard to break down with the food processor blade, and can overheat a regular blender.
How to Make Canned Chickpea Bread
Note that the complete directions are also in the recipe card below.
Step One: Preheat Oven & Prepare Baking Pan
Preheat the oven to 375F (190C). Prepare a 9×5-inch (22.5 x 12.5 cm) loaf pan by lining with parchment paper (to prevent the bread from sticking to the pan/ loaf tin). If you do not need the bread to be 100% oil-free, you can spray (with nonstick cooking spray) or grease/oil the sides of the pan.
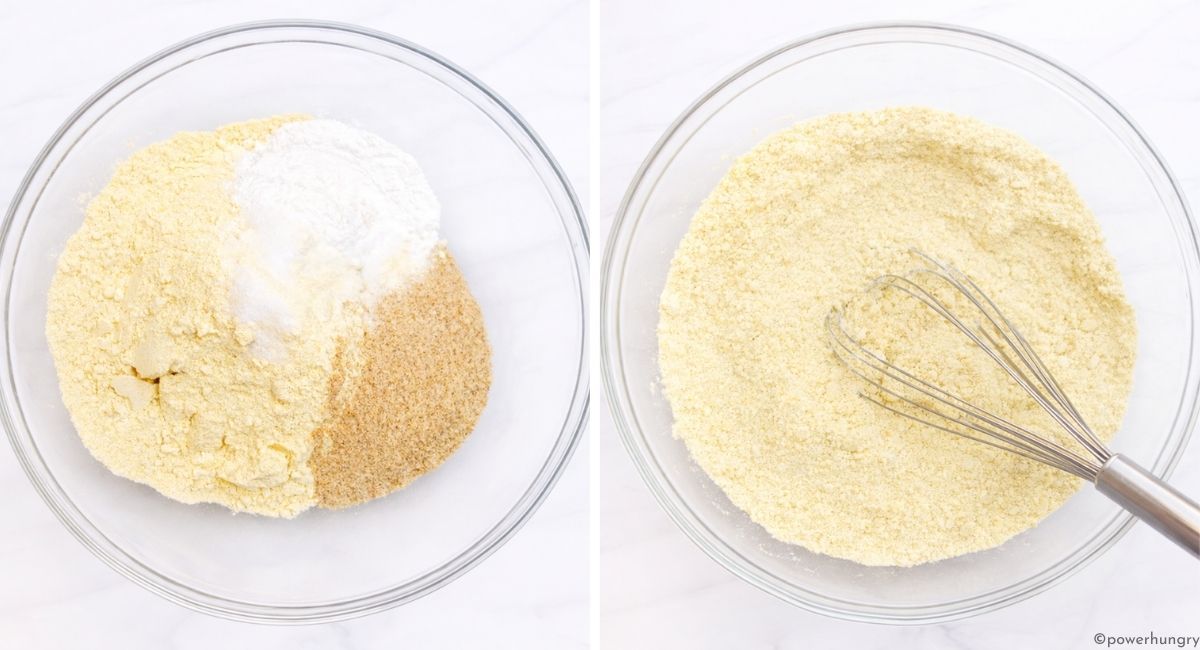
Step Two: Mix the Dry Ingredients
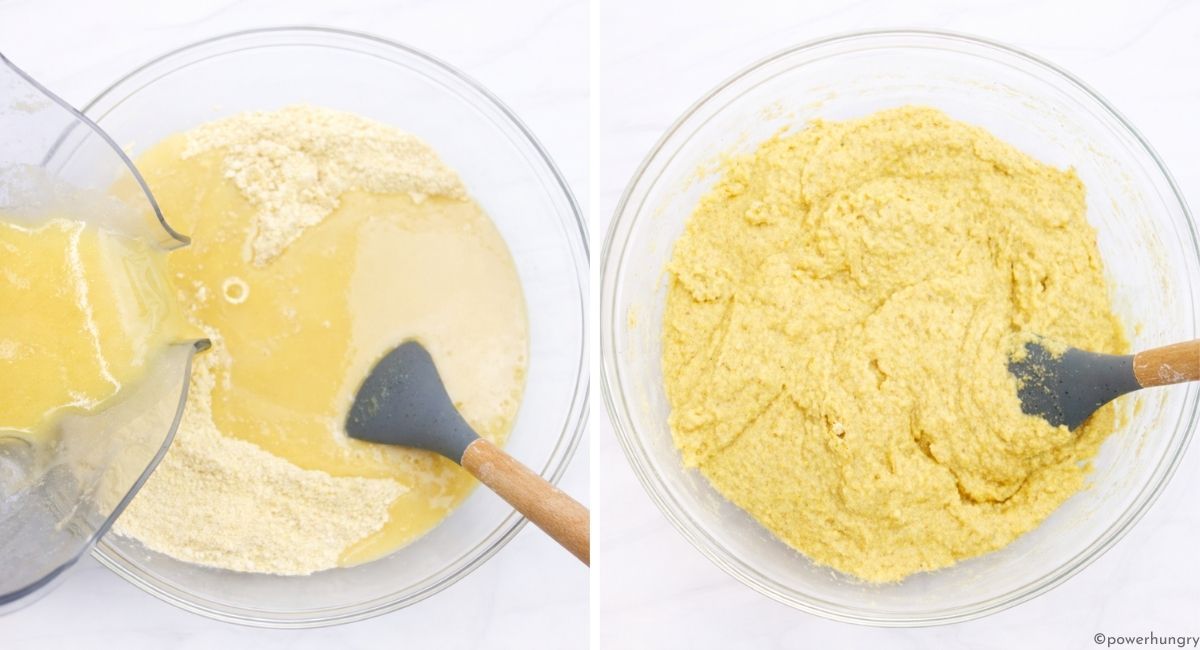
Whisk the chickpea flour, whole psyllium husks, baking powder and optional salt in a large mixing bowl until blended.
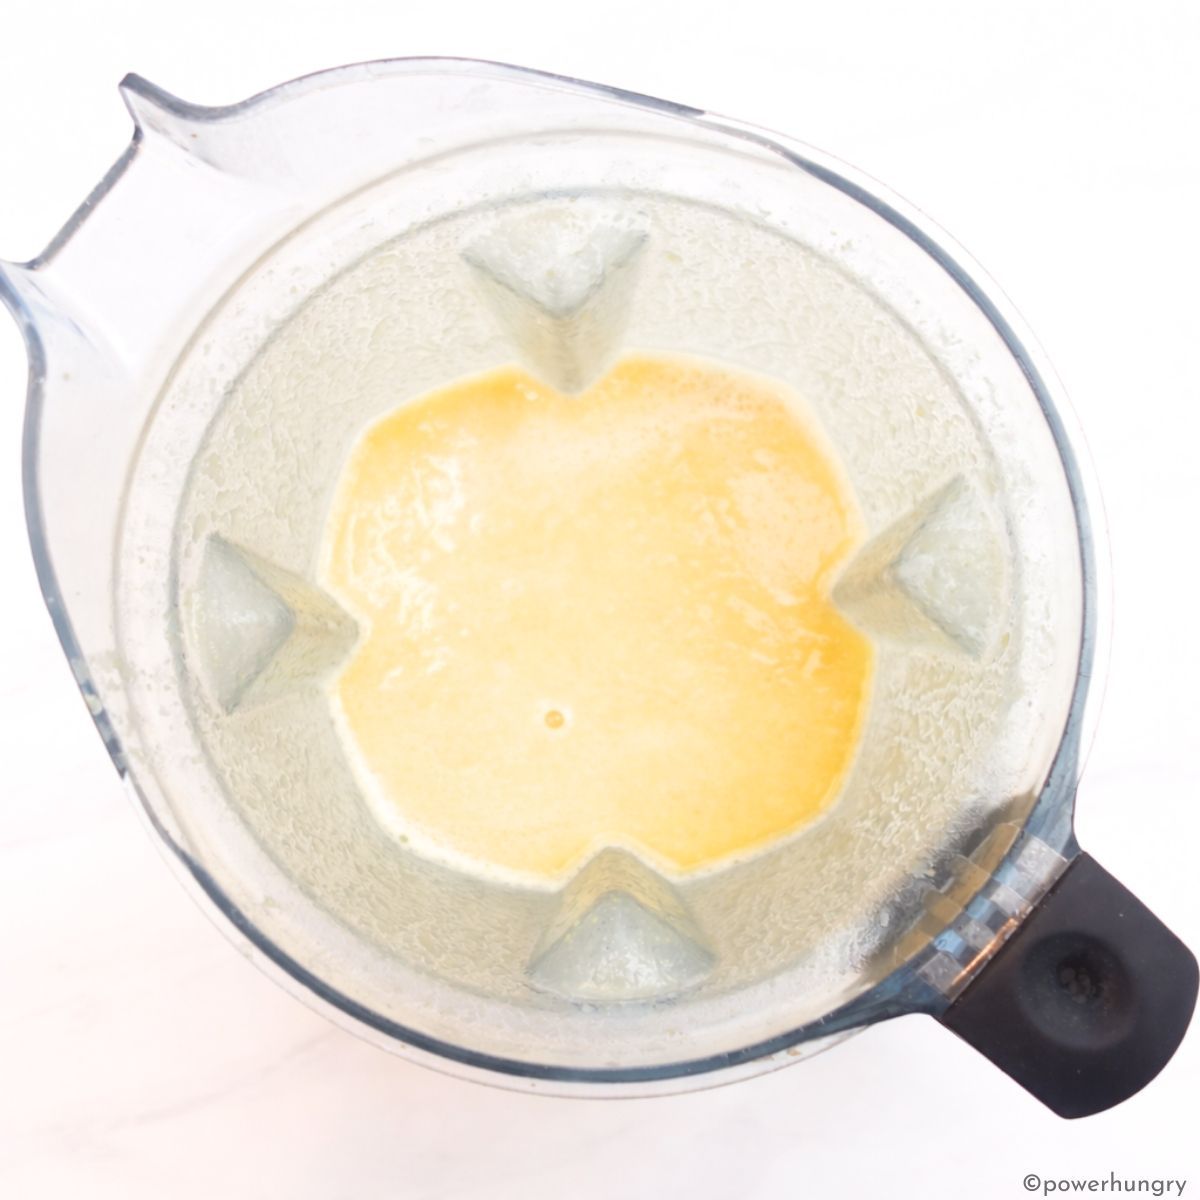
Step Three: Blend the Chickpeas, Aquafaba & Water
Blend the chickpeas with their canning liquid (aquafaba) and water until completely smooth and creamy.
Step Four: Stir in Wet Ingredients
Add the blended chickpea-aquafaba mixture to the bowl of dry ingredients. Use a rubber spatula or large wooden spoon to stir and blend with a spatula until completely combined into a thick dough.
Step Five: Transfer Dough to Pan
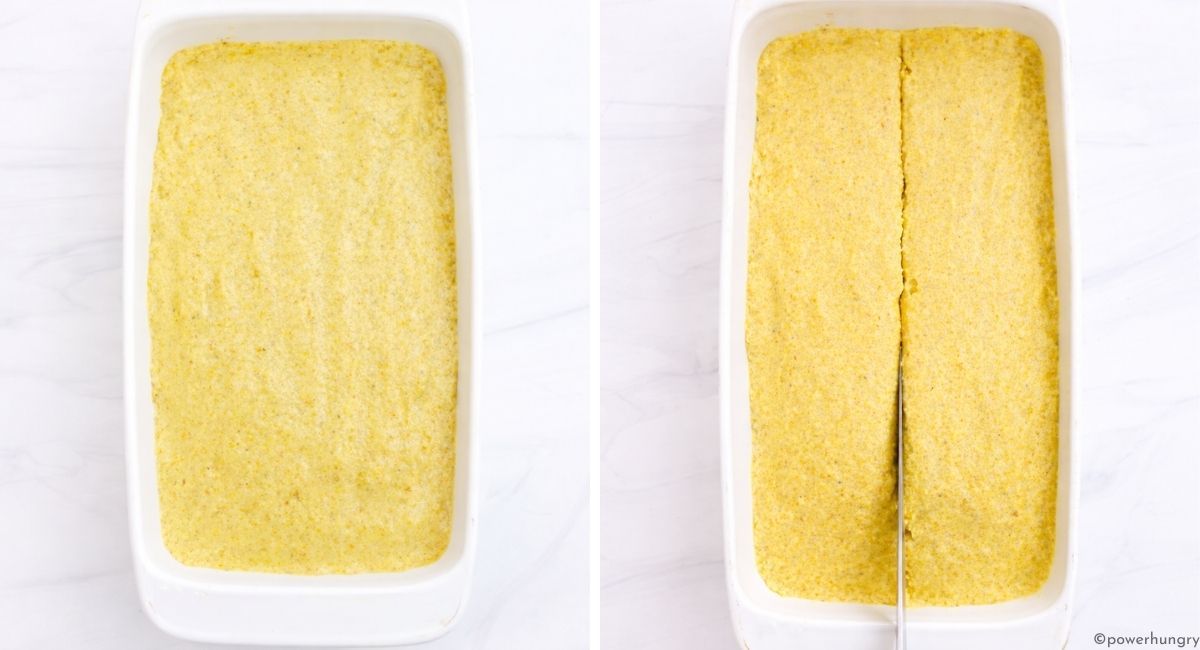
Working quickly (you want to get the bread into the oven as soon as possible), transfer the dough to the prepared baking pan. Use a spoon or spatula to spread the dough evenly and smooth the top. Using a sharp knife, make a lengthwise slash through the dough (at least 1/2-inch/1 cm deep).
Step Six: Bake
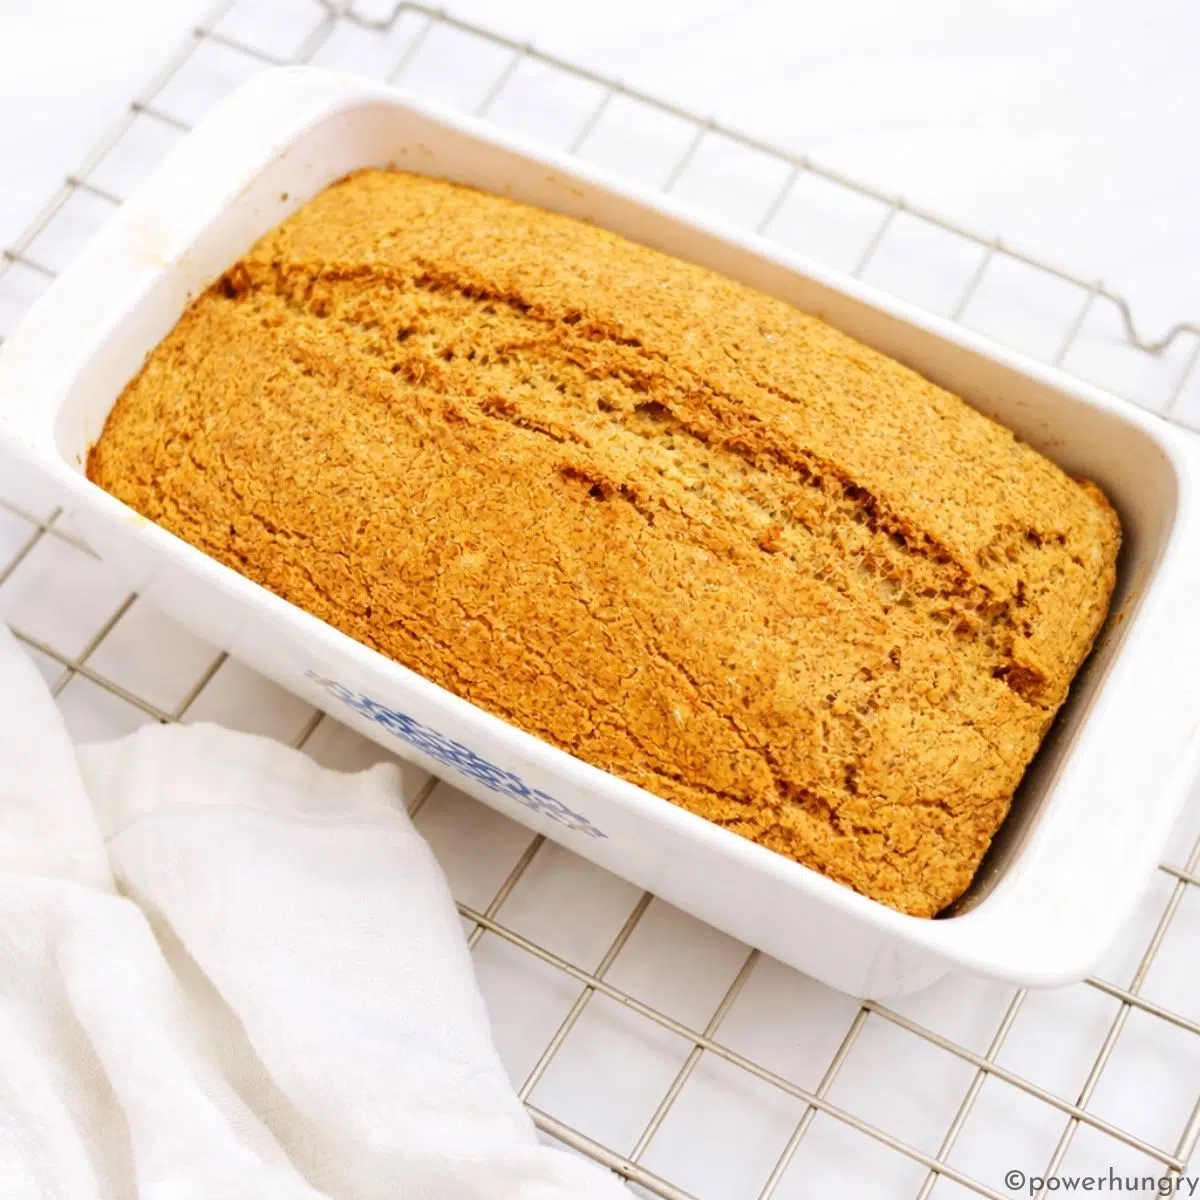
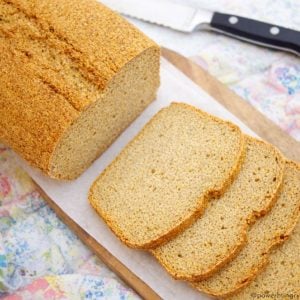
Bake the chickpea flour bread in the preheated oven for approximately 80 to 90 minutes until risen (it will have a peak), the surface of the bread is golden brown and cracked down the center, and a skewer inserted near the center of the bread comes out clean.

Step Seven: Cool & Slice Bread
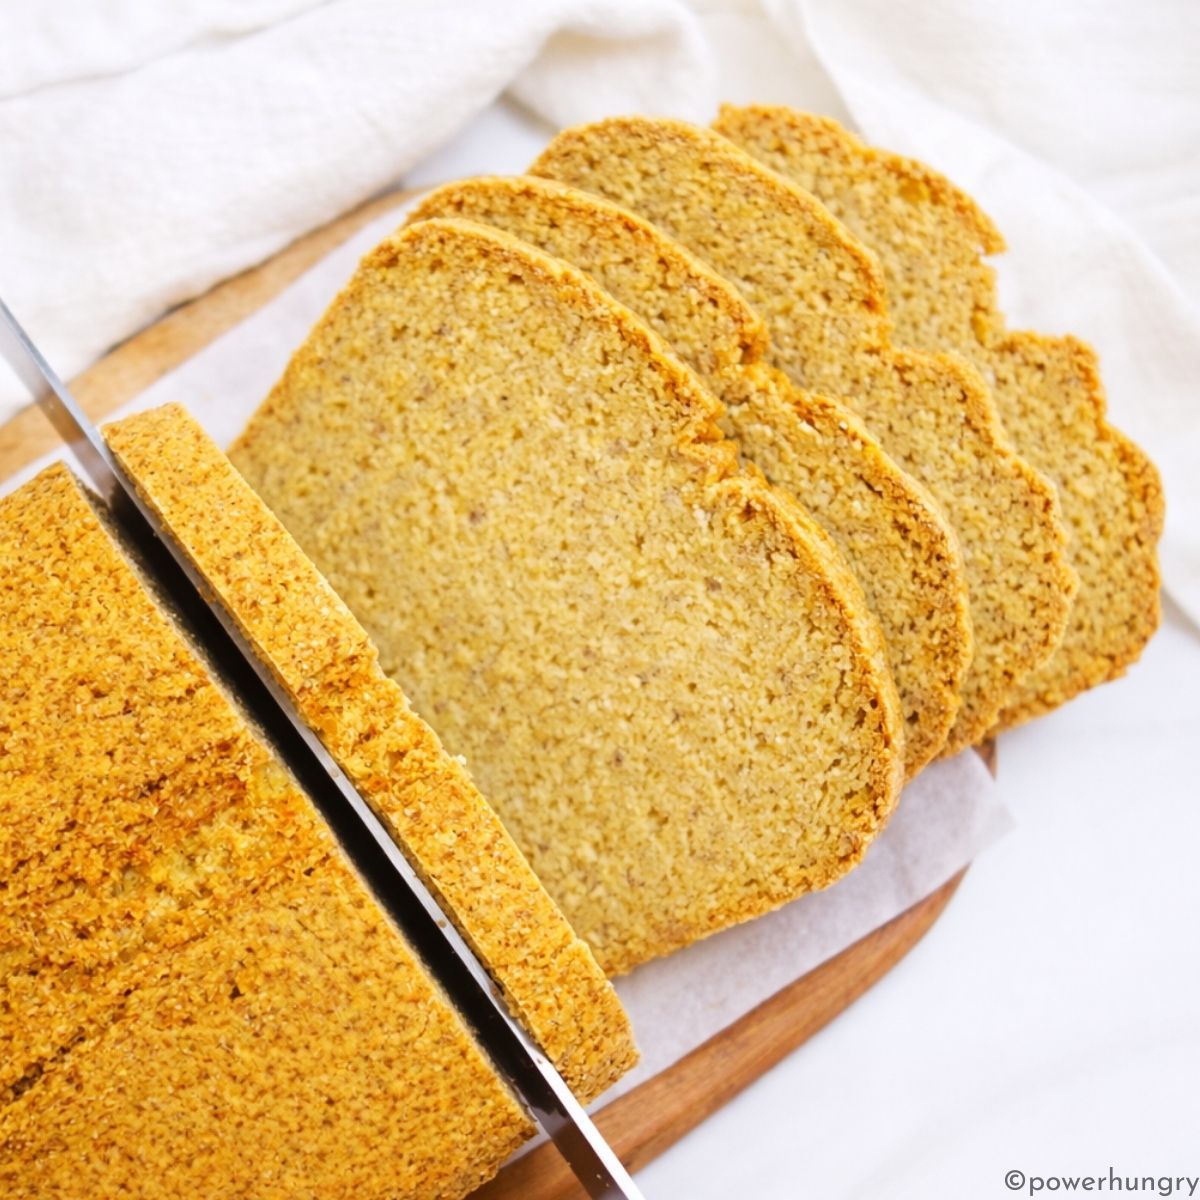
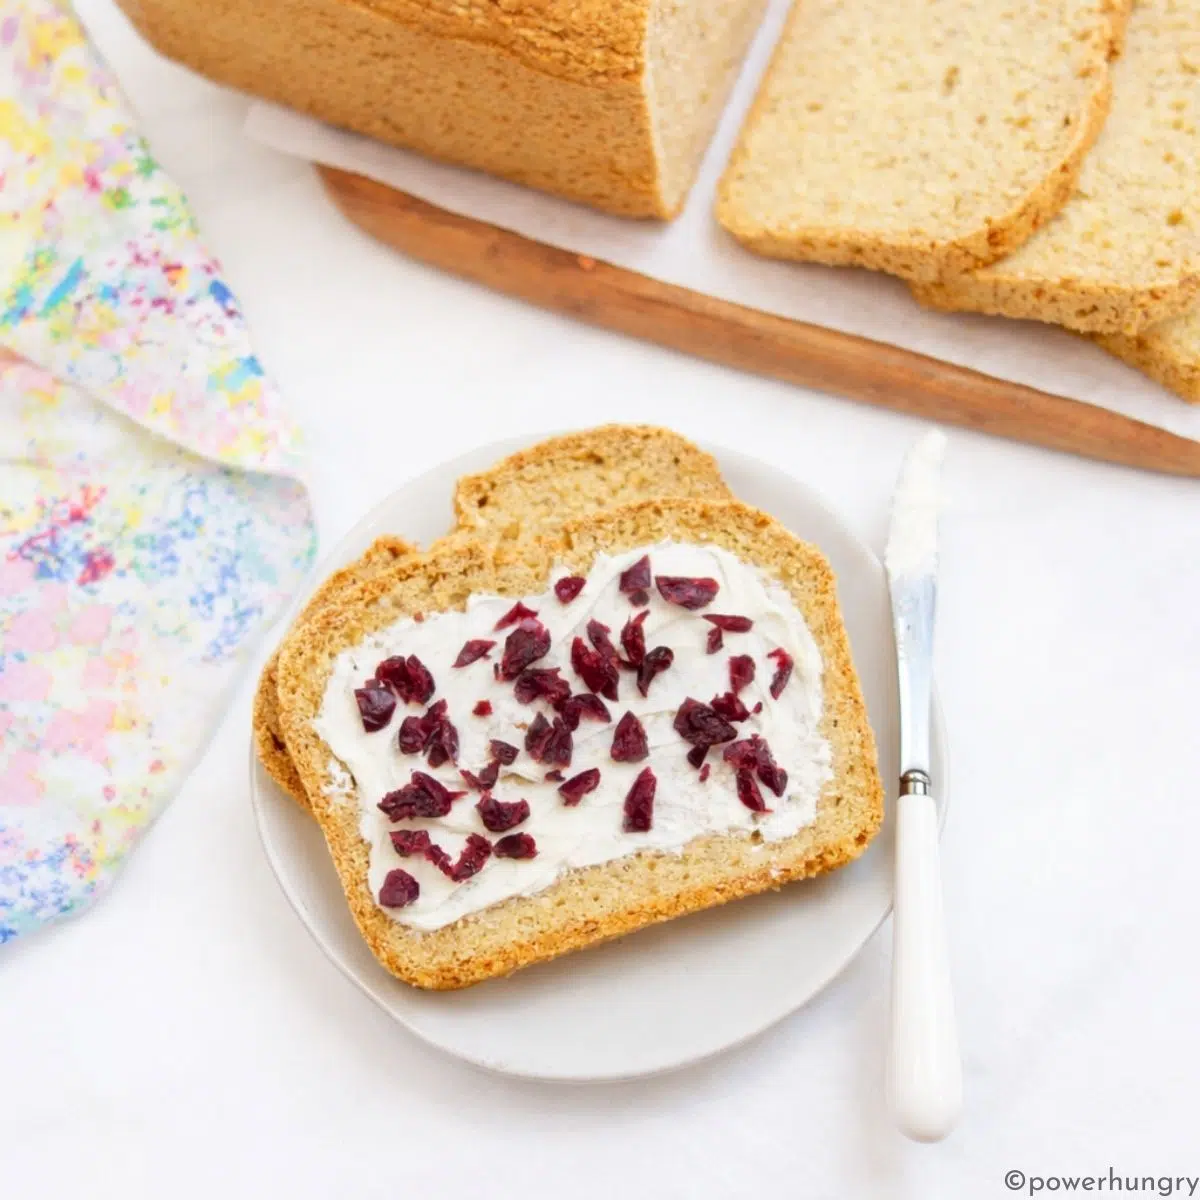
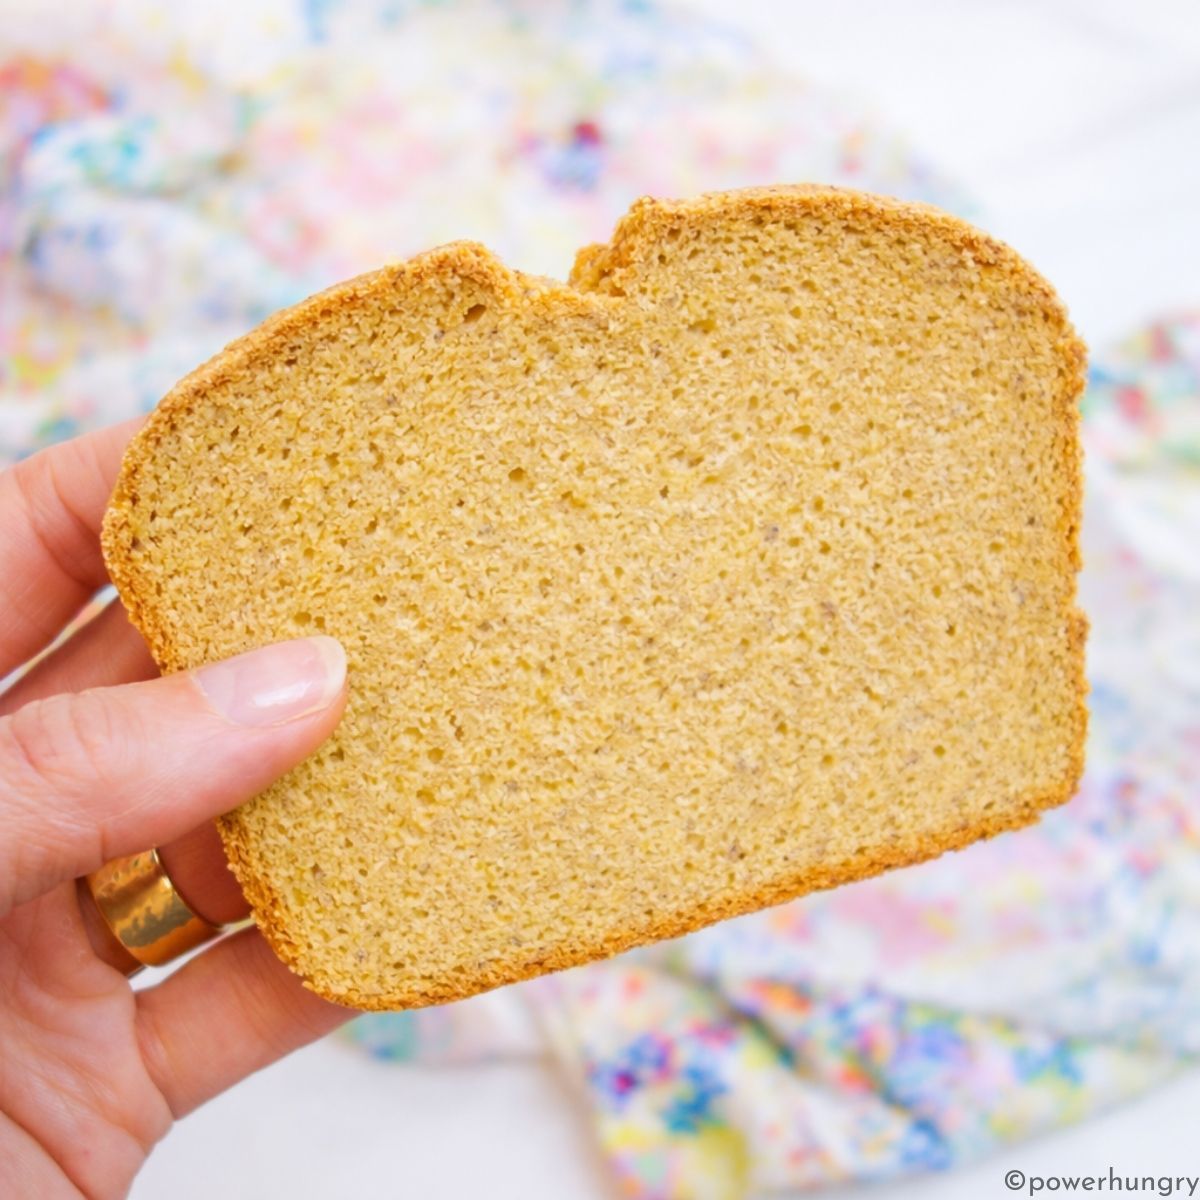
Let the bread cool, in the pan, on a cooling rack for 15 minutes. After 15 minutes, remove the bread from the pan and cool the loaf completely on a cooling rack. Once completely cool, cut the bread into slices. The bread is very firm, which means it can be cut into thin or thick slices.
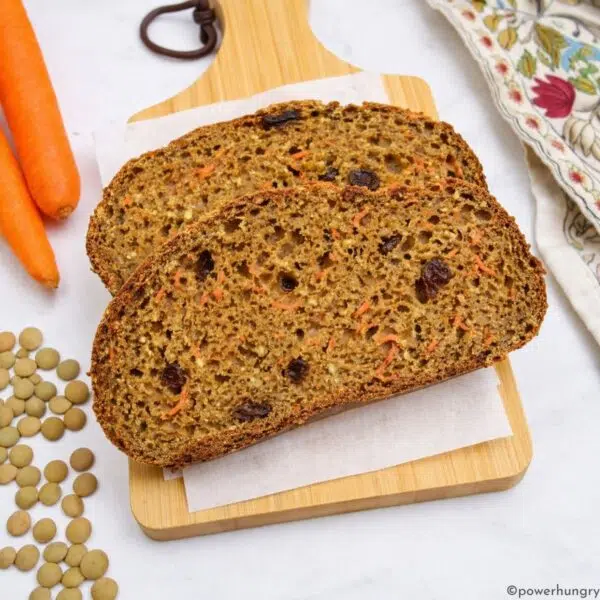
Texture & Flavor
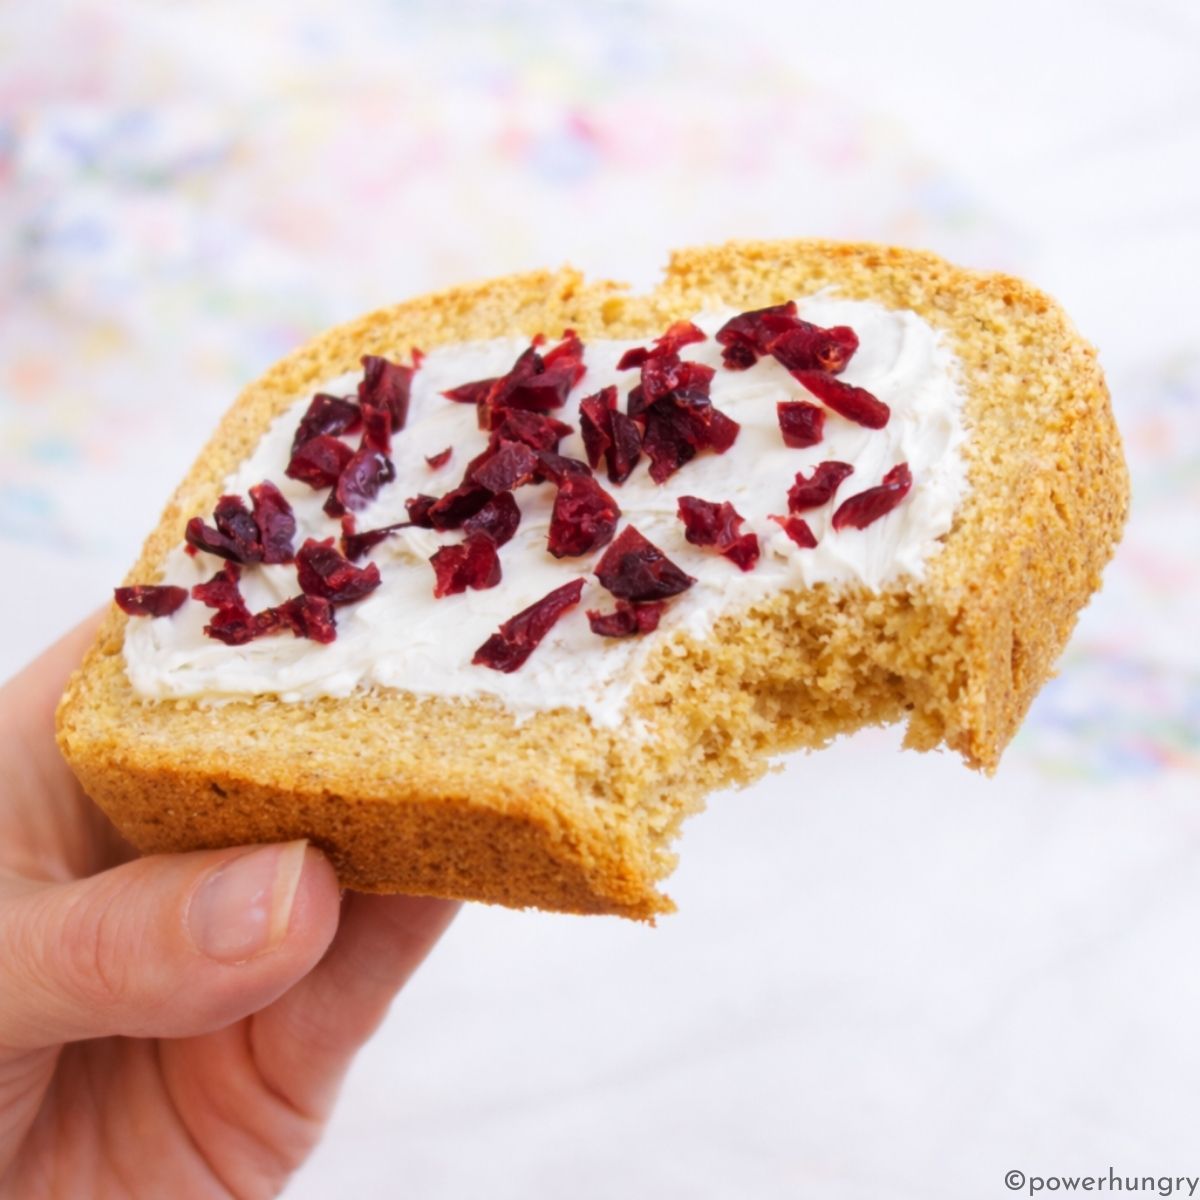
This chickpea bread bakes into a firm, hearty loaf that slices cleanly without crumbling.
The extended bake time removes any strong chickpea flavor, leaving behind a mild, nutty taste reminiscent of roasted chickpeas or falafel.
The bread works beautifully with both sweet and savory toppings, and the high protein and fiber content make it especially satisfying.
How to Store Chickpea Bread
Store the cooled high protein bread in an airtight container at cool room temperature for 1 day, the refrigerator for 1 week, and the freezer for up to six months. The bread has a high moisture content, hence the necessity to store it in the fridge after one day, or freeze it, if planning to store for more than a week.
Troubleshooting Chickpea Bread
- Blend the Chickpeas Completely Smooth. Blend the chickpeas, aquafaba, and water until completely smooth and creamy. Any remaining pieces of chickpea can create a slightly uneven texture in the finished bread.
- Use Whole Psyllium Husks (Not Powder). Whole psyllium husks help give the bread structure and prevent it from collapsing after baking. If using psyllium powder instead, use the same weight (27 g), not the same volume (see recipe notes)
- Slash the Top Before Baking. Making a deep lengthwise slash in the dough helps the bread expand evenly while baking and creates the characteristic crack along the top of the loaf.
- Allow the Bread to Cool Completely. This bread firms up as it cools. Cutting into it while warm can make the texture seem slightly gummy, so it’s best to wait until the loaf is completely cool before slicing.
Ingredient Substitutions
- Can I use a different gluten-free flour instead of chickpea flour? I do not recommend substituting the chickpea flour. The ratio of wet to dry ingredients is formulated specifically for chickpea flour, and other gluten-free flours or blends will alter the texture and structure. I
- Can I omit the psyllium husks? No. Psyllium husks are essential for structure and prevent the loaf from sinking after baking. Ground chia seeds and flaxseed meal will not work as substitutes.
- Can I use other varieties of canned beans? Possibly, but I have only tested this recipe with canned chickpeas and cannot guarantee results with alternatives.
Flavor Variations
You can easily vary the flavor of this chickpea bread with a few simple additions:
- Herbs & Savory Seasonings. Stir in 1 to 2 tablespoons dried herbs (such as Italian herbs or herbes de Provence) or 2 to 3 teaspoons ground spices like cumin, curry powder, garlic powder, or onion powder before baking.
- Sweeteners. Add 3 to 5 tablespoons of coconut sugar, maple syrup, agave, or date sugar. If using a liquid sweetener, reduce the water by the same amount.
- Warm Spices. For a lightly sweet loaf, add 1 to 3 teaspoons total of cinnamon, pumpkin pie spice, or a blend of cinnamon, cardamom, nutmeg, and allspice.
- Seeds & Nuts. Sprinkle chopped nuts or seeds over the unbaked loaf (pressing gently into the surface), or fold them directly into the batter. Walnuts, sunflower seeds, hemp seeds, sesame seeds, almonds, and pecans all work well.
Frequently Asked Questions
- What Makes This Chickpea Bread Different? Unlike many chickpea bread recipes that produce a dense loaf or flatbread, this recipe creates a sliceable sandwich bread using three forms of chickpeas: canned chickpeas, chickpea flour, and aquafaba. The combination produces a hearty loaf with 9 grams of protein per slice, without using yeast, gluten, or protein powders.
- Is chickpea bread gluten-free? Yes. This bread is naturally gluten-free because it is made with chickpea flour instead of wheat flour.
- Does chickpea bread taste like chickpeas? No. The long bake time removes most of the bean flavor and produces a mild, nutty taste.
- Can chickpea bread be toasted? Yes. The bread toasts well and becomes slightly crisp on the outside while remaining tender inside.
More Chickpea Flour Bread Recipes
- Chickpea Flour Tofu Bread (High Protein)
- Chickpea Flour Flax Sandwich Bread
- Chickpea Flour Sandwich Bread
- 3-Ingredient Chickpea Flour Beer Bread
- Chickpea Flour Soda Bread
High-Protein Chickpea Bread (4 Ingredients, No Yeast)
Equipment
- 1 9×5 inch loaf pan
Ingredients
- 4 cups chickpea flour
- 1/3 cup whole psyllium husks
- 4 teaspoons baking powder, certified GF, as needed
- Optional: 1/2 teaspoon salt, optional/adjustable
- 1 15 oz/ 425 g can of chickpeas, DO NOT DRAIN
- 2 cups water
Instructions
- Preheat the oven to 375F (190C). Prepare a 9×5-inch (22.5 x 12.5 cm) loaf pan by lining with parchment paper (to prevent the bread from sticking to the pan/ loaf tin). If you do not need the bread to be 100% oil-free, you can spray (with nonstick cooking spray) or grease/oil the sides of the pan.
- Whisk the chickpea flour, whole psyllium husks, baking powder and optional salt in a large mixing bowl until blended.
- Blend the chickpeas with their canning liquid (aquafaba) and water until completely smooth and creamy.
- Add the blended chickpea-aquafaba mixture to the bowl of dry ingredients. Use a rubber spatula or large wooden spoon to stir and blend with a spatula until completely combined into a thick dough.
- Working quickly (you want to get the bread into the oven as soon as possible), transfer the dough to the prepared baking pan. Use a spoon or spatula to spread the dough evenly and smooth the top. Using a sharp knife, make a lengthwise slash through the dough (at least 1/2-inch/1 cm deep).
- Bake the chickpea flour bread in the preheated oven for approximately 80 to 90 minutes until risen (it will have a peak), the surface of the bread is golden brown and cracked down the center, and a skewer inserted near the center of the bread comes out clean.
- Let the bread cool, in the pan, on a cooling rack for 15 minutes. After 15 minutes, remove the bread from the pan and cool the loaf completely on a cooling rack. Once completely cool, cut the bread into slices. The bread is very firm, which means it can be cut into thin or thick slices.


Thank you for another healthy, thoughtfully formulated recipe! Do you happen to know the weight, in grams, of the chickpea flour? I have a grain mill, and it is difficult to accurately measure flours based on volume. Thank you!
Hi Adrienne! You are so welcome. The weight is 480 grams. If you toggle to metric (underneath the ingredients in the recipe card is a toggle for US customary and Metric) you can get all of the ingredients in grams and ml. Cheers 🙂
Just WOW. Another perfect bread. I have a sliced loaf of the millet tofu bread and this bread in my freezer now. I have celiac disease. I have eaten so many expensive, bad breads. Camilla, your recipes are life changing 🙏🏻
I could not be happier to read this, Katy! Thank YOU for the kind and generous compliments 😊
This bread is outstanding!!! I ground my own chi pea flour (1 pound bag, 454 grams, so I added a few tablespoon of dried white beans to get to 480g of flour). The rise is above the pan, sandwich size, GREAT flavor (not bean-y, it reminds me more of almond flour bread). It slices perfectly. You should rename this miracle bread. Between the dried chickpeas and can of chickpeas, this big loaf of protein bread cost about $2! Thank you!!!
Ji-Woo, thank you! I am so glad you love the bread 😍
Is it ok to use a glass loaf pan? Thanks.
Hi Jana! Yes, that will work .
Hi Camilla.
Thanks so much for your GF recipes
I tried the three ingredients chickpea loaf and it was good but I didn’t like the chickpea flavor. I tried it again adding a little onion powder and a tablespoon of Cider vinegar and it was great. Thanks again
Hyacinth
That’s wonderful, Hyacinth! I am so glad that you gave it a second try, with a flavor twist. Cheers.
Hi Camilla – I liked this ok as a loaf, it has great flavor, but sort-of heavy for sandwiches. Now I make it in mini muffin pan. I love it this way! The rise is very good and they are so filling, a great snack, I pack these in my lunches to go with soups and salads for lunch, they are perfect and keep me satisfied all afternoon. They are also good with almond butter or chocolate hazelnut butter, or jam, for a morning bite. I recommend others try the mini muffins. My bake time was about 11-12 minutes, same temp (another bonus, they are fas this way)
I made 36 mini muffin size breads from the recipe. They rose great and are very delicious! I added about 1 tablespoon chopped fresh rosemary and 2 large peeled cloves garlic (chucked these in blender) and cracked black pepper. Perfect protein snacks that also satisfy my bread cravings!
This is a little bit dense but very tasty! I slice it thin and toast it, yum!
I make the bread in a 9-inch pan. Reminds me of cornbread, which I can no longer eat. Thanks for the recipe!
Do you have a bread recipe that’s no lemon no vinegar (of any kind) no club soda? My daughter can’t have any of these ????
Hi Jenni,
Can she have cream of tartar? It can be used as a substitute for acidic ingredients like lemon juice and vinegar.
If you type both “bread” and “baking powder” into the search function, you will get lots of options for breads that I think will work for your daughter ????
I do not have a loaf pan so I made it in a square 9 inch pan and baked for less t8me. It is heavy but very tasty. Thanks.
Thank you so much for this recipe! I tried it for the first time 2 days ago and had it for breakfast twice – once with avo and once drizzled with olive oil and crushed cumin and coriander seeds. Both meals were so tasty, and I’m super impressed with the denser structure and how thinly once can slice it. And it toasts beautifully. Tons of gratitude all the way from South Africa!
Hello Charmain! Greetings back to you from Texas! I am thrilled that you love the bread–I love a denser bread (especially for toast) so I am happy that you share the same preference. I am grateful to YOU for taking the time to post 🙂 One of my dear friends is from Capetown–she is currently visiting family there as I type this comment.
I love this bread! I do not own a loaf pan (need to get one) so I baked in a 9-inch square pan and it came out perfect.
I am so glad you like it, Mariah!
This did not work for me at all. The inside never cooked despite cooking it for almost 1.5 hours. And I did not use a convection oven. Regular oven, followed the recipe exact.
Hi Susan,
I am so sorry the bread did not turn out. I am not sure what could have gone wrong.
Yummy, easy bread! I made muffins instead of a full loaf. I baked 12 at 375 for about 28 minutes. Delicious!
So glad you like the bread, Min! And thanks for sharing your advice regarding muffins
I had a problem with the insides being uncooked/mushy as well. Used regular bake setting for 50 mins. 🙁
Hi Summer, oh no, sorry that the middle was not done–that is definitely not how it should be. Is there any chance that you are using convection (as opposed to traditional, radiant heat)?
Adding to my last comment, I think you must mean 425 ml (not grams) when describing the 15 oz can of Chickpeas. I am going to use 1-1/2 cups or 215 grams of cooked chickpeas.
Hi Laura,
No, it is in fact 425 grams, not mL, on the can of chickpeas. But that is describing the entire weight of the contents (chickpeas and liquid), not the chickpeas alone.
Any way to use dry chickpeas? I try to stay away from canned
Hi Kayla,
Probably about 1.5 cups of cooked chickpeas, but I am not sure how much liquid is in the can. Perhaps someone else can share. I’ll try to remember to check next time I open a can of chickpeas.
Hi !!
I’ve made the recipe TWICE in one month. The first time “plain” and the second loaf with “black sesame seeds”. The nutty-ness is wonderful and when I drizzle spoonful after spoonful of deliciously sweet honey onto the thin slices, my taste-buds EXPLODE with delight. I’ve shared this recipe with all of my friends and they too believe it’s THE BEST.
Many Thanks
Oh my goodness, so happy that you have enjoyed the recipe so much, Dorothy! The sesame seed addition sounds heavenly, especially with a sweet drizzle on top, YUM!
@Vanila the Orchid Lady, what did you do to make is less moist . Followed the recipe and the taste was yummy but inside was so moist that’s look uncooked . I even left it longer 🙁
Hi Sandra,
I am sorry the bread came out moist inside. That is definitely not how it should be. Quick question: are you using a convection oven? I am finding more and more that issues with the baking of untraditional loaves, like this one, are from baking with convection as opposed to radiant heat. Let me know, Ill try to trouble shoot if that is not the case (i.e., it was baked with traditional radiant heat)
Hey
Please is it possible to use another type of flour besides chickpea flour, like oat flour instead?
Hi Rawaya,
I’m sorry, not with this particular recipe–it needs to be chickpea flour. But I do have bread recipes made with oats (ground into flour). Search oat bread in any of the search boxes 🙂
This is a great recipe! So satisfying.
Amazing recipe!!! Even my kids love it. It is delicious toasted and makes great sandwiches, too.
@Camilla, Hi! This is the best gluten free bread I have ever made. So good and inexpensive and easy, too. Thank you.
What size loaf tin did you use?
Hi Jen,
I used a 9×5-inch tin (see the first line of the recipe instructions) 🙂
Hi, I was just wondering if besan flour would work in this recipe?
Hi Jasmin— absolutely! Be san and chickpea flour are the same thing 😊
I was looking for a bread recipe that didn’t use eggs (we were running low), and came across this one. I’ve recently been experimenting with chickpea flour, and so I decided to give it a whirl. Just had my first piece, and I’m extremely happy with it! The texture and rise are perfect, and I really enjoy the slightly nutty flavor that the chickpea lends. Thank you for sharing such a simple, tasty recipe! I’ll definitely be making this one again!
So happy to heat it, Anna!!! 😊
Any substitution for chickpea flour?
Hi Millie,
I’m sorry, not, not for this bread.
This bread makes me think it would make a good replacement for corn bread. I am going to try bake it in a Pampered Chef Brownie pan next time. I really am enjoying your recipes. Thank you
I agree, Cynthia! Jessie baked it in a brownie pan (see her comment) and it came out great. You two are on the same page!
I made these today in rectangular “brownie” molds, roughly about the size of a muffin. I made 12 in the pan, and they came out beautifully! I have one for lunch with hummus (chickpea overload?), and the rest have gone into the freezer to have on hand for when the baby comes along! Perfect texture! Thank you!
What a great idea to bake it in a brownie mold, Jessie! Thanks for sharing your tip–that would be great for lunches and for “rolls” at holiday.
As for chickpea overload…no such thing in my book! 🙂
That looks good I will have to try that one
love all the recipes that you have posted
Thank you, Karen–let me know what you think if you give it a try!
@Camilla, I didn’t see how much aquafaba liquid to use in this bread recipe as mentioned on the description. Would it be the ‘water’ ingredient as mentioned?
Thank you so very much!
Hi Nina! The aquafaba is the canning liquid (the chickpeas are not drained) 🙂 The canning liquid is added in step two of the directions.
The only salt-free cans of chickpeas I can find around here are 19oz, rather than 15oz. Any idea exactly how I can make this work?
Hi Chanterelle! Without measuring, with a scale, I advise the following. You will need roughly 1/4 less of both the liquid and chickpeas in the can:
(1) Drain the 19-ounce chickpeas into a glass measuring cup. Check out the amount. Drain off 1/4 of the amount (e.g., if it is 1 cupdrain off 1/4 of that (just under 1/4 cup, since the can is 19 oz, not 20)
(2) place the drained chickpeas in dry measuring cups. Set aside just under 1/4 of the chickpeas (you can eat them as you make the bread).
Hope my rough math helps!