
This post may contain affiliate links. Please read my disclosure and privacy policy.
This post may contain affiliate links. Please read my disclosure and privacy policy.
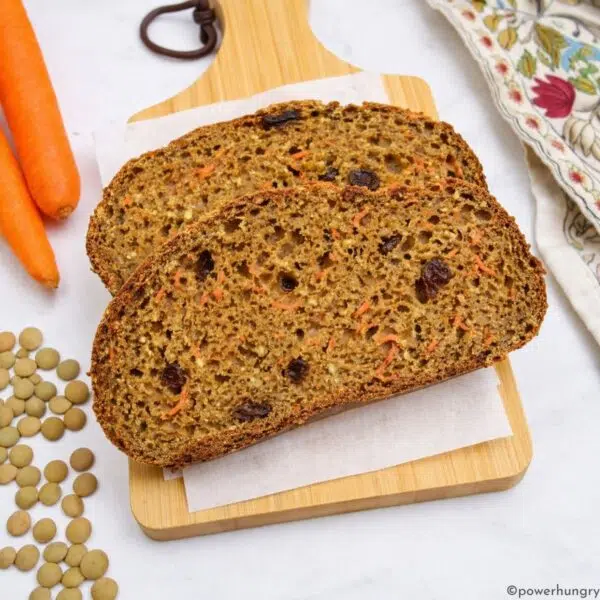
My 3-Ingredient chia millet bread is as easy as it is delicious! This crusty loaf is vegan, gluten-free, oil-free, yeast-free, and sugar-free. Slice the bread for sandwiches and toast, and use as a base for all of your favorite toppings and spreads.

Table of Contents
- 100% Millet Bread without Psyllium
- Recipe Benefits
- Ingredients for 3-Ingredient Chia Millet Bread
- Tip: Grind Your Own Millet or Chia
- How to Make Vegan 3-Ingredient Chia Millet Bread
- Step One: Preheat Oven and Prepare Baking Pan
- Step Two: Mix the Dry Ingredients
- Step Three: Stir in the Water
- Step Four: Transfer Batter to Pan
- Step Five: Bake the Bread.
- Cut into Slices
- What is the Texture & Taste?
- FAQ
- How should I store the bread?
- Can I use different flours (in place of the millet flour and ground chia)?
- My bread came out gooey in the middle. Why?
- How Can I Vary the Flavor of the 3-Ingredient Chia Millet Bread?
- Related Recipes
- 3-Ingredient Chia Millet Bread (V, GF, Oil-Free) Recipe
100% Millet Bread without Psyllium
This simple bread has been in the works for some time. It is a variation of my 100% Millet Sandwich Bread.
A sizable number of you asked if I had a psyllium-free alternative to the original recipe (psyllium husk is a key ingredient in the original loaf; it is essential for the bread’s structure and texture). Up until now, the answer was “no”.
Now it’s a “yes”! Say hello to my 3-Ingredient Chia Millet Bread.

Recipe Benefits
Chia and millet are the superstars of this humble bread.
Chia seeds are the edible seeds of Salvia hispanica. They are high in protein, fiber, and omega-3 fatty acids, as well as a host of other nutrients. Chia seeds can be added to smoothies and other drinks, used as egg replacements in many baking recipes, or ground into flour (as it is used in this recipe).
Millet is a high-fiber ancient grain with a low-glycemic index (i.e., no sugar spike after eating). Further, it is high in B vitamins, calcium, iron, potassium, zinc and magnesium. It has a mild flavor, with subtle flavors of dried corn. It is relatively low in cost, too.
In combination, chia and millet constitute a loaf that is:
- Gluten-free
- Vegan (egg-free & dairy-free}
- Yeast-free
- Xanthan gum-free
- Oil-free
- Sugar-free
- Nut-free
- High in fiber
- Only 3 ingredients (plus water & optional salt)
- Easy to make and bake
Ingredients for 3-Ingredient Chia Millet Bread
The exact amounts of each ingredient are indicated in the recipe card at the end of the post. Toggle between US Customary (volume) and Metric (weights) for preferred measurement option.

To make this simple loaf, you will need:
- Millet flour
- Ground chia seeds (also known as chia flour)
- Baking powder
You will also need some water (I use filtered tap water) to make the dough. Salt is optional, but I recommend adding it, if you eat salt.
Tip: Grind Your Own Millet or Chia
If you have a high-speed blender, or a small electric coffee grinder, you can grind your own flour from whole millet and whole chia seeds in little time.
High speed blenders will turn millet into millet flour in about a minute. The same is true with chia seeds.
If using a coffee grinder, you will need to grind about 1/4 cup (maximum) at a time. Place any extra flour in an airtight bag or container and freeze until next time.
Food processors do not work for grinding whole millet into fine flour (the millet seeds are too hard to be broken down by the food processor blade). Chia seeds, however, are softer than millet seeds and can be ground in a food processor.
How to Make Vegan 3-Ingredient Chia Millet Bread
Note that the complete directions are also in the recipe card below.
Step One: Preheat Oven and Prepare Baking Pan
Preheat the oven to 350F (180C). Prepare a 9×5-inch (22.5 x 12.5 cm) loaf pan by spraying, greasing, or lining with parchment paper (all to prevent the bread from sticking to the pan).
Step Two: Mix the Dry Ingredients

Whisk the millet flour, ground chia (chia flour), baking powder and optional salt in a large mixing bowl until blended.
Step Three: Stir in the Water
Add the water to the bowl of dry ingredients. Use a rubber spatula or large wooden spoon to stir until completely combined into a thick batter.

Step Four: Transfer Batter to Pan
Working quickly (you want to get the bread into the oven as soon as possible), transfer the batter to the prepared baking pan. Use a spoon or spatula to spread the batter evenly and smooth the top.

Step Five: Bake the Bread.
Bake the bread in the preheated oven for 75 to 85 minutes until risen, the surface of the bread is golden brown and cracked, and a skewer inserted near the center of the bread comes out clean.
Let the bread cool, in the pan, on a cooling rack for 15 minutes.

Remove the bread from the pan and cool the loaf completely on a cooling rack.
Cut into Slices

Once cool, cut the bread into slices. This is a sturdy loaf. It is slightly more crumbly than the original 100% Millet Sandwich Bread.
What is the Texture & Taste?
Texture: This is a firm sandwich loaf with a tender, biscuit-y crust.
Taste: The flavor of the bread is a lot like whole wheat bread. The flavor is equally delicious with sweet and savory spreads, fillings and toppings.
So, go ahead, make this your go-to sandwich and toasting bread!

FAQ
How should I store the bread?
Store the cooled bread in an airtight container at cool room temperature for 2 days, the refrigerator for 1 week, and the freezer for up to 6 months.
Can I use different flours (in place of the millet flour and ground chia)?
No, I do not recommend it. The proportion of wet and dry ingredients is particular to millet flour and chia flour.
The good news is that I have many (MANY!) more easy, minimalist, vegan, gluten-free bread recipes here on power hungry., made with all different kinds of flours. Type “bread” or “sandwich bread” into the search engine for options.
My bread came out gooey in the middle. Why?
The most likely reasons are the following:
- Ingredient measurement issue. Weighing flours is the best way to ensure accurate results. But mis-measurement can also occur at times for simple reasons, such as distraction (it happens to all of us).
- Oven temperature is off. I regularly check my oven temperature setting using an inexpensive oven thermometer. Check to make sure the oven is accurate before baking. If the oven is too hot, it can force a faster rise to the bread, followed by a collapse while cooling.
- Baking powder is old. Expired baking powder will prevent the bread from rising properly, resulting in dense centers.
- Waited too long to get the bread in the oven. The baking powder begins reacting as soon as the batter is mixed. For best rising, it is important to get the bread in the oven asap after mixing. In particular, preheat the oven so that it is at full temperature once the batter is mixed. If the mixed bread batter sits around while the oven preheats, it will not rise properly, resulting in dense, underbaked middles.
How Can I Vary the Flavor of the 3-Ingredient Chia Millet Bread?
Consider adding chopped fresh herbs. dried herbs or spices to the bread to vary the flavor. For example, 1 to 2 tablespoons of dried Italian herbs or herbes de Provence or 2 to 3 teaspoons of ground cumin, curry powder, garlic powder, or onion power.
You can also add a small amount of sweetness to the bread (about 3 to 4 tablespoons maximum). If using a liquid sweetener, decrease the amount of water by the amount of liquid sweetener you are adding. Consider adding some sweet spices, such as cinnamon, nutmeg or cardamom, as well as vanilla, too.
Happy baking! Let me know if you bake a loaf. I would love to know how it turns out.
Related Recipes

3-Ingredient Chia Millet Bread (V, GF, Oil-Free)
Ingredients
- 2.5 cups millet flour, see tip to grind your own
- 90 grams lightly packed finely ground chia seeds, about 3/4 cup of ground seeds
- 3.5 teaspoons baking powder
- 3/4 teaspoon fine sea salt
- 2.5 cups water
Instructions
- Preheat the oven to 350F(180C). Line a 9×5-inch (22.5×12.5 cm) loaf baking pan with parchment paper. If you do not need the bread to be 100% oil-free, grease or or spray the sides of the pan.
- In a large mixing bowl, whisk the millet flour, ground chia seeds (chia flour), baking powder, and optional salt until blended.
- Add the water to the flour mixture and mix (using a wooden spoon, rubber spatula, or clean hands) until completely blended into a thick batter.
- Evenly spread the batter into the prepared pan, smoothing the top.
- Bake in the preheated oven for 75 to 85 minutes until risen, the surface of the bread is golden brown and cracked, and a skewer inserted near the center of the bread comes out clean.
- Let the bread cool, in the pan, on a cooling rack for 15 minutes. Remove the bread from the pan and cool completely on the cooling rack before slicing.
Notes
Option 1–Grind in a small blender or electric coffee mill: Measure the amount of chia seeds called for in the recipe (in this case, 90 grams) . I suggest pulsing to grind, and shaking the coffee mill or blender (hold on to the lid!) in between pulses to ensure an even grind. Process until the seeds are a fine flour. Option 2–Grind in a blender or food processor: You will have the best results by grinding more than you need for this recipe. Most regular size blenders need at least 1 and 1/2 cups of ingredients to blend properly. Process the seeds until finely ground. Measure or weigh the amount of ground chia seeds needed for the recipe. If using cups, rather than weights to measure the flour, lightly pack the chia flour into the measuring cup(s) to achieve an accurate measurement.


Amazing bread! I ran out of millet flour so subbed the 1 cup with oat flour. Worked great! Thank you!
That is great to know, Sue, excellent save! I’m so glad it was such a success 😊
This is delish – and soooo quick and easy! THANK YOU!
Do you think it could be adapted for a pizza crust?
Hi Lynn,
Yay! So happy you like the bread! 🙂 Yes, I do think you could use it for a pizza crust. For a large pizza pan, you could use a whole batch (if it seems like too much, you could bake any extra dough in a ramekin or something similar for an extra mini loaf). Dimple the dough and Prebake (you may want to up the temp to 375, or hotter, to brown the crust), for maybe 10 minutes until pale golden? Then add toppings and bake until deep golden brown 🙂
Thank you for your work! I would like to make this bread using sprouted millet & chia. Do you know & can you advise how the recipe would need to be modified? I am guessing some amount of water would be absorbed into the grains, so I would decrease that. Any other suggestions?
Hi Marie! That sounds like a good plan. I really do not think you will need to make any significant changes. Millet does not absorb much water upon soaking—I think the difference in absorption between regular and sprouted millet will be negligible, or, at most, very minimal (i.e., decrease total amount of water added by a few teaspoons). Cheers 😊
I love your Millet bread recipe – and stumbled on this version w/chia seeds. It’s baking as I write this. I cannot wait to try it.
Wonderful, Lisa, I hope that you like it!
Your cup to gram measurement is off 2 cups flour 240 grams? I made this used the cup measurement cause when I weighed the 2/1/2 cups it was nowhere near 400 grams. Anyway it wasn’t bad I only had flax which I grinded to flour but I’m gonna get chia and make it again. Thanks for your hard work
Hi Debbie,
I am sorry or any confusion with the bread ingredient quantities.
I am going by the grams per 1/4 cup on the Bob’s Red Mill package of millet flour (which is what I use when I do not grind my own). It is 40 grams per 1/4 cup, so 160 per 1 cup (2.5 cups = 400 grams). Please go by the grams rather than cups alone–it is easy for people to get very different cups measurements with flour depending on how the flour is spooned into the cup. I am using 400 grams of millet flour in the recipe, so the grams measurement is definitely the default over the cups. I hope that helps.
I am so glad you were able to make it work, regardless! You are baker, my friend. Cheers to you 🙂
Hi Camilla, just came across to you recipe,it looks really nice! What do you think about using brewers’ yeast?
Hi Iride! Thanks you, glad you found the recipe :). Regarding using brewers’ yeast: do you mean adding in in for nutrition? You could certainly do that (add a few tablespoons, add a few drops more water, if needed).
Hi- it came out great… BUT it has a bitter taste. I’m unfamiliar with millet flour and chia seeds in bread-so would it be either of those? I can’t eat it on its own; it’s great with jam or honey. Can you help me understand? Thanks.
Hi Sarah,
It is definitely not the chia seeds, it is the millet. Millet shouldn’t be bitter, but the grains or flour can become bitter if they areola (due to oxidation–the natural oils in millet can become rancid and will have a bitter taste). It is almost certainly not your fault–it is more likely the manufacturer. If you still have the bag, I would suggest returning (or contact the manufacturer). This is something that can happen with all grains, but with millet, it definitely lets to a bitter flavor. I am so sorry this happened to your bread, Sarah!
I followed your recipe to a T and unfortunately the taste of baking soda was absolutely overwhelming. In most recipes I know there’s the one unspoken act of reducing the taste of baking soda by mixing it with an acid prior to mixing. Getting a reaction started (Bubbles) with vinegar, lemon juice, or even straight up vitamin C powder diluted in water is what gets rid of it. I hope you will update this, because I had to toss the entire loaf due to the sickening taste of 3 and a half teaspoons of baking soda.
Hi Anya,
I am so sorry you had to toss the bread. The issue is that you used baking SODA. The recipe calls for baking POWDER. They are very different and used in very different proportions. Baking powder is made from baking soda plus cream of tartar (which is an acid). You use it in greater amounts than baking soda. Baking soda is much stronger than baking powder and needs to be combined with an acidic ingredient. I hope you will try the bread again with baking powder, as directed 🙂
Excellent recipe – I combined a step and put the measured amounts of millet and chia seeds together in the blender and made them into a flour as one. Worked beautifully. Also side stepped the issue of needing to make larger quantities – a minute in the Vitamix blender and we were good to go. Followed all recipe measurements ans is and swapped a TBSP of water for one of maple syrup. Sprinkled some salt and chia seed on top of the loaf right before popping into the oven and came out beautifully after 78-80 mins at 350F
I am over the moon that it was such a success for you, Melody!!! I love the added crunch (chia seeds on top) and hint of sweetness you added–brava! 🙂
Would ground flax meal work as well as ground chia seeds?
Hi Karen,
I have been wondering the same thing, and wanting to test it! Here is my thought: since the chia seeds are very finely ground, I suggest that you use an equal weight of flax seed meal and finely grind it (finely grind the flaxseed meal, or grind whole flax seeds into a very fine flour—like I do in my flaxseed rolls: https://www.powerhungry.com/2022/06/03/easy-2-ingredient-fluffy-flax-rolls/ I plan to try it in the next few days, or you can give it a go before then!
@Camilla, Hi I used flax meal instead of chia and ground it in my coffee grinder it came out fine. I toast it in my air fryer, Thank you Debbie
Yay! Thank you so much for trying that and posting that it was a success, Debbie! Much appreciated (by me, and others). Cheers.
Five stars! Successful recipe! Exactly like real bread. Didn’t have millet flour so I used half oat and half quinoa. Having a gluten allergy I just love being able to make and eat my own “bread”.
Yay!!!!! Way to adapt the recipe, too, Laurie! I am so happy this easy bread was a success 🙂
Looks delicious…a beautiful loaf of bread! I am looking forward to trying this recipe.
Camilla, thank you for putting in so much effort to create psyllium free recipes! You always tackle the tough challenges!
Thank you.
June
June, you are one of the key people I had in mind when I set out to create some psyllium-free options. Let me know if you give this a try!
I cannot get over how easy and delicious this bread is!!!!!!!! Thank you, from the bottom of my heart, for your healthy, easy bread recipes, they have changed my life.
You are so welcome, Amelia!