
This post may contain affiliate links. Please read my disclosure and privacy policy.
This post may contain affiliate links. Please read my disclosure and privacy policy.
My crusty, high-rising, fine-textured, gluten-free buckwheat sandwich bread will please everyone! Easy to make, it is also vegan, oil-free, sugar-free, yeast-free and perfectly delicious.

The Best Gluten-Free Vegan Bread
That heading is quite a promise. But this recipe delivers! I’ve been squirreled away in my kitchen (thank you, January, for being cold, gray and drizzly–the ideal working conditions for days spent baking), working on an easy, gluten-free, vegan bread recipe that is pretty darn close to foolproof.
In particular, I wanted a gluten bread that RISES (and stays risen!). Without eggs. Without yeast. Without xanthan gum. Without aquafaba. A bread with a fine, dry texture similar to wheat bread. Oh, and a neutral flavor, too, that goes with just about everything and (here we go) passes muster with my “regular bread”-loving husband and son.
No biggie, right?
Well, it was a major biggie in terms of brainstorming, testing, and tweaking. But also 100% worth it. Because of THIS: (totally fabulous, son and husband-approved) Gluten-Free Buckwheat Sandwich Bread!!! (It totally deserves three exclamation points).
Recipe Benefits
Oh, this bread. If you love a scrumptious, filling slice of whole grain bread, this bread ticks all of the boxes. Plus, it is:
- Gluten-free
- Vegan (egg-free & dairy-free}
- Yeast-free
- Xanthan gum-free
- Oil-free
- Sugar-free
- Nut-free
- High in fiber (4.1 g per slice)
- Minimal ingredients
- Easy
Ingredients
The exact amounts of each ingredient are indicated in the recipe card at the end of the post. Toggle between US Customary (volume) and Metric (weights) for preferred measurement option.

Akin to so many traditional white flour breads, this straightforward recipe has few ingredients besides flour, water and leavening. Here is what you will need:
- Buckwheat flour
- Brown rice flour
- Whole psyllium husks (not psyllium powder)
- Baking powder
- Baking soda
- Salt (always optional/adjustable)
- Water
- Cider vinegar
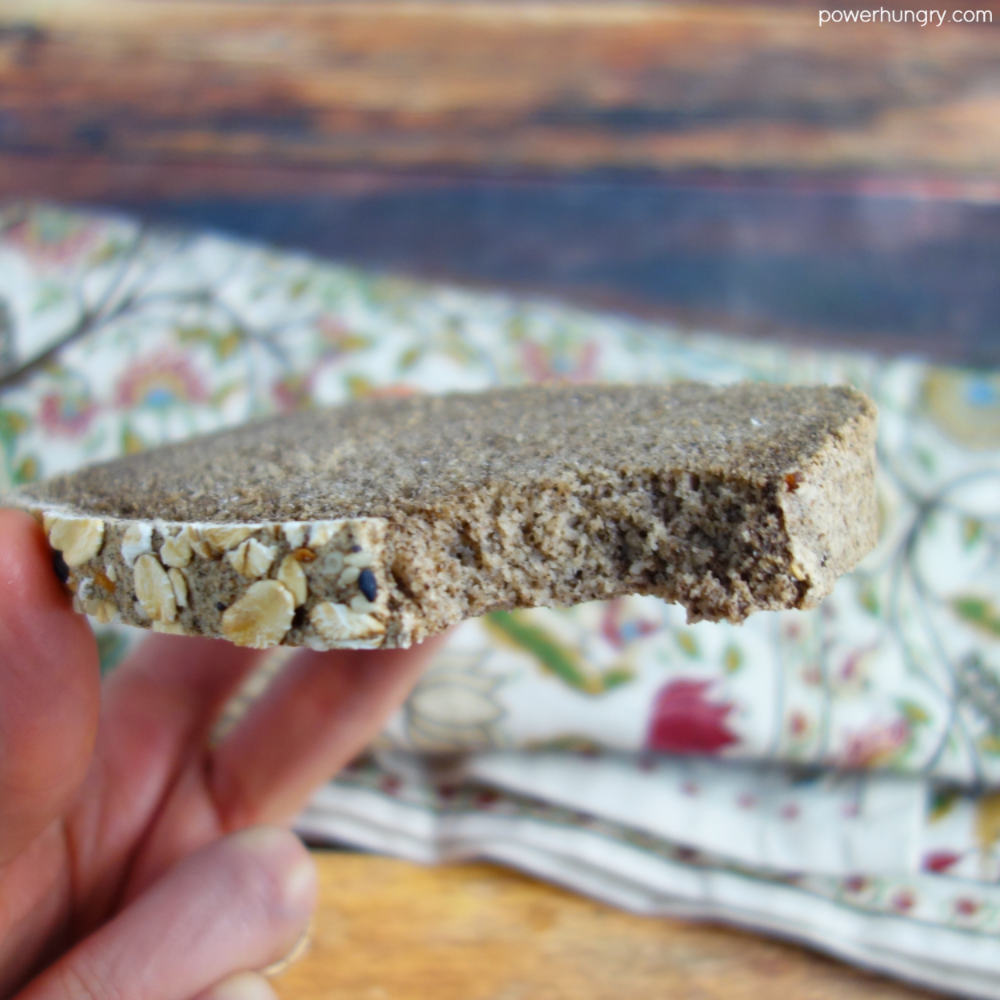
I added some sesame seeds and rolled oats on top for visual interest, but they are optional.
Tip: Grind Your Own Flour
If you have a high speed blender, you can grind your own flour (from whole buckwheat groats or brown rice) in about 60 seconds. It is as simple as chucking it in and blending on high speed (oh yes, do put the lid on. Sometimes I forget… :)). Place any extra flour in an airtight bag or container and freeze until next time (trust me, you are going to make this bread more than once).
Vinegar Options
Any other vinegar–light or dark–can be used in place of the cider vinegar. If you do not have vinegar, or do not use it for dietary reasons, substitute an equal amount of lemon or lime juice.
Step By Step Instructions
Note that the complete directions are also in the recipe card below.
Making this bread is easy, but it has a step that is (most likely) different than other bread you have made. Hint: squishing is involved.
Ready? Here we go.

Step One: Mix the Dry Ingredients.
Whisk the buckwheat flour, brown rice flour, baking powder, baking soda and salt in a large mixing bowl until blended. Nothing unusual with this step.
Step Two: Combine the Wet Ingredients and Psyllium.
Whisk the water, vinegar, and psyllium husk in a medium mixing bowl. Let the mixture stand for about 5 minutes to thicken. If whole psyllium husk is new to your ingredients wheelhouse, this step is less usual. The psyllium mixture will begin to set into a loose, pale gel almost immediately (similar to flax and chia gels but less sticky than the former).
Step Three: Squish!

Let the squishing begin! I advise washing your hands again because they will be your best tools for mixing.
Add the psyllium mixture to the flour mixture and start mixing/squishing with your hands to combine the wet and the dry. It is not hard, but squishing, as opposed to stirring, is the most efficient way to combine the mixtures into a dough. Do not add more liquid. The dough will come together in about a minute or two of squishing.
Roughly shape the dough into a ball while it is still in the bowl.
If you do not want to use your hands, a standing mixer fitted with a paddle attachment is the best option.
Step Four: Shape the Dough.

Wash any excess dough off of your hands. With still moist hands, shape the dough ball into a loaf shape to fit a 9×5-inch (22.5 x 12.5 cm) loaf pan. Place the loaf in the pan (lined with parchment and/or sprayed or greased). Smooth the top and gently press into shape, rounding the corners and sides.
If you like, sprinkle the surface of the loaf with the optional toppings.
Step Five: Bake the Bread.
Bake the bread in a preheated 325F (160C) oven for 90 minutes until risen (it has a significant rise!), and the surface of the bread appears golden brown, dry, and crusty. The bread will also sound hollow when tapped.
Let the bread cool, in the pan, on a cooling rack for 15 minutes.

Remove the bread from the pan (remove the parchment paper) and cool the loaf completely on a cooling rack.
Isn’t this a beautiful loaf?
Slice it Thick or Thin

Slice the bread thick or thin for sandwiches, toast, and multipurpose gnoshing. This is a sturdy bread (no crumbling!).
What is the Texture & Taste?
First, texture: This is a fine-textured, firm bread (ZERO gumminess), with a very pleasant crust. The texture is akin to a traditional bread made with wheat flour. The crust is even more pronounced (in the most wonderful way) a day after baking. Toasting the bread results in a crisp, crunchy, filling slice.
Taste: The flavor of the bread is very mild and whole-grain toasty, similar to a whole wheat bread. The stronger flavor of buckwheat is made mellow by the neutral taste of the brown rice flour. Use the bread for every kind of topping and filling, savory or sweet, you crave!

Storage
Store the cooled bread in an airtight container at cool room temperature for 2 days, the refrigerator for 1 week, and the freezer for up to 6 months.
FAQ
Can I use different flours (in place of the buckwheat flour and brown rice flour)?
I do not recommend it. The proportion of wet and dry ingredients, as well as the quantity of psyllium husk, is particular to the buckwheat flour and brown rice flour combination. The one exception is quinoa flour, which generally works well as a substitute for brown rice flour. I plan to experiment with other flours and ratios in the days and weeks to come–I will share the successes, I promise.
Can I Use Something Other than Whole Psyllium Husks?
Alas, no, it must be whole psyllium husks. Other gelling agents, such as flaxseed meal or chia seeds, will not work as direct substitutes (they might work, but it would involve some experimenting to determine their efficacy).
I also do not recommend psyllium powder. It can work as a substitute for the whole husks in some recipes, but not with this bread.

Happy baking! Let me know if you give this a try :).
Related Recipes
- 4-Ingredient Buckwheat Flax Chia Bread {vegan, GF, oil-free}
- Oil-Free Buckwheat Granola {Vegan, Oat-Free, GF}
- 1-Ingredient Flourless Buckwheat Bread {vegan, gluten-free}
- Healthy No-Bake Buckwheat Granola Bars {vegan, gluten-free}
- Buckwheat Almond Shortbread Cookies {vegan, gluten-free}
- Fruit & Cinnamon Buckwheat Cereal {Gluten-free, Vegan}
- Buckwheat Flour Carrot Muffins (Vegan, Oil-Free, GF)

Gluten-Free Buckwheat Sandwich Bread (Yeast-free, Oil-free)
Equipment
- 1 9×5 inch loaf pan
Ingredients
- 1.5 cups buckwheat flour, (light or dark)
- 1.5 cups brown rice flour
- 2 teaspoons baking powder, (certified GF, as needed)
- 3/4 teaspoon salt
- 1/2 teaspoon baking soda
- 2.5 cups water
- 1 tablespoon cider vinegar, (see notes for options)
- 1/3 cup whole psyllium husks, (not psyllium husk powder)
- Optional Toppings: rolled oats, sesame seeds, poppy seeds, hemp hearts
Instructions
- Preheat the oven to 325F(160C). Spray or grease a 9×5-inch (22.5×12.5 cm) loaf baking pan and (optional) line with parchment paper.
- In a large mixing bowl, whisk the buckwheat flour, brown rice flour, baking powder, salt and baking soda until blended.
- In a medium bowl whisk the water, vinegar, and psyllium husks until blended. Let stand for about 5 minutes to thicken.
- Add the psyllium mixture to the flour mixture and mix to completely combine into a dough (the best method: use clean hands to squish the ingredients together. Alternatively, use the paddle attachment on a stand mixer). Roughly shape the dough into a ball.
- Rinse off any excess dough from hands. With moist hands, shape the dough into a loaf shape to fit the loaf pan. Place in the prepared pan. Use moist hands to smooth the top and round the sides slightly. If desired, sprinkle with optional toppings.
- Bake in the preheated oven for 90 minutes until the surface appears golden brown, dry and crusty. The bread will sound hollow when tapped. Cool in the pan, on a cooling rack, for 15 minutes.
- Remove the bread from the pan and cool completely on the cooling rack before slicing.


Please can you advise if this could ever be cooked in a fan oven at lower temperature or in a slow cooker? Here in UK, it is really hard to find non-convection ovens & I really want to try your bread recipes.
I had a few attempts before I spotted a note from you saying conventional ovens only, which more than explained my disasters.
Hi Pat,
I am so sorry you’ve had problems making the breads. I’ve been doing some more research about adapting bread recipes for convection/fan ovens. The consensus from multiple baking authorities is to lower the baking temperature by 25F (10 to 15C) and begin checking for doneness earlier. I think the baking time for my breads, like this one, are still going to need the longer time, so the lower temp will be the primary fix. It should help, especially, to prevent the top layer of the dough from rising too quickly (a common issue when using fan ovens), which can cause a big bubble.
I wish I could advise about baking the bread in a slow cooker, but I have never tried that. It sounds like a good possibility— slow steady heat, ceramic walls. It would be a worthwhile experiment!
Hi there! Would oat flour or chickpea flour work as a replacement for brown rice flour? Thank you!
Hi SP— I think chickpea flour would work beautifully. I would use an equal weight of chickpea flour as rice flour.
When I found this recipe in my collection, I wondered why I stopped making it a while ago. My son said it’s because the grains you put on top always fall”;) I knew it couldn’t be only that.
So I made it again – and now I remember : it is too moist.
So I went to look in the comments if by any chance Camilla gave tips about that… And you did !
I love so many things about this bread – and next time I will try the tips you gave and finally have a real sandwich bread & it will be zero effort to stay away from gluten bread which makes me feel so bad.
Thank you !
Can I swap the buckwheat flour for tigernut flour & use same measurements for all other ingredients?
Hi Dayna! I wish I could make a recommendation one way or another, but I have never used tiger nut flour to make a loaf bread (only smaller items, such a cookies and brownies), so I do not know if that would work.
I used metric measurements for the dry ingredients (for baking, it’s always more accurate). For the liquid I was going to use US measurements… but it makes a difference. 2.5 cups is 2 1/2 cups correct? But if you use metric (591 ml) it’s 2 cups (500 ml) + 91 ml (which is between 1/3 and 1/2 cup) on my standard measuring cup. That makes a difference in the water amount. Can you clarify?
Also, does the bread stay in the pan for 15 min. on a cooling rack, then remove? One of the comments says to remove the loaf from the pan to complete cooling. Maybe you just mean after the 15 min in the pan?
Hi Becky,
I’ll start with the easier question about cooling: I am not sure which comment you are referencing (apologies), but you can follow the instructions here: “Cool in the pan, on a cooling rack, for 15 minutes. Remove the bread from the pan and cool completely on the cooling rack before slicing.”
As for cups and ml. First, yes 2.5 is 2 1/2. Using decimals rather than fractions (some readers find 2 1/2 or 2-1/2 confusing, and the converter will not convert the written version of 2 and 1/2. 2.5 is universally understood as 2 and 1/2).
The conversion gets a bit bogged down because standard liquid measuring cups round up from the literal conversion of 237 ml. Moreover, it is different depending on the country. Some round up to 240 mL, others to 250 mL. So there is no straightforward solution to converting. Rather than making an arbitrary decision to choose 240 or 250, I am sticking with the actual conversion. You can always add a few more tablespoons, as needed.
Thank you for the reply! Sorry, but I’m confused where the 237 ml comes from? 2.5 cups converts to 591ml as your recipe states.
I think I just realized the difference…. The 250ml line on the US standard measuring cup isn’t the EXACT same measurement as the 1 cup line… it’s close but the “line” is lower, meaning ml is less than 1 cup.
I just looked up a calculator and 1 cup is 237ml (must be what you were referring to). Bottomline, it sounds like I need to make sure I’m using 591ml…. I didn’t realize that when looking at the measuring cup, 1 cup and 250ml were not the same amount. Hope that makes sense! Sorry for any confusion, I just want to make sure my bread turns out as good as yours!
Got it, thanks Becky! 🙂
This is delicious, came out just like the photos. This one and your millet bread are my favorite bread recipes. Thanks for the great recipes.
Hi Camilla,
I am so happy that I stumbled upon your recipe as there are very few out there that don’t contain yeast or xanthan gum, both of which I avoid for health reasons. So I did make this bread and for some reason it came a bit moist in the middle. It is still edible but I really want to achieve this real bread consistency everyone is admiring. Can you perhaps tell me the amount of flours in grams? I know baking is all about accuracy and since there are many types of cups I figured maybe my consistency is due to inaccurate amount of flour which doesn’t match your recipe? Also can you think of other tips that will help me sort the moisture problem?
Thanks a bunch
Hi Doni!
I am so happy that you found my website as well–welcome! You can find the grams and mL measurements for the recipe in the recipe card: at the bottom of the ingredients, you will see a toggle for US Customary (the default, since I am in the US) and Metric. Toggle to metric 🙂
As far as moistness: (1) it sounds like it could have used more time in the oven. Ovens vary, so some run a little bit hotter, some less hot, so for long baking breads like this one, it is likely you needed 15 minutes or so longer in the oven; you can tent the loaf with foil if it starts to brown too much. Bake until a skewer inserted near the middle comes out with only a few moist crumbs attached (2) add a deep slash down the middle of the bread before baking to allow heat to escape from the center; and (3) be sure to remove the loaf from the pan to complete cooling (otherwise the moisture from the bread can accumulate in the pan and make the loaf damp as it cools). Cheers, Doni!
I followed the recipe exactly and my loaf turned out really well! It has a lovely, almost nutty flavour and a really nice texture, especially when toasted and crisp on the outside. I take it to work and add cottage cheese, chives and ground pepper just before I eat it. Very yummy! It slices easily too and you can make the slices quite thin if you want to. I love that it uses whole grains and has lots of fibre. I was a bit worried as my oven only has a fan setting and I think that you’re not supposed to use the fan setting for gf breads, but it turned out really well! Thank you for this lovely recipe. I’m going to try out some of the other recipes if I can summon the energy! 🙂
Fantastic, Ann! I am so glad it turned out fine with the fan, thanks so much for sharing that, it will be suer helpful to others who only have a fan setting oven (convection oven here in the States). All the best 🙂
I figured out what was going wrong. Thought I mention this for anyone else struggling with it being too moist.
I prefer to weigh my flours. I think I had googled the weight of the 1-1/2 cups of each buckwheat and rice flour and had been using those weights for the measurements. Today, I went by volume and then weighed them — I was missing at least 1/2 cup of flour. I made it today using the correct amounts and SO MUCH better. Yay!!
Excellent, Patricia! Thank you for your sleuthing, and for sharing ❤️
I made this bread which was easy to make. I liked the fact that it didn’t have to rise so it was a quicker simpler process. The texture of the bread is good but the taste is not. The outside is hard. The interior has some bounce but isn’t too dense. The taste is bland. I have made many gluten free breads that tasted good. I really wanted to like this one because it was easy to make but unfortunately I didn’t like the taste.
Hi Robin,
Thanks for the honest review. I love the flavor of buckwheat, but I understand it is not for everyone. Cheers.
I made this bread with half buckwheat flour and half millet flour and it came out great.
Oh, that is great news, Loretta! Also, I am 100% going to try that this weekend!
Hi,
Do you leave the dough rest for 15 to 30 minutes before baking in order for the dry ingredients to best be absorb?
Hi Nicole,
No, you do not want to do that as it will lessen the power of the leaveners (baking powder and soda) if the batter is sitting for awhile before hitting the heat of the oven. The dry ingredients absorb the liquids during the long slow bake in the oven. Cheers 🙂
Wonderful bread –now my go to! Have you made this into pizza crust or buns?
Hi Jane,
I am so glad that you love the bread! I have made it in mini loaves and muffin sizes (about 50 minutes for the 5 inch pan loaves, about 30-35 minutes for the muffin rolls). But pizza sounds intriguing. I think you could do at lest 2 curst (maybe three?) from the amount of dough for 1 loaf. I would love to know if you give it a try!
I will give the pizza crust a try! Traveling for a bit, but I will in October 🙂
Sounds great, Jane 🙂 Happy travels.
I love this bread all over again, every time I make it! It’s just like “real” bread, but better.
I am so happy to hear it, Laurie! Thank you for taking the time to let me know, it means a lot 🙂
I used to buy something similar but they changed the ingredients (added vinegar, which I can’t have). Found this recipe today with very similar ingredients so thought I’d try it. It came out perfectly. Thanks SO much! I’ll be trying more of your recipes soon.
Oh, I am so glad the bread worked out so well, Patricia! 🙂
Hi Camilla,
I want you to know that this is a staple at our house now. I often bake it in a muffin tin for roll size portions (makes it easy to freeze). I bake the roll/muffins for about 45-50 minutes. It’s so good, thanks a bunch.
That’s a great idea, Maisi! Thank you for shar8ng the baking t8me for the smaller breads. So glad you are enjoying the recipe.
Can you use this recipe to make breadrolls? And if yes would the baking time be the same?
Thanks, Vanisha
Hi Vanisha,
I think that could work well. Depending on the size and thickness of the rolls, I guesstimate half the baking time, but you’ll have to check along the wZy for your initial try.
Thanks for the recipe, I really want to try it. Is it ok to use flour made from roasted buckwheat?
Hi Nina! Yes, that will definitely work (and will likely be even tastier) 🙂
Followed recipe exactly and came out great. I have Candidiasis so finding a no yeast recipe was wonderful. I will try it next time with Buckwheat light a finer grind buckwheat. Maybe up the BP a bit. Thanks for all your recipes.
How wonderful Janet! I am so glad you enjoyed the bread. And yes, make it your own with tweaks that you prefer 🙂
You tried this only with buckwheat and wasn’t good? Why did you choose to add the brown rice? I’m asking because I would prefer this version to the other recipe 100% buckwheat with soaking method ????
Hi Francesca,
I wanted to create a higher sandwich style bread loaf. 100% buckwheat flour would not work after multiple tests (it collapsed after baking), hence the addition of rice flour. The soaked buckwheat bread you mention is a VERY different style of bread, very different texture (mister, and denser, far more rustic in style). One method of bread-making does not work for all ingredients and styles of bread (especially when it comes to gluten-free breads). I hope this helps to explain.
Camilla I am a Holistic Chef and am so impressed with all of these wonderful ancient grain and gluten free offerings on your website and the effort and energy you put into creating this FREE for anyone to access – I spent many years working particularly with ancient grains and teaching about cooking with them before it was cool or even understood here in australia – I have to also applaud you in the way you handle so many Rude and Ungracious people like Francesca and her comments –
Your graciousness is incredibly decent and kind.
I think a reminder to everyone reading these recipes is that they take time, energy, money and experience to create, photograph, write up, up load and ensure they can be as successful as possible for anyone trying them – it is no mean feat – kudos to you Camilla.
And yes this website would be monetised and so it should be – it is Camilla’s work.
Hi S Grace,
I cannot tell you how much your comment (more like an open letter!) means to me. Thank you, from the bottom of my heart xxxooo
This didnt’t come out so great for me. It didn’t rise much, so it’s pretty dense and I would add more salt next time. If you have any suggestions I’m open to them.
Hi Karen,
I’m sorry the bread did not turn out as expected. This is not a high-rising bread (the post photos show the height in the pan). Soda bread is typically a more dense bread than yeast breads, for example, or other quick breads.
Hi Camilla, my bread is just out of the oven. So looking forward to tasting it soon. ???? Thanks for an easy healthy recipe.
you are very welcome, Carolyn!
Hi, just wondering why this recipe is oil-free? I’m trying to get more fats in my diet so I was wondering if adding olive oil would disrupt anything in the bread
Hi Brian,
You are welcome to replace some of the water with oil. I would not replace more than 1/4 cup. ????
Thank you for this recipe! <3 Didn’t have any rice flour so used half millet/oat flour as a substitute for it and kept everything else the same and turned out exactly like the photos!
That’s fantastic, Diyann! Thank you so much for sharing your millet/oat flour sub, that sounds great–I know that will be useful for others (including me!) 🙂
I can’t have brown rice so I swapped in white rice flour, and also can’t have vinegar so substituted cream of tarter as someone suggested, and it’s surprisingly tasty. If I could put honey or butter or nut butter on it I would be over the moon with joy, but even with my sad apricot spread it was still enjoyable and felt like I was eating “real” bread. Oh, and after struggling to mix it I threw it in my Kitchen-Aid and that made quick work of it. Will definitely use that next time. 🙂
Great improvising , Daryl! It’s official, you are a true baker 🙂 So glad you like the bread!
Can psyllium husk powder be used instead of the flakes? I purchased the powder before finding this specific recipe.
Hi Brittany,
I think tat should be fine–just make sure to use an equivalent WEIGHT (you will use much less powder than flakes–it is usually about 1 teaspoon powder to 1 tablespoon flakes, but check your package and compare to the weight of psyllium needed for the recipe). Some people have had less successful results with powder, but others say it works fine for them 🙂
Hallo, this looks and sounds from reviews such a good loaf. Lovely easy recipe.Have tried it twice, not entirely successful. Went by one reviewer and substituted chia seeds and flax meal for the Psyllium Husks. Definitely won’t try that again. 2nd time got the Husks. Much better, but Bread rose high in the centre, had a Whiteish Crust, and was a bit moist/uncooked inside. It won’t go to waste, was o.k. toasted. I did start the Bread off in too high an oven – 180 – in error. Corrected after 20 mins, and baked on 150, not the 160 you recommend, as mine is a hot oven. So perhaps this, and the fact that my tin is 22 x 11, a bit smaller than yrs, and metal, might all make a difference.
I appreciate yr recommendation for a Glass Loaf Pan, and have bought one, virtually the same size as yrs. So looking forward to the next loaf being a case of 3rd time lucky. I wd appreciate yr comments on the above, tho. Thank you. ( Also very much like the sound of the coconut bread).
Ann
Any alternative to vinegar? Husband can’t have any citrus or vinegar.
Hi Mandy! Can he have cream of tartar? You can use 1 teaspoon of cream of tartar for every tablespoon of vinegar or lemon juice.
Thie is the best tasting bread i have had in recent years..thank you and so easy to make I love it
Yippee! Thank you for taking the time to post, Debbie, that makes my day 🙂
This is my go-to bread recipe. As a Coeliac, it’s been a game changer. I’ve tried other recipes and this one wins hands down. The only change I make is I add just a little more apple cider vinegar. I toss in toasted sunflower seeds to the mix as well. Thanks so much for sharing such a delicious bread recipe!
I am so happy to hear it, Kylie! 😊
@Camilla, Greetings. I have a general question WHAT is the vinegar doing to the recipe? Is it taste or does it change texture of the dough? thanks for answering my curiosity.
Hi Sam,
It’s a good question. The baking soda needs an acidic ingredient (in this case, vinegar. Lemon juice also works) to react with in order to work. Baking powder is made with baking soda and cream of tartar (acidic), so you do not need to add an acid to recipes for it to work. Both baking soda and baking powder or sometimes used in baking recipes, especially breads, because the baking soda gives a more powerful rise at the beginning, whereas the baking powder gives a slow and steady rise.
Brilliant recipe!
A great tasting recipe Camilla. I’ve tried it many times (you might remember my writing some time ago when I was having mixed success.) Letting the psyllium husks sit for about 15 minutes works better for me, not 5 minutes as stated in the recipe. The mixture is now rising well and has a smooth texture. While the taste is great I think my bread is a a little too moist. Any ideas on how to correct this? It’s meant to be a bit moist, isn’t it?
I have the option of using/not using the fan in my oven. I find it cooks best at 180C in the Conventional Oven and 160C in the Fan Forced Oven.
Your Oat Bread recipe is great too, Camilla though it turns out moist like the Buckwheat one. I cook for 90 minutes.
Thank you.
Geraldine
Hi Geraldine! I am so glad that you like this, and the oat, sandwich bread. When I make the bread, it is not what I would describe as “moist.” I definitely recommend the conventional oven. There could be slight variations from the type of pan used (ceramic/glass/metal), but not by more than a few minutes. It sounds like everything is going to plan, but perhaps your oven just requires the bread to bake a little bit longer (10 minutes or perhaps up to 15). You can always tent the bread with foil to prevent over-browning. I hope this helps!
I must have won the lottery when I found your site (via another recipe). I cannot believe all of the amazing GF bread recipes you have! I made this on and the almond tortillas. Love them both and cannot wait to try more recipes. Thank you!
I added yeast at start by mixing 2 tsp yeast with 2 tsp sugar and half cup of listed water and worked well is recipe very nice soft sandwhich bread
Great recipe! My husband loved it. He has histamine intolerance and can’t tolerate whole psyllium husks. So I substituted 1/2 cup chia seeds and 1/2 cup flaxseed meal for the whole psyllium husks. I followed the recipe as written and just replaced the whole psyllium husks.
Thank you so much for the recipe!
Hi Chris! Thank you SO much for sharing that you made this with a chia-flax substitute instead of psyllium husks! That is fantastic, I know that will be a HUGE help to many who cannot tolerate psyllium husk (or do not have them in their pantry). Sending you a giant hug for sharing that 😊. Thank YOU!
Wow. Thank you for sharing this recipe. This is the best vegan, gluten free, yeast free bread I’ve ever baked at home, and I have tried many over the years. Great texture, great taste, satisfyingly filling. Again thank you 🙏🏼
Wow back, Marie! Thank you so much, I am so happy you love the bread 🙂
This is the Best gluten and dairy free bread recipe I have tried! I have tried many! Thank you much it just what I was looking for 💕
I am so happy to hear that you love it, Cate!!! 🙂
Thanks for sharing this recipe, the bread is ridiculously easy to make and it’s delicious. Even the fussy Mr loves it. I have a second loaf in the oven as I type this.
The only observation that I have is that the 27 gm psyllium husks I have measures out more like 1/2 cup, so I went with the weight instead of the measurement. I got interrupted while making the first loaf and the psyllium really gelled up firm and it was hard to mix. I actually had to add a bit of water to get all the flour mixed in. In spite of that, the loaf came out perfectly. I hope the second one comes out as good. 🙂
Hi Gracie,
I am so glad the bread was a success! I am guessing there is so variation with different brands of psyllium husks— I am glad you stuck with the weight measure. It actually sounds like it should be— there’ll should be pretty stiff (hence my hands-in, squishing recommendation. A spoon definitely does not do it for me 😊).
@Camilla, this is so good! Ive been making whole groats buckwheat bread and don’t like the texture. This is my new GF buckwheat bread!
Can this bedone in a bread maker?
Hi Edward,
I have not tried it in a bread machine, so I apologize, I cannot make a recommendation one way or another.
So, I have just tried this recipe. Sooooo good. I am terrible at following a recipe and this was not exception. I had some buckwheat sour dough starter that I’d “reactivated” and I thought I was going to make a sourdough bread. But I saw this recipe and thought….maybe????!!! No waiting for mega hours to get it ready to bake. It rocks. Thank you.
That is simply wonderful, Jacqueline!
Thanks so much for this recipe. It has become a go-to for me and I have made it many times. Sometimes I add caraway seeds for a rye-bread effect, and sometimes I add cinnamon and raisins and a tiny hint of sweetness for a raisin-bread effect – both are delicious, as is the recipe exactly as written!
Wonderful, Robin! I love the sound of your variations 🙂
This is delicious! The taste and texture remind me of the bakery rye and pumpernickel breads I grew up with (and am unable to eat now)
Definitely adding caraway seeds next time
One question: how do you get the oats, sesame seeds, etc. to stick to the top of the dough? Mine all fell off when I cut the bread.
Thanks for an awesome recipe, Camilla!
Hi Karen! Oh yay, I am so glad you like the bread! Caraway seeds sound like a great addition (love those, too). I don’t remember doing anything special for the oats and seeds, I just sprinkled them on top. But you can moisten the top of the bread (brush some water on top) just before sprinkling to help “glue” the oats and seeds to the top (then gently press a little bit to adhere to the dough) 🙂
There used to be a one ingredient buckwheat bread (just soaked the buckwheat grommets overnight, blended and added some salt and water and baked?) Do you still have that recipe here??
Hi Jessi! Yes, it is still on the site. Here it is 🙂 1-Ingredient Buckwheat Bread
PS I forgot to say also that the bread always takes too long to cook.
Hi Camilla, As I enjoy your buckwheat bread recipe I am determined to make a good loaf but it’s always wet/moist on the inside. Should I use less water? It doesn’t roll into a ball before baking. I’m weighing ingredients so that couldn’t be the problem. Hope you can help.
Hi Geraldine,
Oh no, I’m so sorry the bread is having issues. How frustrating.
Based on your description of the bread not coming together before baking, I am wondering if there is an issue with the psyllium. Are you using whole psyllium husks or psyllium powder? I always use whole psyllium husks. Psyllium husk powder is supposed to work as an equivalent (by weight), but two other readers have recently mentioned (for different recipes) that they needed to use more powder.
Let me know if you are using powder psyllium. If not, I’ll try to rethink what the issue might be 😊
@Camilla, Thank you Camilla for your response. I made another loaf yesterday which is much better than I have made previously but it is still moist. I weighed the flours and psyllium (I don’t think I weighed the psyllium other times) and the mixture came together into a ball. It seems that maybe I need to cook for a longer time. At 90 mins I tested and, as the skewer came out clean I assumed the loaf was ready. Are you able to offer another suggestion for a perfect loaf?
Hi Geraldine! I would suggest baking in a glass pan for this particular bread (that’s what I use). Here’s why: glass is an insulator, slowing the flow of heat between the air of the oven and the bread batter UNTIL the glass itself heats up–then the glass retains heat for longer than a metal pan (good for a bread like this one that needs a long, slow bake).
@Camilla, I forgot to say that I used psyllium husk and not the powder.
Thank you.
Geraldine
@Camilla, And again. Sorry to be troubling you. While enjoying my toasted buckwheat bread for lunch I was thinking that our spoon measurements here in Australia are different from those in the US. I used 20ml cider vinegar for 1 tablespoons (US 15ml, correct?) and our teaspoon is 5ml. I realise that there is little difference but I wonder whether this affected the moisture level of the baked bread. I wouldn’t have thought I had too much baking powder etc but……
Camilla, are you able to shed any light on this? What spoon measurements do you use?
Thank you again, in anticipation of your reply.
Geraldine
Hi Geraldine! I don’t think the extra teaspoon of vinegar is the culprit (yes, US tablespoon is 3 teaspoons, 15 mL). But I do have a thought: what kind of pan did you use, metal, glass, or ceramic?
@Camilla, Thanks for replying to me again, Camilla. I’m determined to make a success of this bread, as no doubt you have guessed. It’s such a lovely flavour. I have a sensitivity to wheat and yeast so these ingredients suit my gut. I like it too as it’s very easy to make. I will try your oat bread recipe too when I have mastered this one!!
To answer your question, I have a metal, non-stick loaf pan which is light in colour on the inside and a dark colour on the outside. I don’t use a fan when baking and have been using 160C. My oven, which is only a couple years old, has a thermostat at the top and the bottom. The temperature of the oven is fairly accurate. I think I’ll raise the oven shelf position one row when I try it again in a few days time.
Geraldine
this is an amazing recipe ! first one I made was good but the 2nd attempt turned out a bit better.. I used a touch more A.C vinegar and used the Paddle with a mixer & it turned out great.. I know the great thing about this recipe is there is no Oil.. but if you want the crust to crisp up a bit better I used a little bit of olive oil spray and really goldenned up the crust… thanks for the recipe ! amazing
I am so happy to hear that you had such success, Tom! And thanks bunches for sharing your tips 😊
This is my first time baking a bread and I only put a pinch of salt in the dough. Plus I just put them all together and didn’t really sit the psyllium husk and other ingredients for. 5 mins. My bad
Hello Camilla,
Thank you for this life-changing recipe. I will never buy store made GF bread now that I have found your site. Many blessings.
Hello, thank you for a beautiful recipe. I baked the best GF load so farin by bread machine using the quick bread (non yeast) option. For the flours, I did not have brown rice so I had instead 3/4 cup white rice and 3/4 cup bsissa which is roasted oat flour.
Ooh, that sounds wonderful, Hania! Now I am going on the hunt for roasted oat flour, sounds heavenly. And I am so happy to hear that it worked in the bread machine 🙂
Thank you thank you thank you! This bread is amazing!!! You are a genius for this recipe! This is the first time l’ve baked bread and it came out great! The texture is great! It’s a beautiful loaf of healthy bread! I have a question. Since I’m new to baking bread, I don’t know how it works if I were to want my loaf of bread taller. Mine was only about 2.5 inches tall at its tallest point which isn’t sandwich size. I followed the recipe to a T- even using a scale instead of measuring cups (which was new to me). Could I double the recipe in my 9×5 pan and expect it to grow vertically and be more the size of sandwich bread? If so, how do you think that would affect the baking time? I really appreciate your recipes! Thank you!
Kristen! I am thrilled that you have entered the world of bread baking, hurray! I completely understand about wanting a higher loaf, and you can make it happen by using an 8×4 inch loaf pan. You can find them easily online (less so in stores, except kitchen specialty stores). I would bake for about the same time. The bread will be nice and high without any other changes 🙂
@Camilla, thank you so much! I also baked your oat bread and it is incredible! Your buckwheat and oat bread recipes are the best gluten free bread I have ever had! And the healthiest! And my very discerning husband agrees! We could never have bread regularly because they’re so unhealthy and not even very good especially since most are frozen and the texture is weird after defrosting. But now we can have bread everyday! And I froze the buckwheat and it tasted great and still had a great texture after being frozen. Incredible! We recently had tuna salad sandwiches and danced with happiness like kids because we’ve missed those simple pleasures. You have blessed our life! You are a blessing! Thank you!
Your comment brought tears to my eyes, Kristen 🥰
HI, I am enjoying, actually loving, your recipes! I made the GF buckwheat and brown rice bread today and I have a question for you please. The bread turned out a bit too moist (still edible and tasty)and a tiny bit denser that your photo shows. I followed your directions and even allowed an extra 5 minutes of baking time as I did not get the traditional hollow sound when tapping on the loaf.
I measured the ingredients (didn’t weigh as I now see your recommendation below)and tested my baking powder’s action. Gave it a good squishing for about 2-3 minutes, rolled it to form a loaf.
Was measuring rather than weighing the problem? Do you suggest weighing all your dry ingredient in all your recipes? If so, could that information be included on all your recipes? Thank you very much.
Hi Charlene,
I am happy you liked the bread and that, overall, it was successful,
Yes, the density/moistness issue is most likely due to measurement. I have become a convert to measuring with a scale (instead of cups) for alternative baking. I strongly recommend it for ensuring accuracy and consistency. I find it is actually easier and faster to measure with the scale, too, once you get into the groove of it.
I am going back through my older posts and providing weights to all. All baking recipes moving will have grams measurements 🙂
I tried this recipe with amaranth flour instead of rice flour but it turned out very gummy, despite baking longer than called for. Any idea what went wrong? I used 1.5 cups amaranth flour. Thanks!
Hi Alexandra,
I am sorry you had problems with the bread. I have not tried the bread with amaranth flour, so I am sure that was the problem. I have not used amaranth flour, but I have worked with amaranth (in whole grain form)–it is very, very sticky, so I cannot imagine that the flour would work well in a sandwich bread of any kind. I mention in the post that it is not a good idea to substitute flours (the only other option I tried was quinoa flour in place of the rice flour). Alternative breads such a this are very dependent on the exact ingredients and measurements. I hope you give it another try with the specified ingredients.
my dough was too wet to “squish” and the bottom of the baked bread was a little wet. Do you weigh your ingredients or use a cup to gram converter? I used the metric gram measurements and it seemed like the flour weights we a little low. Any help? p.s. the bread was still good but no as good as the pictures.
Hi Anna,
I am the glad that the bread was still good! I’m not sure what could have gone wrong. I make this recipe once a week using these measurements. I weigh all of the dry ingredients to the gram. The water is measured using liquid measuring cups (standard conversion on US liquid measuring cups is 1 cup = to 250 mL). Were you using whole psyllium husk (I have not made this with psyllium husk powder)? Was the water-psyllium husk mix nice and thick before adding it to the dry ingredients?
@Camilla, I did use whole psyllium but I will try leaving the psyllium-water mixture longer. And it’s nice to know that you use all of the grams, they are so much more accurate and I live in the uk where all recipes use grams and millilitres. (Also a US cup is 236ml and Canadian, Uk and Australian cups are 250ml as far as I’m aware.)
Hi Anna,
Ok, I hope that works out! The US standard for 1 cup liquid is 250 mL (marked on all liquid measuring cups).
Can’t wait to try this! I’m looking to meal prep a few sandwiches and was wondering how this bread holds up with spreads on them for a couple of days in the fridge?
Hi Mel! It holds up great! In fact, I had not finished a recent loaf before leaving to visit my parents for a week (it was store in a container in the refrigerator). It is still excellent a week and a half later, especially toasted 🙂
hi there! looking to try this recipe and wondering if the pysillium husks can possibly be substituted for anything? this recipe looks amazing!
Hi Ava,
Apologies, but no, not for this one. I have lots of other gluten free, and grain-free, vegan breads on the site that do not have psyllium. Hope one of those might appeal 🙂
Turned out perfect, thank you. It’s hard to find easy whole grain gluten free breads to make
I am sensitive to rice. Any idea what to substitute it with. Also sensitive to gluten
Thanks
Rachel
Hi Rachel! You can use an equivalent amount of quinoa flour or amaranth flour 🙂
Love this recipe!! Only hitch was that I had to bake it longer than 90 minutes, but definitely worth it.
So glad it worked out, Olivia!
Hi! I’m on my second batch of this bread – I’ve really enjoyed having it around. I hate that most GF bread recipes feel so complex and are usually pretty unhealthy…that and hard to bake, gummy in the center, etc. I loooove that this bread is so easy to cut and a nice mix of soft but hearty. My only issue is that it tastes…well, kinda bland? At first I thought I hadn’t put in enough salt, but my 2nd batch tastes similar. I am wondering if there is a way to add a little depth of flavor without ruining your existing construction! A tablespoon of honey? A little melted butter? Any ideas? I don’t need it to be vegan. Thank you!!!
Made it yesterday and it’s amazing! Thank you!
I made this bread this morning and it is delicious! So easy!! I find I am turning to your website more and more for recipes and each one is a winner. Thank you so much for all the effort you put in. Without you I’d be practically breadless. 😄 You’ve got a real talent with food!
Thank you sooo much, Roxanne! I am so happy that you are finding lots of options here (hurray for bread!)
Hi,is the oven temperature for a regular oven or fan oven? Wondering if I need to reduce the temp for fan oven
Hi Gillian,
I use a regular oven. I am not sure about adjustments for a fan (convection) oven, I have never baked in one. Perhaps you can google the manufacturer website for your particular oven, or for adjustments in general for convection? Apologies that I cannot help with this one.
Thanks, I baked mine at 150.The taste is delicious, but it didn’t rise as much as yours. My 1/3 cup of psyllium husk weighed 54g, not 27, although my cup measures matched for the other ingredients. Should I have just used 27g maybe?
Hi Gillian,
Glad that you liked the bread! It sounds most likely that the lack of rise was due to using almost double the amount of psyllium. Are you sure that you are using whole psyllium husks, as opposed to psyllium husk powder? 5 grams per tablespoon is the standard for whole psyllium husks across multiple brands (hence 1/3 cup, which is 5.33 tablespoons, comes to 26.65, which I round up to 27 grams). Psyllium husk powder weight varies by brand, but ranges from 9 g to 12 g per tablespoon, which is closer to the weight you mention (54 g) for your 1/3 cup measure. I would definitely go by weight next time (27 g), to get the proper rise 🙂
@Camilla,
this is a winning recipe. easy, nutritious, inexpensive and very delicious. Thank you for all of your original bread recipes!
Thank you for this easy and delicious recipe.I have made several times now for gatherings with extended family members with allergies. Big success with everyone (even those without allergies). Thank you for providing your recipes to all of us!
Thank you for some real bread! ❤️This is definitely the best GF yeast free that I’ve tried, and it was incredibly easy to make.
I am thrilled you like it!!!!!😊👍🏻
I made this bread and really like it! I prefer it toasted but it is great plain, too.
Hi Camilla, I love this bread. It came out perfect. My picky husband loved it tooo! Thank you!
So happy to hear, Randee!!!
This is fantastic! Turned out exactly as promised. I used my ‘bake only’ setting on my bread maker for 90 minutes. Could have used a little more time but otherwise perfect. A keeper.
I am so glad to know that this worked well in your bread machine, Julie!!! I live my bread machine, I am going to follow your guidelines 🙂
I really like this bread. I made two loads.
Whoohoo!!!!
This bread came out perfectly! Can’t thank you enough for sharing all of your dedicated, consistent efforts at perfecting recipes and then sharing them – what a treat for us! I really appreciate your blog and continue to return to find recipes to try. Thank you!!!!
I am so happy to know that the bread came out well, Kristen!!! Thank YOU! 🙂
You’re welcome! And I want to add my appreciation that the recipes I try all have only a few ingredients – I for one find that attractive in a recipe. : )
😊😊😊thank you, Kristen !
What if I only used buckwheat flour? Would that work as well?
Hi Isabelle,
You are welcome to try. I did not have success with all buckwheat in some of my earlier renditions leading up to the final recipe, which is why I started experimenting with the buckwheat brown rice blend. For best results, I recommend staying with the recipe.
Can’t wait to try this! Quick question: what if someone did like the taste of yeast? Any way that the recipe could be amended to work with yeast?
Hi Laure,
This one will not work with yeast, but if you want to add instant yeast flavor, you could sub a 12 ounce can or bottle of gluten-free beer for 1 and 1/2 cups of the water 🙂
Camilla, I am so glad you love a challenge! Gluten free, yeast free, vegan bread is quite the challenge and you did it! This bread lives up to all your claims. It is delicious with a fine crumb and it rises too!It is absolutely delicious! Your 3 Ingredient Almond Bread and Vegan Keto Sunflower Seed Bread are delicious as well!
Thank you for sharing your wonderful recipes!
June
June! Thank you for trying the bread and giving it a thumbs up! 😍 so glad it worked for you 😊
Made this almost as soon as I saw it posted on Pinterest. It is PERFECT! Mine came out just like the pics except I did not add toppings. I cannot thank you enough for your recipes. 😍
Thank you so much, Janelle! I am so glad you like the recipe!
@Camilla, I made this bread it came out perfect and so effortless to make. you are a gift to the world
Sarah, your sweet note nearly brought me to tears. Thank you, and I am so glad the recipe is a success!