
This post may contain affiliate links. Please read my disclosure and privacy policy.
This post may contain affiliate links. Please read my disclosure and privacy policy.
Vegan gluten-free oat sandwich bread, made with ease! Hearty, delicious, and great with everything, it is also yeast-free and oil-free.

As promised in my Gluten-Free Buckwheat Sandwich Bread post the other week, I’ve been busy testing other combination of flours to create additional easy, vegan, gluten-free breads. My kitchen is very sticky.
But I would do it all over again. In fact, I am only just beginning, because the results are so exciting and delicious. First up, an oat loaf (because I <heart> oats). I attempted two all-oat loaves. The results were sunken and squidgy. So, I played with oat flour & brown rice flour combinations (the latter yields a finer texture, eliminates the oat squidge) until I got it right. This is it: Vegan Gluten-Free Oat Sandwich Bread.
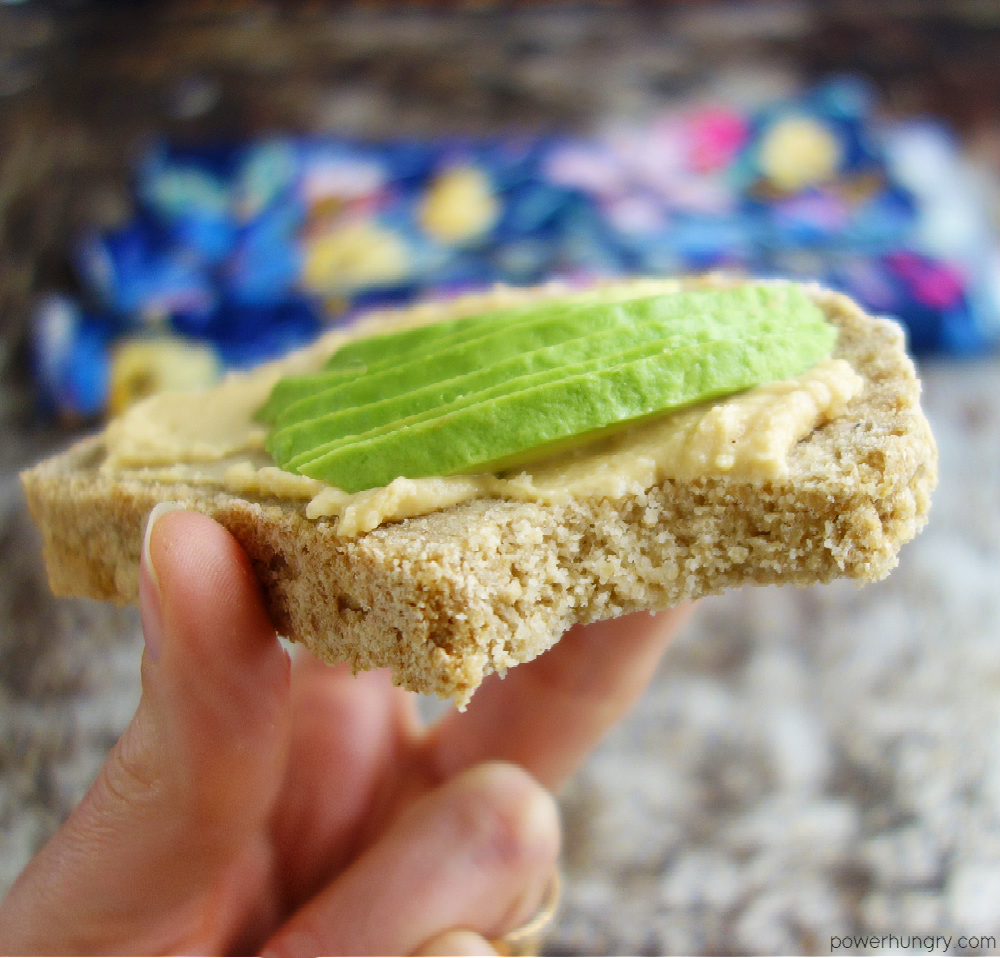
As the name makes clear, it is sandwich bread, suitable for slicing thick or thick. But I could also have dubbed it “toasting bread,” because it is positively outstanding when toasted and topped with sweet or savory spreads and toppings.
Recipe Benefits
If the mild, toasty flavor of oats sounds like the perfect sandwich bread to you, prepare to be wowed by all of the other features of this hearty, wholesome, totally toast-worthy bread. It is:
- Gluten-free
- Vegan (egg-free & dairy-free}
- Yeast-free
- Xanthan gum-free
- Oil-free
- Nut-free
- High in fiber (3.3 g per slice)
- Easy
Ingredients for the Bread
The exact amounts of each ingredient are indicated in the recipe card at the end of the post. Toggle between US Customary (volume) and Metric (weights) for preferred measurement option.

Like my Buckwheat Sandwich Bread, I’ve kept the ingredients for this loaf to a minimum. Here is what you will need:
- Rolled oats, ground into a flour (or use pre-ground oat flour)
- Brown rice flour (see my tip at the end for grinding your own, with ease)
- Whole psyllium husks (not psyllium powder)
- Baking powder
- Baking soda
- Salt (always optional/adjustable)
- Water
- Vinegar
- Optional: A bit of coconut sugar (or other sweetener)
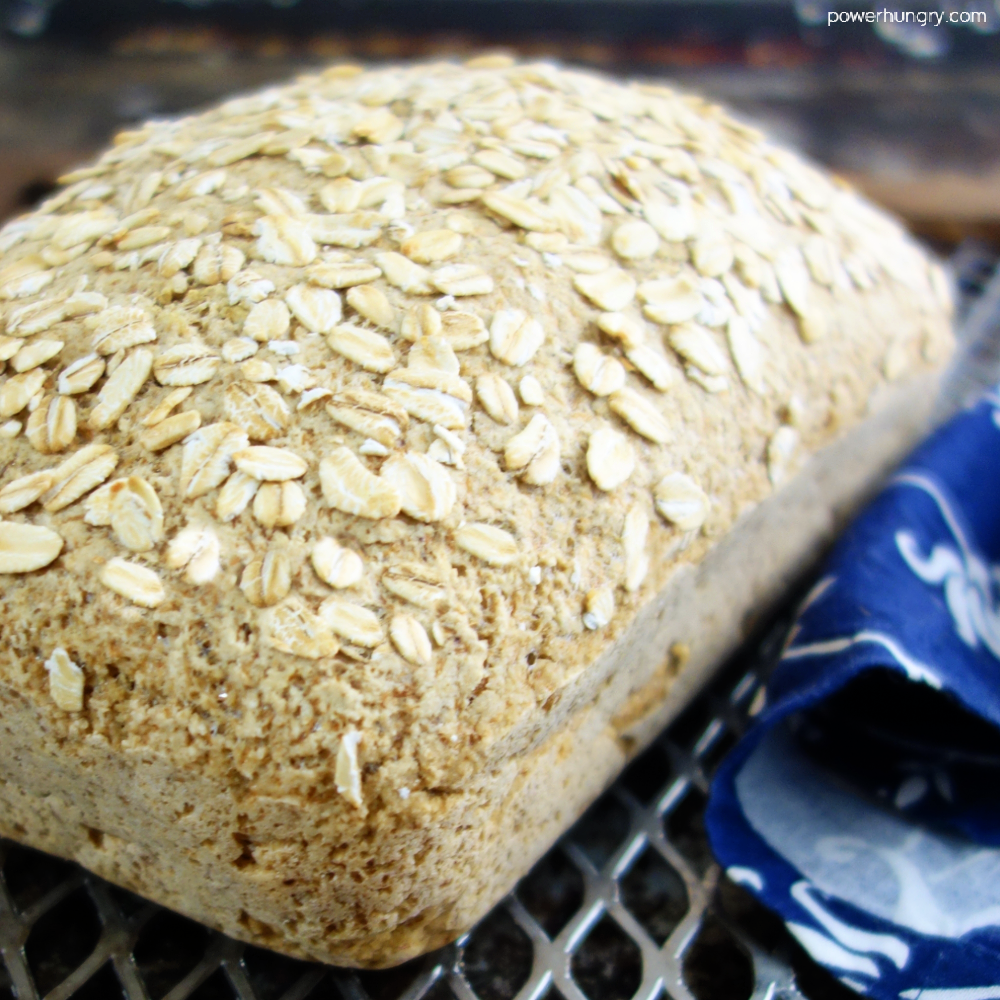
I sprinkled some additional rolled oats on top, for decoration, but it is your choice to add them or not.
I like to add a tablespoon of coconut sugar to the recipe, but it is not necessary for bread’s success. Adding a tablespoon of coconut sugar (or the sweetener of your choice) does not make the bread sweet. It does, however, enhance the oat-y flavor of the bread. It’s one of those something-something ingredients, a subtle enhancement that heightens other flavors. It’s up to you whether you want to add it in.
Step by Step Instructions
Making this bread is a cinch. The preparation (under 10 minutes), is quick, too.
Let’s do this, shall we?

Step One: Combine the Wet Ingredients and Psyllium.
Whisk the water, vinegar, psyllium husk, and (opotional) coconut sugar in a medium mixing bowl. Let the mixture stand for about 5 minutes to thicken into a gel. This psyllium mixture provides body, volume and structure to the bread, much like eggs in traditional quick bread recipes.
Step Two: Mix the Dry Ingredients.
While the psyllium mixture is gelling, whisk the oat flour, brown rice flour, baking powder, baking soda, and salt in a large mixing bowl until blended.

Step Three: Mix to Make a Dough.
Add the psyllium mixture to the flour mixture and stir with a wooden spoon to combine. If you have made, or at least looked over, my Buckwheat Flour Sandwich Bread, you will note that this bread does not require “squishing” (i.e., using your hands to combine the wet and dry ingredients). While still quite thick, the dough can be combined by stirring with a spoon or spatula.
If you love to get your hands in dough (count me in), you are welcome to use your hands instead of a spoon!
Gather the dough, while still in the bowl, into a ball-shape.
Step Four: Shape the Dough.

Rinse your hands with water (it is a sticky dough; it is easier to shape it with moist hands). Shape the dough ball into a loaf shape to fit a 9×5-inch (22.5 x 12.5 cm) loaf pan. Place the loaf in the pan (which has been sprayed or greased). Smooth the top with your hands and press into shape, rounding the corners and sides.
If you choose, sprinkle the surface of the unbaked loaf with the some rolled oats.
Step Five: Bake the Bread.
Bake the bread in a preheated 325F (160C) oven for 90 minutes until risen, and the surface of the bread appears pale golden brown, dry, and crusty. The bread will also sound hollow when tapped.
Let the bread cool, in the pan, on a cooling rack for 15 minutes.

After the 15 minutes, remove the bread from the pan and cool completely on a cooling rack. Pretty, pretty, pretty!
Cool Completely Before Slicing
Make sure that the bread is completely cooled before slicing it. The reason? The oats. While the bread is still warm, the oats will stick (somewhat) to the cutting knife. Once cooled, the bread will have a fine texture that slices without any significant sticking.

What is the Texture & Taste?
First, texture: This loaf is fine-textured but hearty. It is closer to a dense whole wheat/whole grain loaf than a fluffy, white flour loaf. That also means that it is very filling. It can be sliced thin or thick As I mentioned earlier, it is especially good toasted.
I do not find this bread to be at all gummy in texture. Any subtle springiness is due to the high proportion of oats in the dough. When toasted, the bread is crispy and crunchy, with a warm, nutty flavor.
Taste: The flavor of the bread is very mild (both brown rice and oats hare neutral flavors). For a deep, robust flavor, consider adding up to 2 tablespoons of dark molasses to the dough. The bread is wonderful with just about any sweet or savory filling or topping you love.

FAQ
Can I use different flours (in place of the oat flour and brown rice flour)?
I do not recommend it. The proportion of wet and dry ingredients, as well as the quantity of psyllium husk, is particular to this oat flour and brown rice flour combination. The one exception is quinoa flour, which generally works well as a substitute for brown rice flour. I am working on other flour combinations and will continue to share the successes.
Can I Use Something Other than Whole Psyllium Husks?
No, it must be whole psyllium husks. Other gelling agents, such as flaxseed meal or chia seeds, will not work as direct substitutes (they might work, but it would involve some experimenting to determine their efficacy).
I have not tried this with psyllium powder. It can work as a substitute for the whole husks in some recipes, but I am uncertain of how it might work in this particular bread.
Can I Use Something Other than Vinegar?
Yes, an equal amount of lemon juice or lime juice can be used in place of the vinegar. Also note that any variety of vinegar (e.g., apple cider, white, balsamic, etc.,) can be used in the recipe.

Tip: Grind Your Own Oat Flour & Brown Rice Flour
I grind my own oat flour and brown rice flour. Whole brown rice and oats cost far less than ready-to-use rice and oat flours. And, it is fast (under a minute) and easy to do.
Rolled oats can be finely ground in a food processor or high-speed blender. Brown rice can only be ground in a high speed blender (regular blenders and food processors cannot grind the rice into a fine flour). Extra flour (oat or rice) can be store in an airtight container at cool room temperature for up to 3 months, or in the freezer for up to 1 year.
Happy Baking!
More Gluten-Free, Vegan Oat Breads to Try:
- Flourless Millet Oat Bread {vegan, GF, 5 ingredients}
- Rustic Irish Oat Scone Bread {Vegan, Gluten-Free}
- Oat Flax Skillet Bread {3-ingredients, Vegan, Oil-Free, GF}
- Healthy Zucchini Oat Bread {Oil-Free, Gluten-Free, Vegan}
- Gluten-Free Teff & Oat Bread {Vegan, Yeast-Free}

Vegan Gluten-Free Oat Sandwich Bread {oil-free, yeast-free}
Ingredients
- 2 cups 200 g rolled oats (certified GF, as needed)
- 1 and 2/3 cups, 234 g brown rice flour
- 2 teaspoons baking powder
- 3/4 teaspoon baking soda
- 3/4 teaspoon fine sea salt
- Optional: 1 tablespoon coconut sugar, or other sweetener
- 2 and 1/3 cups, 575 mL water
- 1/3 cup 27 g whole psyllium husks
- 1 tablespoon 15 mL vinegar
- Optional: 1 to 2 tablespoons rolled oats for topping
Instructions
- Preheat the oven to 325F(160C). Spray or grease a 9×5-inch (22.5×12.5 cm) loaf baking pan.
- In a high-speed blender or food processor, process the oats into a fine flour.
- In a large mixing bowl, whisk the oat flour, brown rice flour, baking powder, baking soda, salt, and (optional) coconut sugar until blended.
- In a medium bowl whisk the water, vinegar, and psyllium husks until blended. Let stand for about 5 minutes to thicken.
- Add the psyllium mixture to the flour mixture and mix to completely combine into a dough. The dough will be thick, but still stir-able. Alternatively, use the paddle attachment on a stand mixer. Roughly shape the dough into a ball.
- With moist hands, shape the dough into a loaf shape to fit the loaf pan. Place in the prepared pan. Use moist hands to smooth the top and round the sides slightly. If desired, sprinkle with optional oats.
- Bake in the preheated oven for 90 minutes until the surface appears pale golden brown, dry and crusty. The bread will sound hollow when tapped. Cool in the pan, on a cooling rack, for 15 minutes.
- Remove the bread from the pan and (important) cool completely on the cooling rack before slicing.


Thank you for sharing your recipes, especially those with minimal ingredients! I tried this bread today and loved it. I made two versions: #1 exactly as the recipe says and #2 with sticky black rice flour, both turned out very good. The only downside is that they are sticky, but they hold together very well, even a bit dense. I’m wondering if I can substitute all the rice flour with oat flour. I know you have another bread recipe with oat flour, but without psyllium. For health reasons, I’ve been looking for a long time for a bread with minimal ingredients, just oat flour and psyllium. Thanks again!
Hi Marie-Claude,
I would not advise using all oat flour. It did not work when I was developing this recipe (hence the addition of brown rice flour), and I have tried with other permutations, too. If you want a simple, all out flour recipe, I think you will like my 4 Ingredient Oat Flour Bread . I based it on Irish soda bread. Cheers.
Looove this bread. Thank you! If I made two loaves, do I need to adjust the cooking time?
Hi Joanne, I am so glad that you like the bread so much! If you do two loaves, you may need to bake them a little bit longer, but maybe not. More importantly, switch positions halfway through baking so that they are evenly baked. Start checking at the minimum baking time as usual but bake a little bit longer as needed. You can always tent the tops with foil if they are getting a little bit too brown, but the center is not quite set. Cheers!
This is a very nice bread. I have made it hundreds of times. I have substituted millet flour for the rice flour and also, if I’m out of oat flour I have used sorghum flour and it turns out beautifully. I use the same measurements as the recipe states and I use a kitchen scale.
I am so glad you like the bread, Melissa, thank you! And thank so much for sharing your adaptations, that’s so helpful 🙂
Very nice bread! I love how substantial it is, one piece goes a long way. Thank you!
Do they have to be whole psyllium husks? My local store has ground husks, but not whole husks and I’d rather not have to order whole husks online if ground will work.
Hi there Di,
Ground psyllium husks / psyllium powder should work (using an equivalent weight). I have warned against using them only because I have only tested the bread with whole psyllium husks and readers have commented that they have had problems using psyllium powder. But that could be operator error. The ingredients are the same (one whole, one ground) so I think you should be fine getting what is available at your store. Again, just be sure to use an equivalent weight of psyllium powder (the volume amount will be much smaller since the husks are ground). Cheers!
Hi Camilla,
I just tried your recipe, while making i realized I only had 100g of rice flour left so I replaced the rest with buckwheat flour and it still turned out fantastic! Fluffy and delicious, I love it 😀
Look at you, creating new recipes, Asia! Brava for taking a chance with the buckwheat flour, based on what you had on hand. I am so glad it turned out well (I am going to try it!)
@Camilla,
I’m definitely still going to try your version tough! as much as I love buckwheat, I’d like not to taste it for once ;D
Why is brown rice needed? I’m a purist and prefer 100% same cereal bread so I would like to understand what is the problem with using only oat 🙂 thank you
Hi Francesca,
I hear you I like 100% single grain breads ,too. For this particular bread recipe, however, I could not make it work with 100% aats (it rose, and then fell flat. I tried many variations). That’s why the brown rice is added. Here is a different bread that is 100% oat (only 4 ingredients). Cheers.
https://www.powerhungry.com/2023/03/17/4-ingredient-100-oat-flour-bread-v-gf-oil-free/
Hi Camilla,
I finally got around to making this bread with the cinnamon and raisins. It is so good; it’s much better than any store bought Cinnamon, raisin bread. Toasted, it’s fantastic. It’s hard not to eat the entire loaf. I’m sure I will be making this many more times. Thank you for all of your recipes..
Linda
No extra sugar, the cinnamon and raisins are sweet enough!!
Oh my goodness, Linda, I need to try that— cinnamon raisin bread was one of my favorites as a child! I love raisins, so I love that you found the bread plenty sweet without added sugar.
This bread has changed my life, seriously. My diet is fairly restricted and up until now, everything I baked or bought did not work. This is best toasted and I’m loving my open faced sandwiches so much. Thank you a million times!
Susie, that is so wonderful— the power of bread! I am so very happy that this bread is making life more wonderful ????
@Camilla, could I bake it in a 8.5 x 4.5 pan for a higher rise and larger slice? If so, how long? Thanks and still loving this bread!
Hi Susie,
Yes, definitely. No adjustment, just begin checking within the time range (it may need a few extra minutes, but not sure)
I am about to make this bread, however I was wanting to know, can I double recipe using a 13cm x 8cm bread tin?
Same temperature and clearly longer cooking time??
I only have psyllium powder though. You have stated in your recipes psyllium husks.
From memory your conversion was 1 teaspoon of powder = 5grams; 1 tablespoons of husks =5grams. So the recipes requests 27g of husks, I would use 5.5 teaspoons of powder then? (27/5=5 and 2 remaining? )
Hope to hear from you soon. There’s a time zone difference with us.
Hi Yovanca! Glad you are going to try the bread!
No, I definitely do not recommend doubling the recipe for a larger pan. There will be problems with the rise. This bread Neds the structure of the specified loaf pan (radiant heat at all sides, fairly close together) . The middle will not cook through in a larger size pan.You could, however, double the recipe and divide it into two loaves (in the specific 9×5 baking pans).
@Camilla, Thank you. You mentioned the use of psyllium husks, I only have psyllium powder, can I use powder over husks or that’s a firm no?
From memory your conversion was 1 teaspoon of powder = 5g; 1 tablespoon of husks =5g. So the recipes requests 27g of husks, I would use 5.5 teaspoons of powder then? (27/5=5 and 2 remaining?)
Yovanca
Hi Yovanca,
Yes, you have got it re: replacement. I do not use psyllium powder, but in theory , it should work (it is simply ground psyllium husks). Cheers 🙁
Hi, thank you for your amazing bread recipe! I’ve made your bread at least 5 times now and always seem to have leftover flour when mixing the wet with the dry. Why is this the case? I swear I’m following the instructions, so maybe this is normal?
Hi Sarah,
I am glad you like the bread! How much flour remains? It is a bit of vigorous mixing to incorporate the flour.. if it is only a little bit, it is ok. But do try to mix all if it in.
I have to say, this is the BEST yeast-free bread I have ever made by far, and possibly the best I’ve ever eaten. I used white rice flour because I can’t have brown, maple sugar as the sweetener, and subbed cream of tarter because I can’t have vinegar. I also let it sit for probably ten hours before slicing it, which I never have the patience to do, but thankfully wasn’t home, because I’m pretty sure that helped the middle have the perfect crumb. I just ate two slices and it took everything in me not to devour the entire loaf. It was also VERY easy to throw this bread together in my Kitchenaid mixer, and I am guessing I’ll be making another loaf next week because I can’t imagine this one is going to last me very long. THIS BREAD IS MAKING ME SO HAPPY!!!
Daryl, that is simply wonderful!!! I am over the moon that you like the bread so much, yay! Thank you for sharing your substitutions, too. Enjoy every slice!
Hi Linda,
I made this bread and while the taste is great, it’s extremely stodgy and rather sticky inside. I weighed out the ingredients and even left it in the oven 30 minutes more than you recommended – is there something I could be missing?
Hi Eva,
It definitely should not be sticky inside–it sounds underbaked. Do you, by chance, have a convection oven (as opposed to traditional, radiant heat oven). That could be the reason.
Hi Camilla,
Do you think I could add cinnamon and raisins to this bread recipe? If so, how much of each ingredient would you suggest? I’ve been looking for a good yeast free cinnamon raisin bread for toast and I cannot find one. Most recipes I find are sweet “dessert” type breads. I’m sure you could develop one… LOL All of your recipes are delicious.
Linda
Umm, we are peas in a pod, Linda–I love raisins and cinnamon in bread! Yes, you cauld definitely make this a cinnamon raisin bread. I would add 1/2 cup raisins (a fairly standard amount for raisin bread) and a tablespoon of cinnamon. You could add a small amount of sweetener (say, up to 2 tablespoons of your choice of sweetener), or leave out extra sweetness. Cheers!
HI Camilla,
I am new to your sight and I’ve tried baking 2 other bread recipes. I tried the coconut brown rice bread 2 times and it never really baked. I tried the multigrain bread and it was a success when baking for about 2 hours. (when and bought a food scale) I’m going to continue to try. Some of your bread recipes say do not bake in a convection oven. This bread does not. Should all of your bread recipes be baked in a regular conventional oven? I would like to try this bread next and it is not stated.
Thanks so much,
Linda
Hi Linda,
I do not own a convection oven, so all of my recipes are baked in a traditional (radiant heat) oven. Convection ovens can pose problems with alternative breads (especially very alternative breads such as the ones I have here :)). They are better for quick browning and crisping (think cookies). Slow radiant heat (conventional, not convection) is ideal for breads that need a slow and steady rise (notably breads with psyllium–convection heat can case a bubble while the bottom stays dense).
I hope this helps, Linda!
Hello, can I use regular white rice flour for this recipe instead of brown rice flour?
Hi Niveditha, Yes, you can definitely use white rice flour instead of brown.
Hi, I make your bread with oat and rice flour. Unfortunately I had to put in the garbage. Become very gummy. (It’s not the first time I am baking your bread).
Can you recommend other company for psyllium husk than “Anthony” please. He is out of stock. So in order to bake I need alternative company to purchase psyllium husk.
Thank you
Yael Maimon
Hi Yael,
Oh no, I am so sorry to hear that you had poor results. The bread should definitely not be gummy. My favorite brand is NOW foods whole psyllium husks. I have found that they are often out of stock, too. I do not know if the egg shortage has caused a shortage of egg alternatives (such as psyllium husks)
Good bread and inexpensive to make. I will use this recipe in the future. Thanks.
Excellent, Melissa, I am so glad that you like it!
Have you used this recipe to make rolls. If so do you have size of roll and baking temp & TIME.
Hi Susan,
I have not, but I think it would work great. I suggest 12 rolls. You could place them in muffin tin cups or bake free form on a baking sheet. I would start checking for doneness at 45 minutes.
Since this bread is so amazing, I’m going to bake two loaves at once this next time (and maybe with one of the coconut flour/rice flour loaves too? Can’t wait to try that one).
My question is: if baking 2 or 3 loaves in oven at once, Does that affect/alter the bake time at all? (I don’t know if changes air circulation in oven etc).
Thanks!
Hi Eve,
Yes, it could affect the baking time of the bread when you have multiple loaves in at once. You may need to add extra time (it can vary by oven–it might not be the case). I also suggest switching the positions of the loaves once or twice during the bake. So glad you like the bread!
I wanted to share what my sister texted me after I baked her a loaf of this (and gave, fingers crossed, as I haven’t tried it before).
She is gluten-free and in the last few month had to also cut out dairy and eggs due to her baby’s allergies. Those latter two omissions have been extra hard for her.
Here’s what she said:
“Wow wow! Your bread is such a treat. Like the genuine food treat I’ve been craving. It’s beautiful! And it’s texture is like real bread! Flavor is fairly neutral as you mentioned, which is perfect as a conduit for jam etc. And seems very promising for future iterations!”
She later affirmed its the best gluten-free bread she’s ever had.
Thank you, Camilla!
That is the sweetest comment ever Eve!!! Thank you so much for sharing. I am so happy it is a success for you and your sister 🙂
This looks like a fabulous recipe – I was wondering if I could use Bob’s egg replacer (where one of the ingredients is psyllium husks along with tapioca and potato starch). Any thoughts on whether that could work as the binder?
Hi Pooja,
I don’t think that is going to work. The psyllium husks are critical to the success of the bread (for adding structure and volume). Psyllium husk fiber is listed as the last ingredient of Bob’s red mill egg replacer. The starches that are list fists, as well as the baking soda, are not going to work in the same way for this bread.
@Camilla, ok good to know. I’m going to try it with the psyliium husks fiber and I will let you know how it goes! Thank you for your quick response!
This bread is soooooo good. It’s been a total blessing to have this recipe as it doesn’t contain any of the starches found in most GF bread and it’s crazy easy to make. I’m in the beginning stages of an elimination diet and this was one of only places I could find a recipe to make bread that I can eat. I can’t wait to try some other recipes.
I am so happy that you are enjoying the bread, Shawna! And so happy that it works with your needs–so wonderful 🙂
Hi! Can I use store bought regular white rice flour?
Hi Mamta,
Yes, that should work fine! Use an equal weight of flour.
You need to indicate specifically psyllium husks and not powder which is extremely important. I just wasted all of these ingredients.
Hi Jennifer,
I am so sorry your bread did not turn out, I know how frustrating that is! Regarding the whole psyllium husks: I completely agree, it is super important! If you look back at the post and the recipe, I specific over and over again to use whole psyllium husks, not psyllium powder (including in the picture of ingredients, where there is a bowl of the psyllium husks labeled WHOLE PSYLLIUM HUSKS). That being said, I know that I (many times!) miss an important step or guideline (even in my own notes!). It is so maddening. I hope you will consider giving the bread another try! Cheers 🙂
Everyone of my family and friends who have tasted this bread (including a lot of people who are not familiar with gluten free breads) LOVE this! I have a rice intolerance so I have been experimenting with different flours including chickpea, coconut, quinoa (as recommended) and a combination of two or three of the above. I have also increased the oat flour (so 2 2/3 cups oat and 1 cup other). The coconut alone is by far our favorite. It does increase the calories but it is so delicious! Almost like a cake! I accidentally had the oven on 375 one of the times and I actually preferred the outcome as the loaf had a beautiful crust (I am partial to crunchy crusts). So this is the temperature I bake it at now. I have also made these into single serving rolls so that I am less tempted to eat the whole loaf. This bread freezes really well. Thanks so much for this and so many other amazing recipes!
Oh my goodness gracious, Karen!!! Thank you so much, and thank you, too, for sharing your adaptations and variation!!! I am DEFINITELY going to do some experimenting based on what you have tried. And I will definitely try the 375 next time. Yay and thanks, and thanks for sharing with other!!! 🥰😍❤️
This is the best vegan , gluten free , yeast free and gum free bread we’ve ever had. My children can finally have bread. You are a God send!
Holy wow, thanks Dani!!! I am so glad this bread is a success for you!!!
Amazing bread! Thank you!
This bread is fantastic! I’ve made it 5 times now and will continue to make it. Thank you for this recipe.
I made this yesterday and I took a gamble with the psyllium powder. At least I think it is, it’s the Knosyl brand (daily psyllium) and it worked beautifully!!! I’ve used it in many of your brilliant and delicious recipes. This bread is awesome, I love it so much, I had it it with some pb and strawberry jam last night and tonight will be sandwiches and I’m already planning on making loaves for my parents. Thank you so much Camilla, you’re very inspiring!
Kathryn, that is wonderful! I just looked up that brand, I had not heard of it before now. So glad that it worked so well and that you are enjoying the bread xo
Camilla, I can no longer eat psyllium and I love this bread…such a disappointment! We love the light taste and texture of this bread. Even though you said the psyllium can not be subbed, I tried flax and it did not work. If you have any suggestions I will give them a try.
Thanks for all the lovely recipes you share!
So sorry you can no longer eat this, June. I will come up with some other bread recipes that do not have psyllium (I know a few other readers mentioned they cannot eat psyllium).
@Camilla, thank you!
@June,
I haven’t tried it in this recipe yet but chia seed powder tends to be a closer sub for psyllium ime.
I just made this and I love it. The taste is so familiar but I can’t quite place it. I’ve been looking for a quick and easy recipe to replace store bought bread and this might just be it! Do you have any tips for the baking time if I double the recipe
Hi Dolly! Oh wonderful I am glad this bread is a sucess.
When you mention doubling the recipe, do you mean to make a bigger sandwich loaf (still in a 9×5 pan)? I would not recommending making a bigger 9×5 loaf, this is about as large as you can make it for a loaf (the interior has to slowly bake, it becomes too difficult to achieve with a bigger loaf).
Camilla, I think this might be your best bread yet! I made it yesterday to have on hand for this wintry weekend. I love the taste and texture and it is so easy!
Thank you!
June! I am soooo happy to hear that you made it and love it! Glad you got it baked before the cold weather arrived 😊. It is definitely soup and bread weather!
I tried your buckwheat bread the other week and can’t wait to try this one! Do I need to use finely milled or ground oat flour (the same consistency as store bought)? Or can I just grind my oats in my food processor, which yields a more textured “flour”? Thanks
Hi Danielle! I use my food processor to grind the oats into flour. It does not need to be ultra fine. Hope you like it!
hi! i’m obsessed with your 3 ingredient almond flour muffin – it’s on weekly rotation so thank you for sharing ❤️.
for this recipe, is it possible to sub for psyllium husk powder? if so, what ratio would you recommend.
also , would it be possible to sun the brown rice flour with cassava flour instead?
thank you!
Hi Sk! I am so happy to know that my almond flour muffins are part of your baking routine, whoo-hoo!
You could try with the psyllium powder, but I am not 100% certain of the results. If you try, go by weight (27 g), which is just shy of 7 teaspoons (2 tablespoons plus 1 teaspoon) psyllium powder. I have to had as much success with psyllium powder in larger loaves, but have not specifically tried it with this recipe. I would love to know how it goes for you if you try it!