
This post may contain affiliate links. Please read my disclosure and privacy policy.
This post may contain affiliate links. Please read my disclosure and privacy policy.
My easy multigrain gluten-free sandwich bread is a delicious, nutritious wonder! Throw everything in a blender, pour in a pan, and bake–that’s all it takes to make a sensational loaf of bread. The bread is also vegan, flourless, oil-free, sugar-free, xanthan gum-free, and totally toast-worthy.

Table of Contents
- Gluten-Free Vegan Multigrain Bread
- Recipe Benefits
- Ingredients for Easy Multigrain Gluten-Free Sandwich Bread
- Vinegar Options
- How to Make Vegan Gluten-Free Multigrain Bread
- Step One: Preheat the Oven and Prepare the Pan
- Step Two: Blend the Grains & Water
- Step Three: Whisk in the Remaining Ingredients
- Step Four: Pour Batter into Pan
- Step Five: Bake the Bread
- Step Six: Remove from Pan & Cool
- Slice it Thick or Thin
- What is the texture & taste of the bread?
- FAQ
- How should I store the Easy Multigrain Gluten-Free Sandwich Bread?
- I have flour versions of some (or all) of these grains. Can I use them to make the bread?
- Can I use different grains (in place of the oats, millet or buckwheat)?
- What kind of millet do you use?
- My oven has a convection setting. Should I use it for this bread?
- My bread came out gooey in the middle. Why?
- Can I Use Something Other than Whole Psyllium Husks?
- More Easy Gluten-Free Sandwich Bread Recipes:
- Easy Gluten-Free Multigrain Sandwich Bread Recipe
Gluten-Free Vegan Multigrain Bread
If I am not mistaken, this is my easiest gluten-free vegan sandwich bread recipe yet.
It is also my favorite, to date. Why? Because it is so darn delicious. Add in versatile, filling, and almost foolproof, too.
The almost foolproof part is a result of tinkering with my methods for similar breads, such as my Buckwheat Sandwich Bread, Oat Sandwich Bread, and 100% Millet Sandwich Bread. Could I simplify the steps further? Also, could I make the bread from whole grains without first grinding said grains into flour?
The answers are Yes and Yes! I could not be happier to share the results with you.

Recipe Benefits
This wonderful bread boasts the following:
- Gluten-free
- Vegan (egg-free & dairy-free}
- Flourless (made from whole grains)
- Xanthan gum-free
- Oil-free
- Sugar-free
- Nut-free
- High in fiber (4.6 grams per slice)
- Minimal ingredients
- Easy to prepare
Ingredients for Easy Multigrain Gluten-Free Sandwich Bread
The exact amounts of each ingredient are indicated in the recipe card at the end of the post.

The ingredients for the bread are minimal: a mixture of gluten-free grains, psyllium husk for structure, and a few basic pantry items:
- Rolled Oats
- Buckwheat groats (whole buckwheat)
- Millet
- Whole psyllium husks (not psyllium powder)
- Baking powder
- Baking soda
- Salt (always optional/adjustable)
- Water
- Cider vinegar
Vinegar Options
Any other vinegar–light or dark–can be used in place of the cider vinegar. If you do not have vinegar, or do not use it for dietary reasons, substitute an equal amount of lemon or lime juice.
Also, if you need the recipe to be 100% yeast free, use distilled vinegar or the lemon juice option.
How to Make Vegan Gluten-Free Multigrain Bread
If you can operate the basic functions of your blender and oven, you have the skills to make this bread! Here is how to make your inaugural loaf:
Step One: Preheat the Oven and Prepare the Pan
Preheat the oven to 350F (180C). If your oven has a convection setting, do not use it for this bread. This bread needs to be baked using the regular (convection) heat. More about this in the FAQS at the end of the post.
Spray a 9×5-inch (22.5 x12.5 cm) loaf pan with nonstick cooking spray. Alternatively, lightly oil or grease the pan.
Step Two: Blend the Grains & Water

Place the buckwheat groats, millet, rolled oats, water and vinegar in a blender (high-speed or regular).
Blend on high speed, stopping once or twice to scrape down the sides of the blender container, until the grains are broken down and the mixture is relatively smooth. Pour the batter into a large bowl.
Step Three: Whisk in the Remaining Ingredients
Stir the psyllium husks, baking powder, baking soda, and salt into the batter until completely blended. Use a spatula or large spoon rather than a whisk (the batter thickens quickly and will clump onto a whisk).

Important Note
You may be thinking, hey Camilla, why am I dirtying a separate bowl? Why not add the psyllium and remaining ingredients directly to the blender?
The reason is simple: easy batter removal.
Within moments of adding the psyllium, the batter thickens. A lot. If you blend the psyllium in the blender, be prepared to use your hands to scrape out all of the batter. Cleaning the emptied blender (and my hands, counter and arm) after one of my earlier batches took about 15 minutes. None of us need that.
Trust me. It is worth the extra step and bowl.
Step Four: Pour Batter into Pan
Scrape the batter into the prepared pan. This is super-duper easy since you transferred the batter to a bowl in the previous step (you’re welcome ?).
Smooth out the top of the batter. By the time the batter is in the pan, it will be very thick, like a dough.

Step Five: Bake the Bread
Bake the bread in the preheated 350F (180C) oven for 90 minutes until risen and the surface of the bread appears dark golden brown, dry, and crusty. The bread will also sound hollow when tapped.
Transfer the pan to a cooling rack. Cool the bread in the pan for 15 minutes. Pretty!

Step Six: Remove from Pan & Cool
Remove the loaf of bread from the pan (slide a butter knife around sides, as needed, to assist the release). Place the loaf on the cooling rack and cool completely.
Yes, it is as good as it looks!

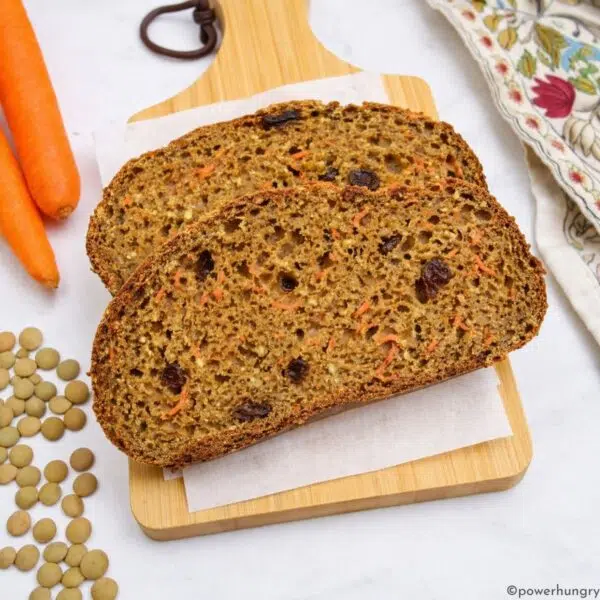
Slice it Thick or Thin
This is, in every way, a hearty multigrain bread. It is sturdy and has very few crumbs when sliced (do make sure it is completely cool before slicing). Slice the bread thick, thin or somewhere in between.

What is the texture & taste of the bread?
First, texture: Blending the grains into a batter results in a bread that is fine-textured yet hearty, coupled with a distinctive, crunchy crust. It is super-filling, too: one slice is very satisfying.
Taste: The flavor of the bread is nutty but mild, all thanks to the combination of grains. I highly recommend toasting slices to bring out the wholesome flavors, as well as to add more crunch.
Spread the bread with sweet and savory fillings and toppings alike. Jam, marmalade, chocolate spread, hummus, nut and seed butter, you name it–everything is delicious on this bread.

FAQ
How should I store the Easy Multigrain Gluten-Free Sandwich Bread?
Store the cooled bread in an airtight container at cool room temperature for 3 days, the refrigerator for 1 week, and the freezer for up to 6 months.
I have flour versions of some (or all) of these grains. Can I use them to make the bread?
Yes! Here is what you need to do to make the substitution(s):
(1) Use the same weight (not volume/cups) of flour in place of the whole grains
I have given cup replacements for using flour in place of grains. However, for the most accurate results, I strongly advise weighing the flour(s) for an exact weight replacement.
| To replace the 1 cup (184 g) buckwheat groats | Use ~1.5 cups (184 g) buckwheat flour |
| To replace the 1 cup (220 g) whole millet | Use 1 cup + 6 Tbsp (220 g) millet flour |
| To replace the 1 cup (100 g) rolled oats | Use 3/4 cup + 1.5 Tbsp (100 g) oat flour |
(2) Skip the blender if using ALL flours
If using flours in place of all grains, skip the blender. Instead, whisk the flours, water and vinegar in a large bowl until blended and then stir in the psyllium, baking powder, baking soda and salt.
If using flour in place of one or two of the grains, prepare the batter in the blender as directed (replacing the grain/s with flour/s).
Can I use different grains (in place of the oats, millet or buckwheat)?
I do not recommend it. The proportion of wet and dry ingredients, as well as the quantity of psyllium husk, is particular to this combination of grains. For the best results, stick with the ingredients and proportions listed.
This does not mean that you cannot experiment! That is what I do almost every day and it can be a lot of fun. It is thrilling when an experiment works out, but you need to prepare for possible disaster.
What kind of millet do you use?
I bring this up for my international readers. In the U.S. and Canada, we pretty much have one millet available, labeled “millet.” It is small and pale yellow. It looks like bird seed because…millet is often used for bird seed (note: do not use seeds designated for birdseed in human recipes ?). The variety available for human consumption is hulled.

North American manufacturers do not specify the type of millet on packages (just “millet“), but various sources indicate that the only millet grown for human consumption in the United States is proso millet. If you have the choice of several millets in your country, opt for proso millet.
My oven has a convection setting. Should I use it for this bread?
No, definitely not. Convection ovens are wonderful for many types of recipes, but not every recipe. Convection ovens excel at quick, crisp cooking. They are not the right choice for long slow baking, and that is definitely the case for this bread.
Convection ovens (or the convection oven setting) can force the outer layer of this bread to rise and separate from the inside of the bread. This will lead to several results: (1) a big bubble under the surface of the loaf; (2) a gooey middle and bottom; and (3) a hard outer crust.
This bread needs the low, slow radiant heat of a conventional oven.
My bread came out gooey in the middle. Why?
The bread should not be gooey at all. But if it happens, possible reasons are as follows:
- Baking in a a convection oven instead of conventional oven. See the section above explaining why this makes a huge difference.
- Inaccurate measurements. Even if you have been baking since forever, it is possible that you mis-measured. It is easy to get distracted for a split second–it happens to everybody! If you measured using cups, I urge using a scale next time around. You will love using the scale to measure once you start.
- Oven temperature is off. I regularly check my oven temperature setting using an inexpensive oven thermometer. Check to make sure the oven is accurate before baking. If the oven is too hot, it can force a faster rise to the bread, leading to a bubble under the top of the loaf.
Can I Use Something Other than Whole Psyllium Husks?
No, for this recipe it must be whole psyllium husks. Other gelling agents, such as flaxseed meal or chia seeds, will not work as direct substitutes (they might work, but it would involve some experimenting to determine their efficacy).
I also do not recommend psyllium powder. It can work as a substitute for the whole husks in some recipes, but for some reason, it does not work well in breads such as this.
Happy baking! I would love to know what you
More Easy Gluten-Free Sandwich Bread Recipes:
- Gluten-Free Buckwheat Sandwich Bread {vegan, no yeast}
- Vegan Gluten-Free Oat Sandwich Bread {oil-free, yeast-free}
- 100% Millet Sandwich Bread (vegan, gluten-free, oil-free)
- Vegan Coconut Flour Sandwich Bread {gluten-free, oil-free}
- 5-Ingredient Lentil Sandwich Bread {grain-free, vegan}
- Chickpea Flour Sandwich Bread {Grain-Free, Vegan, 5 Ingredients}
- Vegan Coconut Flour Flax Bread (Oil-Free)

Easy Gluten-Free Multigrain Sandwich Bread
Ingredients
- 3 and 1/4 cups, 769 mL water
- 1 cup 184 g raw buckwheat groats
- 1 cup 220 g raw millet
- 1 cup 100 grams rolled oats
- 1 tablespoon 15 mL apple cider vinegar
- 1/3 cup 27 g whole psyllium husks
- 2 teaspoons baking powder
- 3/4 teaspoon baking soda
- 3/4 teaspoon salt
Instructions
- Preheat the oven to 350F (180C). Note: do not use convection setting for this bread (see post for explanation). Spray or grease a 9×5-inch (22.5×12.5 cm) loaf baking pan.
- Place the water, buckwheat, millet, oats, and vinegar in a blender container. Blend on high, stopping once or twice to scrape down the container, until smooth.
- Pour the batter into a large bowl. Stir in the psyllium husks, baking powder, baking soda, and salt until blended (it will become very thick).
- Pour the batter into the prepared loaf pan, smoothing the top.
- Bake in the preheated oven for 90 minutes until the surface appears golden brown, dry and crusty. The bread will sound hollow when tapped.
- Cool in the pan, on a cooling rack, for 15 minutes.Remove the bread from the pan and cool completely on the cooling rack before slicing.


I am not gluten free but I love this recipe because of the quality of the ingredients and lack of fillers/preservatives. It was also super simple to prepare. One blender and one bowl-can’t beat it! Thanks for this healthy bread recipe. I look forward to making many more of your recipes in the near future.
That means so much, Tina. thank you! Glad you enjoy good bread–and easy recipes 😉 –as much as I do.
I was able to replace the millet with an equal amount in grams of whole sorghum. It’s not my favorite bread in terms of taste, but the texture is great. Thank you for the recipe. 🙂
That’s excellent, Hiroshi. Thank you, too, for sharing that you had success subbing some of the millet with sorghum. In terms of taste: perhaps you can experiment with different flavorings for the bread (e.g., spices, extract, herbs, savory or sweet) to enhance the taste more to your liking 🙂
This recipe wouldn’t work for me. Vinegar is a fermented product of yeast.
I mention lemon juice as an option for vinegar in the recipe post.
This recipe is amazing! Best GF bread I’ve ever made. Thanks for sharing!
I am SO happy you like the bread, Diane! Thanks so much for taking the time to rate it and let me know. Cheers.
So nice to find a gf bread recipe without the added fillers. I baked the loaf at 350 for 90 minutes and followed directions for cooling. I waited to cut it until it was completely cooled, but still found the lower center to be slightly undercooked. Any suggestions ?
I used a metal 9×5” pan.
The bread was marvelously dense and I can’t wait to toast it tomorrow morning. Thank you so much!
Hi Caryl, I am so glad that you like the bread!
A few reasons why it might have been undercooked near the bottom:
Temperature: since ovens can vary, it could be that with your oven it needs a little bit more time. Perhaps add 10 to 15 minutes longer next time (you can tent the top with foil, as needed, if it starts to get to brown)
Did you cool it in the pan? This can make the bread dense/soggy at the bottom. Take it out of the pan after it is cool enough to handle and cool on a cooling rack.
The leavening might not have full power. You can test baking powder or soda by adding a small amount to a bowl of vinegar. If it fizzes, it’s still active.
I hope one or more of these help! Cheers.
Thank you for this beautiful recipe! I love how you blend the soaked grains with the water in the blender and then add the psyllium husk. The other recipe I tried had me grind the soaked grains in the food processor and it never ground fine enough to make a nice bread. It makes so much more sense to add the water to the soaked grains in the blender, instead of to the psyllium husk! My question is, is it possible to use yeast instead of baking powder? I can no longer use baking powder or soda. Thanks!
Hi Sharlene,
I am so glad you like the method here! I find it so much easier to do it this way, too (I am also trying to make things easier for clean-up, especially!). Regarding yeast: I have not tried it, but I think it could work with the method I use for my Flourless Brown Rice Yeast Bread. (1) Use slightly warm water for the blending (it will get a little bit warmer as you lended); (2) Add about 1 tablespoon of some kind of sugar (maple syrup, coconut sugar, regular sugar) to the blender to feed the yeast (the yeast will eat the sugar); (3) Use 2 and 1/4 teaspoons FAST-ACTING/ INSTANT yeast. Add it to the the blender after eveything is blended and blend to combine. (4) Pout the batter into the prepared pan and let rise 15 to 30 minutes until it is JUST BELOW THE TOP EDGE of the pan (no higher or it will overflow in the oven); (5) immediately place in PREHEATED oven (same temp) and bake as directed. I would love to know how it goes, Sharlene!
Is there any substitute for the millet? Thanks.
Hi Mary! An equal weight of rice (brown or rice) will work.
Is is possible to use steel cut oats instead of the rolled oats? Replacing by weight?
I wanted to make my 4th loaf and don’t have rolled oats! Great recipe!
Hi Bee! Yes, that should work great 🙂 I am also glad you like the recipe!
I made my first loaf and I am truly excited that this is the best bread I have made gluten free thus far. The flavor is good and I could see adding walnuts and honey in the next time. I’m excited to try again but we will enjoy this loaf! Thank you for your dedication to help others get healthy. I even messed this up by adding all flours to blender and it still turned out. It did stick to the glass pan and it took me a little time to get the bread out.
Hi Cynthia! I am so happy you like the bread! Yes, you definitely can customize it with add-in’s, so go for it!
Nonstick parchment paper is a wonder product for lining baking pans to help prevent sticking ????
I am excited to try this new bread recipe. Is it possible to cut back on any of the sodium and still have it rise properly? Do you have any suggestions?
Hi Cynthia! I understand, and yes, I do have suggestions: (1) do not add the salt, eliminating it will not affect the rise at all; and (2) use reduced sodium baking powder. Rumford and Hain brands both making lower sodium baking powders that are excellent. They are not always in stores, but you can order them by mail (or look for them in health food stores, or in the healthy goods section of the grocery store). Cheers!
We love this recipe and I make it weekly. I’m wondering though, if there’s any possibility of making burger buns from it? If you were going to attempt (as I plan to) how might you adjust the oven temp and baking time?
I am so glad you like the recipe, Jen! I am sure you could make this into buns. I would do the same oven temp. You could probably get 8 big buns from the recipe (maybe 10, depending on size). I would try 20 to 25 minutes and check every five minutes after. Also…if you decide to make hamburger buns more regularly, you might consider getting a hamburger bun pan (it sounds odd, but they exist). I do not own one, but have used one at a friend’s home and it was pretty great (I think I need to ask for one for Christmas). Google it–many options exist. Great for getting the perfect shape!
Just made this and it is fantastic. I baked it at 325 but in the recipe notes it says 350 can you clarify which temp? Also is glass dish or tin better ?
Thanks for this amazing easy delicious recipe
So hard to find vegan gluten feee and no added oil bread.
I am definitely going to try your other breads!
Hi Mandy,
Apologies, it is 350F–thanks for pointing out my error, I have corrected it. I am glad it came out fine at 325F! I use glass, ceramic and metal with equal success.:)
This is another delicious and nutritious success! Thank you Camilla for tweaking and playing and sharing these delicious goodies with the wold! 🤗 As a note, my oven is a combined microwave oven, and it works only with convection. So, to work around that, I tested wrapping the bread mold with a sheet of parchment paper and, on top of it, wrap foil paper, to keep everything insulated. It looked like a shiny wrapped gift. 😁 And it worked! So it may be a solution for anyone who wants to make this goodie and has a convection only oven. 🙂
Thank you so much for sharing your most excellent tips, Isabel! And I am so happy you like the bread 😍
Hello,
Thank you for your recipes and their simplicity. If I want to bake more than one bread at a time, should I change temperature or cooking time?
Thank you.
Hi Kristin,
It is definitely better to bake one loaf at a time, for even baking, but if you want to do more than one, I suggest changing their position halfway through baking (put one in the place of the other).You can keep the oven temp the same, but you will likely need to bake longer (I am not sure how much longer, but could be somewhere between 5 to 20 minutes).
Just took my first loaf out of the oven!! It looks and smells FABULOUS. I hope it tastes that good. So easy to make. Thank you for sharing your expertise and talents.
This bread is absolutely delicious! And so simple to make!!
I’ve been using many of your recipes over the last month, as I became aware of several food sensitivities. Pure grace that I found your website that has so many tasty, easy recipes using such diverse ingredients! Who knew chickpea flour had so many uses?
Just tried this bread today and I am so impressed with it! Will definitely become a staple. Thank you so much for all of your effort to provide all of these recipes for us. I very much appreciate you.
Suzanne! I am so happy that you found my site, and thank you so much for the kind words. My sister is visiting and loves this recipe, too, we are planning on making another loaf today–I am thrilled that you love it, too 🙂 Thank you so much for taking the time to post a comment, and a huge welcome to you!
Hi, what if my blender is rather weak, should I first soak the grains?
Hi Gabriele! Yes, you can definitely do that! You can do a quick soak in boiling water for about 20 minutes, or soak overnight. You can use the same water as the soaking water (blend after soaking). If you decide to drain the water, measure the amount you add for soaking before, and after you drain (so that you know how much water was absorbed). Sunstract the absorbed amount from the 3 and 1/4 cups water you add to blend the batter (i.e., if the grains absorb half cup water, add 2 and 2/3 cups fresh water to the blender with the soaked drained grains. 🙂
What would be the change if you only had access to buckwheat flour and not the whole grain?
Hi Elizabeth! Just to be clear–do you mean you have the other whole grains for the recipe, but want to swap in buckwheat flour for the whole buckwheat groats? If that is the case, YES, that should work just fine. Here is what you can do: replace the 1 cup of buckwheat groats (184 g) with 1 and 1/4 cups buckwheat flour (185 g) (I used bobs red mill buckwheat flour for reference). You can add the buckwheat flour to the blender with the other grains, or whisk it in with the psyllium once the blended grains mixture is added to the bowl 😊
Wow! I was not expecting to love this bread as much as I did! I haven’t ever made bread like this from blending the mix of the whole seeds, and then adding in the leavening agents afterward… it worked like a dream! No gumminess at all. I didn’t have millet so I swapped it for raw quinoa, and that worked perfectly well! I will be making this again and again- very easy and fun to make too. Thank you so much!
Ooh, thanks so much for sharing that quinoa worked in place of the millet, Madeline! And just like that, you made this recipe your own 🙂 I am so happy that you love the bread (and yay for bread-making that is fun, right? 😊)
I’ve made a few other buckwheat bread recipes, but the flavor was a little too pungent and the results gooey. The combination of flours in this recipe, however, yields a PERFECT bread! I’ve already made it once and loved it (so did B!) and I’ve just made another. We’re trying to get away from commercially-made breads, for health and the expense. Now I off to go try a few more of your sandwich bread recipes! Brilliant always, Camilla!
Thanks a million, Rebecca 🥰❤️😊
This looks amazing! Is it possible to use whole flax seed instead of whole psyllium husk in this recipe?
Hi Vicky,
Unfortunately, no, flax will not work in the same way as the psyllium in this recipe.
Camilla, this is another great one! Made it for our bread heading to the weekend but we ate roughly 1/3 of it for family dinner tonight. My whole family thanks you!
Wonderful, Neela! Sop glad the family enjoyed it 🙂