
This post may contain affiliate links. Please read my disclosure and privacy policy.
This post may contain affiliate links. Please read my disclosure and privacy policy.
Vegan gluten-free 100% sorghum flour bread is the quick and easy sandwich bread you are craving! This versatile bread is also oil-free, sugar-free, xanthan gum free, and yeast-free.

Table of Contents
- Vegan & Gluten-Free Sorghum Bread (no other flours!)
- What Is Sorghum?
- Recipe Benefits
- Ingredients for Vegan Gluten-Free 100% Sorghum Bread
- Tip: Grind Your Own Flour
- Vinegar Options
- How to Make Gluten-Free Vegan Bread with Sorghum Flour
- Step One: Preheat the Oven and Prepare Baking Pan
- Step Two: Combine the Dry Ingredients.
- Step Four: Transfer Dough to Prepared Pan
- Slice the Bread
- What is the Texture & Taste?
- FAQ
- How should I store the bread?
- Can I use different flours (in place of the sorghum flour)?
- What kind of Sorghum Flour do you use?
- My oven has a convection setting. Should I use it for this bread?
- My bread came out gooey in the middle. Why?
- Can I Use Something Other than Whole Psyllium Husks?
- How Can I Vary the Flavor of the Bread?
- Related Recipes
- 100% Sorghum Flour Bread (vegan, oil-free, GF) Recipe
Vegan & Gluten-Free Sorghum Bread (no other flours!)
You are going to make some incredible toast (plain, or topped with avocado, jam, or nut butter) and sandwiches with this delicious bread. Serve it with your favorite soups and salad and get ready for praise to follow. Go ahead, enjoy every minute of it!
Please set aside any and all negative thoughts, such as “I cannot bake my own bread,” and “gluten-free bread is extremely difficult” or “”gluten-free bread baking requires a laundry list of ingredients.”
Friends, you’ve got this. My easy, single-flour (sorghum!) bread is easy as can be and requires no kneading, no rising, and no patience, either. Mix the dough in five minutes, send it to the oven, and in short order, you have a hearty loaf of whole grain bread.

What Is Sorghum?

You may not be familiar with sorghum, but it has been a staple grain for many cultures over the centuries. It is the fifth most produced cereal crop in the world and is affordable, sustainable, and multi-purpose in its uses.
Sorghum is naturally gluten-free, and rich in both macro- and micro-nutrients. In particular, it is high in fiber and protein and a host of minerals, including iron, magnesium and copper.
Sorghum grains can be cooked in the same way as rice, millet or quinoa, ground into a fine flour, and also popped, like popcorn.
Recipe Benefits
Sorghum flour is a popular gluten-free flour, but it is most often used in combination with other flours for gluten-free baking. This quick sandwich bread relies on sorghum flour alone (no other flours or starches). The bread is all of the following, and more:
- Gluten-free
- Vegan (egg-free & dairy-free}
- Yeast-free
- Xanthan gum-free
- Starch-free (e.g., no tapioca starch, potato starch, corn starch or arrowroot starch)
- No addtional gluten-free flours (e.g., no brown rice flour, almond flour, or gluten-free flour blends)
- Oil-free
- Sugar-free
- Nut-free
- High in fiber (3.9 g per slice)
- Minimal ingredients
- Easy
Ingredients for Vegan Gluten-Free 100% Sorghum Bread
The exact amounts of each ingredient are indicated in the recipe card at the end of the post. Toggle between US Customary (volume) and Metric (weights) for preferred measurement option.

You will only need the following humble ingredients to make this loaf:
- Sorghum flour
- Whole psyllium husks (not psyllium powder)
- Baking powder
- Baking soda
- Salt (always optional/adjustable)
- Water
- Apple cider vinegar (or lemon juice, or any other vinegar you have on hand, or prefer)
Tip: Grind Your Own Flour
If you have a high-speed blender, or a small electric coffee grinder, you can grind your own flour from whole sorghum in little time.
For best results, use a high speed blender or grain mill to process the grains into flour. It will only take about a minute, total. You can also use a coffee grinder. However, you will need to grind about 1/4 cup at a time (it goes quickly). Place any extra flour in an airtight bag or container and freeze until next time.
Food processors do not work well for grinding whole sorghum into fine flour. At best, the processor will produce a rough meal.
Vinegar Options
Any other vinegar–light or dark–can be used in place of the cider vinegar. If you do not have vinegar, or do not use it for dietary reasons, substitute an equal amount of lemon or lime juice.
How to Make Gluten-Free Vegan Bread with Sorghum Flour
Note that the complete directions are also in the recipe card below.
Good news: this is more than a great recipe, it is an easy recipe!
Step One: Preheat the Oven and Prepare Baking Pan
Preheat the oven to 350F (180C). Grease or spray (with nonstick coking spray) a 9×5-inch (22.5 x 12.5 cm) loaf baking pan.
If you would like to keep the bread 100% oil-free, line the pan with parchment paper (preferably nonstick parchment paper), leaving an overhang on opposite sides for easy removal of the bread loaf after baking.
Important Preheating Tip
It is important to have the oven fully preheated, and the pan prepped and ready to go, as soon as the bread dough is mixed. The baking soda and baking powder are activated as soon as wet and dry ingredients are combined. If the dough is left to sit, even for a few minutes, the bread will not rise properly. So get the dough in the pan, and then the pan in the oven, immediately after mixing.
Important Tip About Convection Ovens
If your oven has a convection option, I recommend that you do not use it for this bread. This bread needs to be baked using the regular (conventional, radiant) heat setting. More about this in the FAQS at the end of the post.
Step Two: Combine the Dry Ingredients.
In a large bowl, whisk the sorghum flour, whole psyllium husks, baking powder, baking soda and salt until blended.

Step Three: Add the Wet Ingredients
Add the water and vinegar directly to the bowl with the whisked dry ingredients. Stir until completely combined and no dry ingredients are visible in the bowl.
The psyllium husks will activate very quickly, soaking up some of the added liquid, and thickening the dough.

Step Four: Transfer Dough to Prepared Pan
Scoop the bread dough into the prepared baking pan. Use a spoon or silicone spatula to smooth and even out the top of the dough.
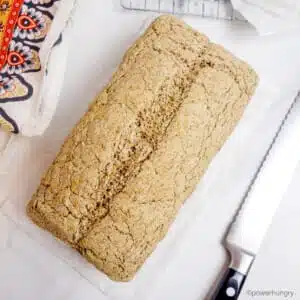
Using a sharp knife, cut a lengthwise slash (about 1/4-inch deep) across the top of the loaf.

Step Five: Bake the Bread.
Bake the bread in the preheated 350F (180C) oven for 85 to 90 minutes until risen and the surface of the bread is a pale golden brown, dry, and crusty.

Let the bread cool, in the pan, on a cooling rack for 15 minutes.
Remove the bread from the pan and cool the loaf completely on a cooling rack.

You did it! You have a beautiful loaf of vegan gluten-free bread, ready and waiting for toast, sandwiches, and all-around gnoshing.
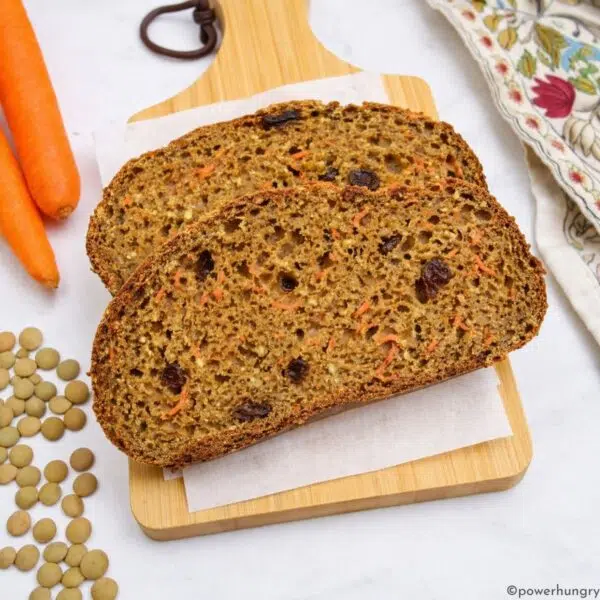
Slice the Bread

This is a sturdy bread, with minimal crumbs. You can slice it thick or thin, as you desire.
What is the Texture & Taste?
First, texture: This is a hearty, firm bread with a crisp crust. It reminds me of a light whole wheat bread.
Taste: The flavor of the bread is mild and toasty. The flavor, like the texture, reminds me of wheat bread. The bread is great with sandwiches of all kinds (sweet and savory). I love the bread toasted, with nut or seed butters, hummus, vegan cream cheese, jam…you name it.
The bread is a great accompaniment to dinners and lunches, too. It is wonderful with soups, stews and salads.

FAQ
How should I store the bread?
Store the cooled bread in an airtight container at cool room temperature for 2 days, the refrigerator for 1 week, and the freezer for up to 6 months.
Can I use different flours (in place of the sorghum flour)?
I do not recommend using any other flours besides sorghum flour in this particular recipe. The proportion of wet and dry ingredients, as well as the quantity of whole psyllium husks, is particular to the sorghum flour.
However, I have many other sandwich bread recipes that are similar to this one that use different flours. Below are links to a few of them. The breads are made with buckwheat flour, oat flour, millet flour. I even have a high protein sandwich bread that has no grains at all (it is made with sunflower seeds and red lentils!).
- Gluten-Free Buckwheat Sandwich Bread {vegan, no yeast}
- Vegan Gluten-Free Oat Sandwich Bread {oil-free, yeast-free}
- 100% Millet Sandwich Bread
- Easy High Protein Sandwich Bread (4 ingredients, V, GF, Oil-Free)
What kind of Sorghum Flour do you use?
I bring this up for my international readers. In the U.S. and Canada, there is only one type of sorghum flour available. It is simply labeled “sorghum flour.” It is pale in color and looks like all-purpose flour.
If you live in a country where multiple varieties of sorghum flour are available, I suggest choosing an option that is light in color.

Do Not Use Amaranth Flour. Also note, in particular, that some countries categorize sorghum and other grains broadly as “millet,” even though they are not, in botanical terms, millet. For best results, opt for flour that is specifically labeled as sorghum flour.
My oven has a convection setting. Should I use it for this bread?
No, definitely not. Convection ovens are wonderful for many types of recipes, but not every recipe. Convection ovens excel at quick, crisp cooking. They are not the right choice for long slow baking, and that is definitely the case for this bread.
Convection ovens (or the convection oven setting) can force the outer layer of this bread to rise and separate from the inside of the bread. This will lead to some, or all, of the following results: (1) a big bubble under the surface of the loaf; (2) a gooey middle and bottom; and (3) a very hard outer crust.
This bread needs the low, slow radiant heat of a conventional oven.
My bread came out gooey in the middle. Why?
The most likely reasons are the following:
- Baking in a a convection oven instead of conventional oven. See the section above explaining why this makes a huge difference.
- Ingredient measurements are off. For best results, weigh the ingredients. It is very easy to mis-measure flour, in particular, with cup measurements.
- Oven temperature is off. I regularly check my oven temperature setting using an inexpensive oven thermometer. Check to make sure the oven is accurate before baking. If the oven is too hot, it can force a faster rise to the bread, leading to a bubble under the top of the loaf.
Can I Use Something Other than Whole Psyllium Husks?
Alas, no, it must be whole psyllium husks. Other gelling agents, such as flaxseed meal or chia seeds, will not work as direct substitutes (they might work, but it would involve some experimenting to determine their efficacy).
You should be able to use an equal amount (by weight, not volume) of psyllium powder. I have not tested the bread with psyllium powder.
How Can I Vary the Flavor of the Bread?
Consider adding dried herbs or spices to the bread to vary the flavor. For example, 1 to 2 tablespoons of dried Italian herbs or herbes de Provence or 2 to 3 teaspoons of ground cumin, curry powder, garlic powder, or onion power.
You can also add:
- chopped nuts or seeds (up to about 2/3 cup, total)
- sweetener, such as maple syrup or coconut sugar (up to 1/4 cup)
- Sweet spices (such as cinnamon, cardamom, or ginger)
Happy baking!

Related Recipes
100% Sorghum Flour Bread (vegan, oil-free, GF)
Ingredients
- 3 cups 420 g sorghum flour (see tip to grind your own)
- 1/3 cup 27 g whole psyllium husks
- 2 and 1/2 teaspoons baking powder
- 3/4 teaspoon baking soda
- 3/4 teaspoon salt
- 2 and 3/4 cups, 651 mL water
- 1 tablespoon 15 mL cider vinegar (see notes for options)
Instructions
- Preheat the oven to 350F (180C). Note: do not use convection setting for this bread (see post for explanation). Spray or grease a 9×5-inch (22.5×12.5 cm) loaf baking pan (or line with parchment paper to avoid all oils).
- In a large mixing bowl, whisk the sorghum flour, psyllium husks, baking powder, baking soda and salt until blended.
- Add the water and vinegar, stirring until combined and no dry ingredients are visible.
- Transfer the dough to the prepared pan. Smooth the top into an even layer.
- Using a sharp knife, make a lengthwise slash into the dough (about 1/4-inch deep).
- Bake in the preheated oven for 90 minutes, or until the surface appears pale golden brown, dry and crusty. Cool in the pan, on a cooling rack, for 15 minutes.
- Remove the bread from the pan and cool completely on the cooling rack before slicing.


Hi, wondering if the psyllium can be replaced with anything? Thanks! Looking forward to trying this!
Hi Lauren! While there is not a simple sub for the psyllium in this particular recipe, I am confident that you can use an equal weight of sorghum flour in place of millet flour in my 3-ingredient Millet Flax Bread (no psyllium, still a great, heart, super simple loaf). Cheers 😊
Gf, dairy-free, sugar-free perfection. Followed recipe exactly. Loaf came out moist, easy-to-slice, rich-tasting. Marvelous with butter! We ate fresh & hot after the cooling period. Looking forward to having it as toast tmw!
Pleasantly surprised at the flavor! Both hubby and I tasted hints of a light popcorny flavor. SO GOOD.
I used Bob’s Red Mill stone-ground non-GMO sorghum flour, Whole Foods 365 organic whole flakes psyllium husk, Bragg’s organic apple cider vinegar.
I used Mom’s method of coating the loaf pan (I used Corningware) w/ non-liquid fat (I used beef tallow & Trader Joe’s cultured butter) topped with gf flour. Loaf slid right out after baking.
I understand elevation & humidity can impact baking outcomes. I’m at around 300’ elevation, and today was humid.
This will be on my baking list on a regular basis! Thanks bunches for this amazing, EASY recipe!!
Linda, I am so thrilled to know youn love the recipe! That you so much for sharing your detailed notes of how you made yours, including the high altitude adjustments. Enjoy! 🙂
Very happy with this. I like using sorghum, I have no reactions to it. This was very easy and will be versatile for my needs. Thank you!
I’m so glad you like the bread, Diana!
Great achievement! I am a sorghum advocate. I am a Ghanaian, a brewing scientist. I brew world-class beers with 100% locally cultivated and malted sorghum. In addition to beer brewing with sorghum, I intend to promote baking bread with 100% sorghum flour. Many thanks for the recipe!
Oh wow, that is high paise indeed, Clement, from someone who is so familiar with sorghum (such a great grain!) I am fascinated to hear about sorghum beer, I am going to look it up after I type this reply). All the best 🙂
I loved the bread. I used psyllium powder and adjusted accordingly. I also used oregano, basil, garlic & onion powder, pumpkin seeds and sunflower seeds. My husband loved it! It was beautiful and held its shape when sliced. Definitely will make again! Thank you!
I am so happy to hear that psyllium powder worked well, Carol, thank you for sharing that 🙂 What a scrumptious loaf, I love the sound of those additions. Glad your husband gave a thumbs up, too!
Hi, Carol. I was looking for this exact information! I only have psyllium powder where I’m at. How did you adjust it in thus recipe? Much, much thanks!
This turned out great. I had been making another gf bread, but I only had sorghum flour available ant my house. This bread is less fussy, slices bettter, and tastes very good. Even my husband liked it. It’s a definite keeper for me. I love how sliceable it is and easy to make. Thank you! 😊
That’s great, Kim, glad to know it was a success! Enjoy!
After failing on the chia bread and then the split pea rolls being way too strong, I am really enjoying this recipe as both the texture and taste are excellent. Thank you so much. 🙂
Hooray, third bread is a charm. So glad you are enjoying the bread 🙂
Oh my goodness this bread is delicious and not fussy at all. I baked it Friday morning and tasted a small slice of the “bum” end and liked the taste. Saturday morning I cut it in half and then into slices (10″ skillet) and it held together wonderfully! It crisped up perfectly in my 400 degree oven for 15 minutes and maintained a chewable center. This is the easiest, most foolproof and tasty GF/vegan bread I have made!!
I baked it in a 10″ preheated and parchment lined cast iron skillet on the bottom rack for 70 minutes. I thought the dough would be thicker and I could shape it, not so and it took it’s shape from the skillet. This is definitely going to be in my rotation of breads. I will borrow a loaf pan from a neighbor and try it that way for comparison in ease and outcome.
Thank you again for absolute DELICIOUSNESS!!!
Natalia! I am SO glad you waited to get enough sorghum flour to make the recipe as written, AND that you made it in the cast iron skillet :). I am delighted that you like it so much, it’s a favorite for Mel, too. I am going to make it in a cast iron skillet next time I make it, too. Thank you for sharing your tips about how you made yours. Cheers 🙂
I made this a second time using a loaf pan. I like the loaf shape and that I get 2 true heels from the loaf. The best part of any loaf of bread! The dough seemed a little drier this time. I followed the recipe and weighed the ingredients with an addition of 1/2 tsp fennel and 1/2 tsp caraway seeds. Regardless, the result was a success! Nice crust, moist crumb and slices wonderfully. It’s good sliced but better toasted and crunchy!
Yum, yum!!
Oh, that sounds SO good, Natalia! I love the flavor of fennel, caraway and all licorice vegetables and seeds, so I am going to have to try that in my next loaf. I am with you on the toasted and crunchy 🙂
Thanks Camilla. I know coconut flour is a moisture hog and makes modifications screwy. I purchased more sorghum so I can make the recipe as written. I’m looking forward to seeing how it turns out. Tomorrow is the day of making magic happen I hope. 🤞
Stay tuned….
I hope that it all goes well, Natalia!
Oh goodness!! I was a little late in. y baking endeavor, but I finally tackled it last night and was not disappointed. The dough was wetter than I thought so of course nothing to shape and it took on the form of the parchment lined skillet. I baked it on the bottom rack for 70 minutes until the crust was golden and a toothpicks pulled clean.
I sampled the “bum” end after it had cooled and it was tasty. This morning, I toasted it for 15 minutes in a 400 degree oven. When sliced it held firm and crisped up so wonderfully. This is now a go to and one of the best GF, vegan breads I have made!! I’m curious how different it would come out in a loaf pan. I’ll have it to try that next time and share the yumminess with whomever I borrow the time from.
Thank you!!!
So glad it was a success, Natalia!!!
Me again. It turns out that I only have 2 cups of sorghum flour. I also have arrowroot, tapioca, coconut and black sesame seed flours. Will any of those work for the shortage of the sorghum? 🙏
Hi Natalia,
I know for certain that coconut flour will not work (it needs to be used in drastically different measurements compared to grain flours). Arrowroot or tapioca might work, but I cannot know. I have never used black sesame flour. Replacing 1/3 of the total flour is a major change. I suggest either waiting until you have all of the sorghum flour or making a smaller loaf (reduce all of the ingredients by one third).
Thanks Camilla. I know coconut flour is a moisture hog and makes modifications screwy. I purchased more sorghum so I can make the recipe as written. I’m looking forward to seeing how it turns out. Tomorrow is the day of making magic happen I hope. 🤞
Stay tuned….
Hi Camilla and thanks for your wonderful recipes. Is this a runny dough that needs to be baked in loaf pan or is it thick enough to be “shaped” and baked in a cast iron skillet ?
Hi Natalia,
You can definitely bake this in a skillet, I think you would get a beautiful bake. I am guesstimating you will need to reduce the cooking time by maybe 20, perhaps even 30 minutes because of hte excellent head conduction from the skillet and increased surface area/ thinner loaf.
Thanks, I’ll let you know how it turns out!
I made this in a muffin tin, dividing into 10 small breads. 1 hour baking. I love it! Thank you.
So glad you like it Emma, and thanks for sharing how you made it in a muffin tin ☺️
Can we turn this recipe into buns for burgers?
Hi Anisa,
Yes, although the bread is a somewhat crusty, so the buns would likely be a little bit crusty (I like toasted buns–some texture, not super soft buns– myself, so that might be ok with you :)) . I would divide into 6 large or 8 medium pieces and shape into mounds on a parchment paper lined baking sheet. Use damp hands to shape and smooth the mounds into bun shapes. Baking time: guesstimating 45 to 50 minutes? I would love to know how it turns out if you try it!
Why is a lengthwise slash needed in this bread?
Hi SD,
Good question! Making a slash allows the loaf to burst at the slash when it expands in the oven, resulting in an even loaf (good for even browning and symmetrical slices once cool). You can choose not to slash, but the the bread it will burst at the weakest point (could be off to one side or one end, leading to a bulge in the loaf). It will taste great, but not as pretty, and it could become overly brown at the burst spot. Cheers.
Thank you! I made this bread yesterday and it came out beautifully. The taste and texture is very different from other flours I use but consistent with gf baked items, but nevertheless, it was delicious to me.
That’s wonderful, SD! Thank you, and so glad you enjoyed it.
Hi there, first, thank you for sharing this bread recipe. What a journey it’s been to find a GF, Vegan bread recipe that didn’t contain yeast. I’ve now made 3 loaves over the last 2 months.
My question is, do you have a recipe for vanilla cupcakes that, similarly, is dairy free, egg free and would allow me to use a natural sweetner?
April, I am so glad you are enjoying the sorghum bread! Yes, I do have a vanilla cupcake recipe that I love (I developed it many years ago). It is vegan, grain-free and gluten-free. Cheers! Here it is: https://www.powerhungry.com/2014/03/08/vegan-coconut-flour-vanilla-cupcakes/
I was given a bag of sorghum flour and on top of what I already had, it made for just too much to have hanging around. This fit the bill, used just sorghum, didn’t use yeast so I didn’t have to run to the store or allow for rising time. It was super quick to mix up and bake. It was tasty and had a decent rise.
Denette, I am so happy you found the recipe to use up your sorghum flour surplus :). Always a bonus when no extra runs to the store are needed. Glad you liked it!
Am I missing something? 2 and 3/4c. water to 3c. flour makes it soupy.
Hi Karla,
It’s all about the psyllium husks. They soak up the liquid and provide the essential structure to the bread. The dough is not soupy at all. Cheers.
Oh I see. I googled to look for a substitute for psyllium husks since I didn’t have any. It didn’t work! Sorry. I’m getting some husks! Thank you for your answer!
No problem, Karla! It would be hard to know what the psyllium husks are like if you haven’t used them. They are really great for GF breads 🙂
Hiya, I’ve sent an comment the other day, about conversion of this fab bread to make in bread maker….Is it possible? Can you please help with this? It would be so interesting if this can be successfully made in the bread maker! Thanks, Anna
Hi Anna,
I have not tried it in a breadmaker. You might want to mix it separately (it only takes a few minutes) and use the bread machine to bake only so that you can set the time, if your bread machine allows for that. Since this is a more unusual bread, I am not sure how it would fare on any of the standard settings (where it is mixed and then baked). But you could certainly experiment and see!
Wonderful bread! I enjoy working with sorghum flour but have always used it in blends with other flours. This is a delicious earthy loaf, great for rustic toast and very filling.
So glad you like sorghum flour for baking, too, Sasha! I am right with you on the hearty toast 🙂
I want try this bread! It’s so hot here instead of using full size oven do you think this would work in a toaster oven (air fryer and other bells and whistles)?
Hi Maria,
I think if you have had success with baking breads in your toaster oven that this recipe should work also. But I would suggest using smaller pans, or perhaps a muffin pan.
I just love this bread! I usually make your buckwheat sandwich bread, but then sweetness and light crumb texture of the sorghum flour won me over. Yummo! Awesome recipe.
Wow, that is high praise, Laurie! So glad that you are loving the bread 🙂
Just wanted to thank you for your simple Sorghum & Millet bread recipes. Am avoiding seed/oils – these recipes fit the bill and are delicious and easy to make. Am also gluten-free so these recipes have
given me bread again! I use sprouted sorghum and millet flours (purelivingorganic.com) – absolutely
no digestive issues!
THANK YOU!!!
Came out great, really good flavor. It makes superb toast, too.
Hi!
I want to share my new experience. I allowed myself to slightly change the recipe: instead of psilium, I took fiber (meal) of flax seeds in the same proportion. Why flax? Because it absorbs water in the same way as psilium and retains it in itself. It turned out to be tastier (that’s what my wife said). In a previous comment, I said that I baked small buns according to this recipe. It’s actually a silicone cupcake mold. I make a little bread from sorghum flour for my wife, and I and our two children eat ordinary bread, which I also bake myself and add milk thistle meal, pumpkin seed meal, hemp meal and others to it.
Nick, thank you so much for sharing your adaptation!
Hi there!
I used this recipe, but I reduced the ingredients to try it.
In addition, I did not have whole psyllium, but its powder.
I somewhere found the ratio of whole psyllium and its powder in terms of moisture absorption, and the powder absorbs twice as much.
I also didn’t use baking powder because it contains wheat flour.
The recipe itself does not indicate the amount of water, but experimentally I determined that this recipe needs about 100 ml, it depends on the flour.
In the end, by scaling down the recipe, I ended up with six small buns that were delicious for a gluten-free meal.
Hi Nick,
I’m so glad that you like the recipe and were able to scale it to meet your needs. Two quick points: the recipe does indicate the amount of water needed. It is 2 3/4 cups, listed right after salt in the list of ingredients. I am glad you were able to figure it out on your own, though second, baking powder: baking powder does not contain wheat flour . Most commercial baking powder contains bicarbonate of soda and cream of tartar, and some starch such as cornstarch to prevent caking. The link I have in my post is for a gluten-free grain, free baking powder that uses tapioca starch instead of cornstarch. All the best.
Amazingly it works. I had sorghum flour in the cupboard awaiting use. I really thought it would either not rise or fall to bits but no, easy to cut with a firm top and bottom and whilst a slightly bitter after taste, I am super happy. It was still moist the day after baking, so a good sign. Will be making this bread again. Had to look up what my stove symbols were haha but found the convention oven version so also learnt something new about my oven. Thanks so much for recipe
I am thrilled to hear it was a success eating GDF! How wonderful! Thank you for giving it a try (despite the doubts) and then taking the time to post a comment. 🙂
Any idea how much 1teaspoon of baking powder weigh on grams?
Hi Sheetal, most sources state that 1 teaspoon of baking powder is 4.8 grams (round up to 5 grams for most kitchen scales)
This bread is wonderful!!! Thank you. I add some Italian seasoning occasionally and it adds a nice flavor. I’ve also used buckwheat flour in place of sorghum and it’s delicious!
Ooh, that sounds great, Kerri! And thank you for sharing that you had success making this with buckwheat flour. I am going to try that tomorrow!
I just wanted to say this recipe is AWESOME! I adjusted it to use cream of tartar in place of the vinegar and it worked great. I follow a low-histamine diet and this has been the first bread that I’ve made that has actually risen and formed similar to a normal loaf. It is so tasty too. THANK YOU!
Oh gosh, Grace, that makes me so happy to know that this works with your diet, and that you like it so much! Thanks for sharing that you had success with subbing cream of tartare for the vinegar–much appreciated!
Why here you instruct to add the psyllium to the dry ingredients while in the millet version must be added to the water? Thank you
Hi Francesca,
I developed these recipes two years apart (the millet bread in 2021, the sorghum bread in 2023). After experimentation with multiple breads I found that it can work to add the psyllium husks directly to the dry ingredients (it is easier than mixing in a separate psyllium gel). Also, not all grains/grain flours (especially gluten-free flours/grains) work exactly the same. I have not tried the same method (adding psyllium to dry ingredients) with the millet bread. You are welcome to try to, it will probably work, but I have not put that as an option since I have tested it (to know that it works as an option).
We LOVE this bread in our family, and I LOVE that it is simple and easy to make!
I put some coconut milk powder in to give it a different flavor, even though it tastes good without.
Looking forward to a psyllium-free version of the same bread!
Thanks for all your lovely recipes!
I am so happy to hear it, Diane! A psyllium-free version is in progress 🙂
I’ve used many of your recipes before and have enjoyed most of them; this, however, is not one of them, I’m afraid. I hadn’t read over the ingredient list carefully before I started; when I came to see that the recipe called for 2 1/2 tsp. of baking powder and 3/4 tsp. of baking soda, I was very concerned, but went ahead with the recipe anyway. The bread rose nicely, and cooked well…but all that powder and soda DEFINITELY left an unpleasant taste! And for me it also makes it impossible to eat even a full slice of bread! It gives me so much gas!
I wonder if you experimented with smaller amount of these ingredients. I use another gf, yeast-free, oil-free recipe from Elavegan all the time (it has different flours) and it has much less of the same for similar quantities of flour (1tsp. baking powder and 1/2 tsp baking soda). She also uses less psyllium (3Tbls instead of 1/3 c.). I wonder how you came up with these amounts?
Thanks for your tireless dedication to give people like myself (Celiac) tasty and easy recipes! I hope this input might help a little!
Hi Michele,
I am so sorry the bread was not to your liking. I am wondering if ,perhaps, you forgot to add the vinegar? The tablespoon of vinegar neutralizes (literally) the baking soda and baking powder. Without it, there would be the strong flavor you describe. This amount of leavening is not unusual for a sandwich bread made with 420 grams of flour. 1 teaspoon baking powder per cup of flour is a well used standard in baking. Yes, I do test a variety of leavening amounts. Vegan gluten-free breads require a lot of testing–they often need an extra boost of leavening in the absence of gluten or eggs.
The recipe you mentioned from Ela’s site is quite different from this one. Leavening amounts will vary according to the flours used and the shapes. Her recipe has less flour than this one (300 grams; this one has 420 grams, a third more) thus requiring more leavening. Hers is also a free-form loaf, not a sandwich loaf (the latter is meant to rise higher). All of these elements factor into the design of a recipe.
Last, regarding the psyllium husk: my recipe actually uses less psyllium than Ela’s recipe. Yes, she only uses 3 tablespoons, but she is using ground psyllium husk powder. I use whole psyllium husks. 3 tablespoons of ground psyllium is 30 grams , as she notes; 1/3 cup of whole psyllium husks is, as I note, only 27 grams. Cheers!
Hi Camilla! I just got a “nudge” to share here a rice bread recipe that I found and have been making ever since. It doesn’t use flours or gums, it uses rice grains (I use risotto rice), oil, salt, sugar (which is optional) and yeast. It makes for an amazing soft bread with a neutral taste, it’s pretty customizable as well, which I would love to see what you come up with to tweak it. 🙂 The recipe I found on YouTube, and since I don’t know if I can share links here, I’ll share the name of the video, it’s called “Best GLUTEN FREE Blender Bread – SIMPLE CHEAP FAST” by a channel called “Tinkery Topics”. Since you have so many people following your blog who can’t use gums or psyllium, this might be very helpful to everyone. Besides being a delicious and incredibly easy recipe, that I know you can make even more streamlined. 🙂 Hugs!
Thanks so much for the share, Isabel, I will check it out!:)
This bread is good. I added some grated zucchini and onion, which I squeezed the moisture from, as well as some herb and a little vegan cheddar cheese. Few toast it and then cubed and dropped into some soup, delicious!
Thank you,
Trina
I am so happy you like the bread, Trina! Your savory zucchini variation sounds incredibly delicious ❤️
I am highly allergic to psychilum what can I use in place of it?
Hi Terry! I suggest trying my 3 ingredient Chia millet bread. I specifically created it in response to readers who wanted to make my millet bread recipe, but have allergies to psyllium. I have not tested it with sorghum flour, but it millet flour is similar in flavor (and cheaper!) I will test it with sorghum flour soon, but you could experiment and replace the millet flour with an equal weight of sorghum flour. Here is the link: https://www.powerhungry.com/2023/01/16/3-ingredient-chia-millet-bread-v-gf-oil-free/
@Camilla,
Thank you for the recipe. I added some things and substituted some things in the recipe. I added finely chopped pecan nuts, chia seeds, and blue agave nectar. I substituted lime juice for the apple cider vinegar because I thought it might taste better. I forgot to score it down the middle, so it might turn out a bit moist. It has about half an hour yet to bake, but the aroma is great.
I will do a follow up post about how it turns out.
Ooh, that sounds delicious, Scott!