
This post may contain affiliate links. Please read my disclosure and privacy policy.
This post may contain affiliate links. Please read my disclosure and privacy policy.
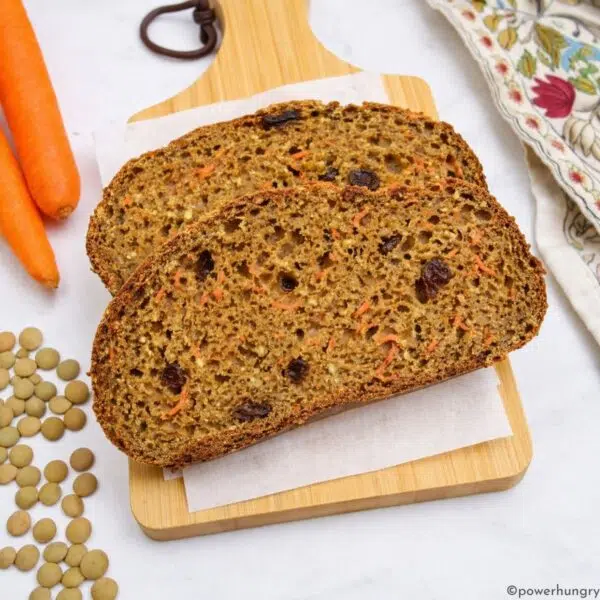
Quick and easy 3 ingredient buckwheat flour protein bread, with 6 grams protein per slice! Perfect for toast, sandwiches, and snacking, it is quick & easy to make, vegan, gluten-free, oil-free, & yeast-free.

A slice (or two) of hearty bread is my favorite snack, breakfast, lunch, dinner…you get the idea 😊. I love bread any time of day.
I am content gnoshing unadorned slices, but I am delighted when I take an extra minute or two to prepare avocado toast, slather on some almond butter (maybe with some chopped chocolate, or berries, or both), or make a sandwich with assorted leftovers.
Good bread means good eating, guaranteed.
Case in point, this 3 ingredient buckwheat flour bread. You do not need to soak or ferment buckwheat groats, or add other gluten-free flours, to make it. It is 100% buckwheat flour, with nothing more than flaxseed meal and water for the batter, and baking powder for the rise.
It also boats a whopping six grams of protein and six grams of fiber per slice!
Table of Contents
- 3 Ingredient Buckwheat Bread Benefits
- Benefits of Buckwheat & Buckwheat Flour
- Ingredients
- Tip: Grind Your Own Buckwheat Flour
- Step by Step Directions
- Step One: Preheat Oven and Prepare Baking Pan
- Step Two: Mix the Dry Ingredients
- Step Three: Stir in the Wet Ingredients (Water)
- Step Four: Transfer Batter to Pan
- Step Five: Bake the Bread
- Cut into Slices
- What is the Texture & Taste?
- Storage
- Substitutions FAQ
- My Bread Is Gooey in the Middle. Why?
- Variations of 3 Ingredient Buckwheat Flour Bread
- Related Recipes
- Buckwheat Flour Protein Bread Recipe
3 Ingredient Buckwheat Bread Benefits
- High protein (6 grams per slice)
- High fiber (6 grams per slice)
- Gluten-free
- Vegan (egg-free & dairy-free}
- Yeast-free (no instant yeast or other yeast needed)
- Oil-free
- Xanthan gum-free
- Psyllium-free (no whole psyllium husks or psyllium husk powder / psyllium powder)
- Sugar-free
- Nut-free
- No starches (e.g., no cornstarch, arrowroot or tapioca flour)
- Only 3 ingredients (plus water & optional salt)
- Easy to make and bake
Benefits of Buckwheat & Buckwheat Flour
Buckwheat is one of the oldest crops in the world and is naturally gluten-free. Despite the misleading name, buckwheat has no relationship to wheat at all; it’s actually a fruit seed (related to rhubarb), not a grain.
Buckwheat is very nutritious. Like quinoa, it contains a full spectrum of essential amino acids, making it one of the few vegetable sources (and of of only a few whole grains / pseudograins) of complete protein that equals the protein of fish or meat in quality.
Ingredients
The exact amounts of each ingredient are indicated in the recipe card at the end of the post. Toggle between US Customary (volume) and Metric (weights) for preferred measurement option.

To make this simple gluten-free buckwheat bread recipe, you will need:
- Buckwheat flour
- Flaxseed meal (ground flax seeds)
- Baking powder (certified gluten-free, as needed)
You will also need some water (I use filtered water from my tap) to make the batter. Salt is optional, but I recommend adding it, if you eat salt.
Tip: Grind Your Own Buckwheat Flour
If you have a high-speed blender, or a small electric coffee grinder, you can grind your own flour from whole buckwheat groats
High speed blenders will turn buckwheat groats into buckwheat flour in about a minute. If using a coffee grinder, you will need to grind about 1/4 cup (maximum) at a time. Place any extra flour in an airtight bag or container and freeze until next time.
Food processors do not work for grinding buckwheat groats into fine flour; the groats are too hard to be broken down by the food processor blade.
Step by Step Directions
Note that the complete directions are also in the recipe card below.
Step One: Preheat Oven and Prepare Baking Pan
Preheat the oven to 350F (180C). Prepare a 9×5-inch (22.5 x 12.5 cm) loaf pan by lining with parchment paper (to prevent the bread from sticking to the pan/ loaf tin). If you do not need the bread to be 100% oil-free, you can spray (with nonstick cooking spray) or grease/oil the sides.
Step Two: Mix the Dry Ingredients
Whisk the buckwheat flour, flaxseed meal, baking powder and optional salt in a large mixing bowl until blended.
Step Three: Stir in the Wet Ingredients (Water)
Add the water to the bowl of dry ingredients. Use a rubber spatula or large wooden spoon to stir and blend with a spatula until completely combined into a thick batter.

Step Four: Transfer Batter to Pan
Working quickly (you want to get the bread into the oven as soon as possible), transfer the batter to the prepared baking pan. Use a spoon or spatula to spread the batter evenly and smooth the top.
Using a sharp knife, make a lengthwise slash through the batter (at least 1/2-inc/1 cm deep).

Step Five: Bake the Bread
Bake the bread in the preheated oven for approximately 65 to 70 minutes until risen, the surface of the bread is golden brown and cracked, and a skewer inserted near the center of the bread comes out clean.
Let the bread cool, in the pan, on a cooling rack for 15 minutes. After 15 minutes, remove the bread from the pan and cool the loaf completely on a cooling rack.

Cut into Slices
Once completely cool, cut the bread into slices. Note that the bread may crumble at the edges if not completely cool before slicing.
Slicing Tip: Chill the Bread
For the easiest slicing, I like to completely cool the bread and then chill it until cold. It is much easier to slice the bread without any crumbs. The bread can be sliced very thin when cold, too!

What is the Texture & Taste?
Texture: This is a firm, filling loaf, with a dense crumb and crisp-tender crust edges.
Taste: The flavor of the bread is a lot like whole wheat bread, with a deeply nutty flavor. It is equally delicious with sweet and savory spreads, fillings and toppings.
Storage
Store the cooled bread in an airtight container at cool room temperature for 2 days, the refrigerator for 1 week, and the freezer for up to six months.

Substitutions FAQ
- Should I use light buckwheat flour or dark buckwheat flour for this 3 ingredient buckwheat flour bread? Either! The photos for the post are with light buckwheat flour. I love both the light and dark flours (dark buckwheat flour has a slightly stronger, nutty flavor).
- Can I swap in a different gluten-free flour (in place of the buckwheat flour)? No, I do not recommend replacing the buckwheat flour with other gluten free flours or blends. The proportion of wet and dry ingredients is particular to buckwheat flour. I have many (MANY!) more easy, minimalist, vegan, gluten-free bread recipes here on power hungry. Type “bread” or “sandwich bread” into the search engine for options.
- Can I use chia seeds in place of flaxseed meal? Yes, but grind the chia seeds into a meal (similar to flaxseed meal). Use an equal weight of chia seed meal as flaxseed meal.
My Bread Is Gooey in the Middle. Why?
- More baking time needed. It may be as simple as the bread needing more baking time.
- Ingredient measurement issue. Weighing flours is the best way to ensure accurate results. But mis-measurement can also occur at times for simple reasons, such as distraction (it happens to all of us).
- Oven temperature is inaccurate. I regularly check my oven temperature setting using an inexpensive oven thermometer. Check to make sure the oven is accurate before baking. If the oven is too hot, it can force a faster rise to the bread, followed by a collapse while cooling.
- Baking powder is old. Expired baking powder will prevent the bread from rising properly, resulting in dense centers.
- Waited too long to get the bread in the oven. The baking powder begins reacting as soon as the batter is mixed. For best rising, it is important to get the bread in the oven asap after mixing. In particular, preheat the oven so that it is at full temperature once the batter is mixed. If the mixed bread batter sits around while the oven preheats, it will not rise properly, resulting in dense, underbaked middles.

Variations of 3 Ingredient Buckwheat Flour Bread
Consider varying the flavor of the buckwheat bread with one or more of the following additions:
- Herbs and/or Seasonings: chopped fresh herbs, dried herbs or spices to the bread batter to vary the flavor. For example, 1 to 2 tablespoons of dried Italian herbs or herbes de Provence or 2 to 3 teaspoons of ground cumin, curry powder, garlic powder, or onion power.
- Sweetener: Add a small amount of sweetness to the buckwheat flour bread (about 3 to 4 tablespoons maximum). If using a liquid sweetener, decrease the amount of water by the amount of liquid sweetener you are adding.
- Spices: Consider adding some sweet spices, such as cinnamon, nutmeg or cardamom, as well as vanilla, too.
- Toppings: add a sprinkle of toppings, such as chopped nuts or seeds, to the unbaked loaf (gently press into surface of the dough) before baking.
Happy baking!
Related Recipes

Buckwheat Flour Protein Bread
Equipment
- 1 9×5 inch loaf pan
Ingredients
- 3.25 cups buckwheat flour, (light or dark flour)
- 1.5 cups flaxseed meal
- 1 tablespoon baking powder, (certified GF, as needed)
- 2.5 cups water, (I use filtered tap water)
- Optional: 3/4 teaspoon salt
Instructions
- Preheat the oven to 350F (180C). Line a 9×5-inch (22.5×12.5 cm) loaf baking pan with parchment paper. If you do not need the bread to be 100% oil-free, grease or spray the sides of the pan.
- In a large mixing bowl, whisk the buckwheat flour, flaxseed meal, baking powder, and optional salt until blended.
- Add the water to the flour mixture and mix (using a wooden spoon or silicone spatula) until completely blended into a thick batter.
- Evenly spread the batter into the prepared pan, smoothing the top. Using a knife, make a slash, at least 1/2 inch (1 cm) deep down the length of the loaf.
- Bake in the preheated oven for approximately 65 to 70 minutes until risen, the surface of the bread appears dry, the center slash is cracked open, and a skewer inserted near the center of the bread comes out clean.
- Let the bread cool, in the pan, on a cooling rack for 15 minutes. Remove the bread from the pan and cool completely on the cooling rack before slicing (see my tip below for easiest slicing).
Notes
Nutrition


This is the most delicious buckwheat flour recepi and saves me money compared to the cost of the brand at whole foods !!! Thank you so much for sharing !!!
I am so delighted you like the recipe, Maritza! 🙂 Here’s to saving $ and eating well 😊
So have the weight for the buckwheat flour?
My measured flour was dry when I added the water and and I ended up using 3 1/2 cups of water and it was not a pourable batter.
Hi Julie,
I am so sorry you are having trouble with the measurements. I am not quite understanding your initial question (“so have the weight for the buckwheat flour?”) Did you mean to say “so COULD I HAVE the weight for the buckwheat flour?” The weight is included in the recipe card. You can toggle between US Customary (cups/ tablespoons/etc) and Metric (grams and ml). It does sound like you had far too much flour, 3 and 1/2 cups of water is a lot to still end up with a dry mixture. If this is not what you were asking, please let me know.
I was excited to try this and really liked the flavor but found the texture somewhat mushy. So I toasted it, and it was better but still not the texture I enjoy, but I loved the flavor. So I sliced up the loaf thin (after chilling the loaf) and made crackers out of it and they are amazing! I simply baked the slices in the oven at 350 until crisp. I love the flavor and the crunch. I have to ration them. They are great for breakfast with my protein shake, as a snack or anytime really!
Next time I am going to bake it in a slightly bigger loaf pan to see if that changes the texture a bit. But I will certainly make this often and just ordered more buckwheat flour. Thank you for all of your fun, easy and . They have helped me so much as I navigate a gluten free, dairy free and egg free diet.
Brilliant, Michele! Thanks so much for sharing!
Such a yummy and easy bread, thank you! I love the dense texture, like some German and Norwegian breads I like. It is slightly damp, which some others may not be used to, but I enjoy very much. I sliced very thin and toasted flat in toaster oven. Outstanding with everything I ate it with an VERY filling. I’ll be making this many times.
That’s wonderful, Mariah. Thanks for sharing info about the texture and tips about slicing thin and toasting flat.
Tasty and so simple – yay! I don’t know how you keep coming up with more ideas for easy and healthy baking and cooking. I just bought some quick yeast last week to try your Bean Millet Protein Bread, and before I could get to it you posted this recipe. This one was so easy I had to make it first thing this morning! FYI, I did have some previously ground buckwheat flour in the freezer, but it was conveniently packaged in 210 g bags for making your Buckwheat Pumpkin bread so I decided to grind it anew today. (For anyone who hasn’t tried that, it’s almost as easy as this recipe and it’s super yummy: https://www.powerhungry.com/2022/12/oil-free-vegan-buckwheat-pumpkin-bread/.)
I’ve always got a backlog of your recipes that I NEED to try. I don’t even get around to trying all the good recipes you create and I just imagine what things must be like at your home. For every recipe you publish I know there has been extensive testing. Where do you find the time?
Anyway, hats off to you again Camilla.
Diane,
This is so kind and generous, thank you so much! Your words mean a lot 🙂 Most of all, I am over the moon that you love this humble bread, I have been loving it for breakfast and lunch. Thank you thank you!
Can’t wait to try this, Camilla!
Hope you like it, June 😊
I am sensitive to flax and chia seeds – anything else I could use?
Thank you.
Hi Linda,
I wish there was an easy substitute beyond these flax and chia, but there isn’t. So sorry. You could 3xperiment with psyllium husks, but it would take some testing to determine if it would work, and it what proportions.
Thanks Camilla, I will try the psyllium husks which work so well with the millet bread.
Sounds good, Linda, would love to know how it works out! 🙂
I made it today and like Mariah said it was slightly damp even though I followed the recipe but still I liked it and will make again. Thank you for a simple recipe for a healthy bread.
Great, Sai, glad you like it. If it came out damp, you can toast the slices to dry them out, or slice and place the slices into the oven at 350 for about 5 minutes.