
This post may contain affiliate links. Please read my disclosure and privacy policy.
This post may contain affiliate links. Please read my disclosure and privacy policy.
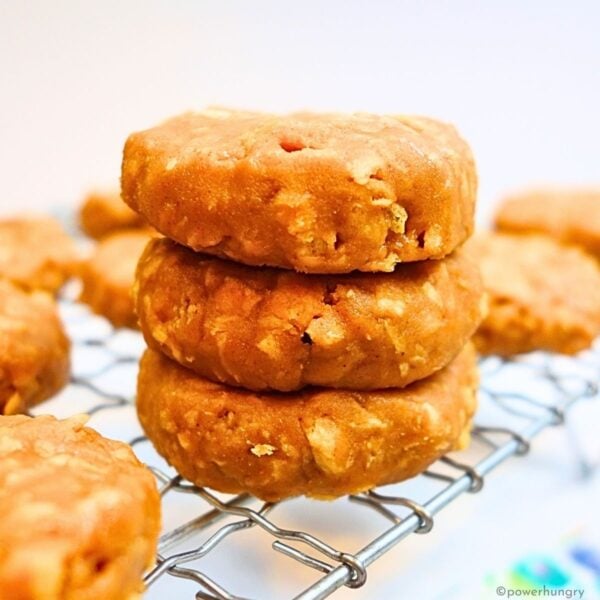
Hearty and versatile 1 ingredient split pea tortillas that are grain-free & vegan. They are oil-free, sugar-free, vegan, high fiber and high protein, too.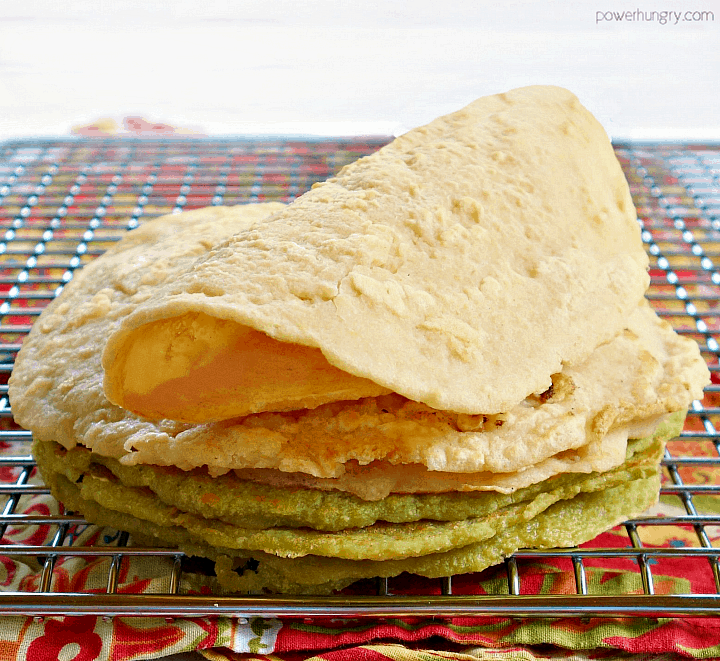
I am not very good at leaving well enough alone.
For example, when the 1-ingredient red lentil tortilla recipe I devised last week turned out to be a big hit, the gold and green split peas in my pantry started calling my name.
Might they work, too?
I had to know.
So I gave them a soak and a whirl. It took some tweaking, and several batches to get it right, but I am happy to report that split pea tortillas are an equally delicious success!

Table of Contents
- Use Split Peas to Make Tortillas
- Recipe Benefits
- How to Make 1-Ingredient Split Pea Tortillas
- Step One: Soak the Peas
- Step Two: Blend Peas into a Batter
- Step Three: Cook the Tortillas
- Step Four: Flip the Tortillas
- Tips for Success
- Taste and Texture
- Flavor Variations
- FAQ
- More Grain-Free & Vegan Tortillas to Love:
- 1 Ingredient Split Pea Tortillas (Grain-Free, Vegan) Recipe
Use Split Peas to Make Tortillas
Split peas are so delicious in soups, and for making dahl, so it was a revelation to discover that, like split red lentils, they can be transformed into tortillas.
They are such a nutritious food: very high in soluble fiber, which is especially beneficial for controlling blood sugar while also providing long-lasting energy, making them seriously amazing athlete fuel! They are also high in protein, B vitamins, and an array of minerals. How wonderful that they can be enjoyed in an on-the-go form!

It does not hurt that they are also VERY inexpensive, especially the more common green variety. Hurray for peas!
Recipe Benefits
- Vegan (egg-free, dairy-free)
- Gluten-free
- Grain-free
- Oil-free
- Sugar-free
- High fiber
- High protein
- Frugal
How to Make 1-Ingredient Split Pea Tortillas
Note that the complete directions are also in the recipe card below.
Step One: Soak the Peas
Combine the rinsed split peas and water in a medium bowl or other container; loosely cover. Let stand, at room temperature, for at least 6 hours or up to 12 hours. (See notes for fast soaking)
Do not drain split peas.

Step Two: Blend Peas into a Batter
Add the entire contents of bowl (soaked peas and remaining water) and optional salt to a high speed blender or regular blender. Blend on HIGH speed until completely smooth (no tiny bumps) stopping multiple times to scrape down the sides of container (it will take 2 to 3 minutes).
The batter should be very smooth. Scrape into a bowl or measuring cup.

Here’s a close-up of the batter. It brings back memories of baby Nick and strained peas!

Step Three: Cook the Tortillas
Heat a nonstick skillet (or very well-seasoned cast iron skillet that is nonstick), or a nonstick griddle, to medium heat (no hotter).
Once warm, turn heat to LOW and add 1/3 cup of batter to the center of the pan. Using a metal spoon, spread the batter into a 6-inch (15 cm) circle.
Do not worry if you need to work the batter around a bit as you add it to the skillet, backtracking over portions of semi-set batter. It is simple to even things out with the spoon once all of the batter is more or less in a 6 inch circle.

Step Four: Flip the Tortillas
Cook for two to three minutes until the surface of tortilla appears dry. Slide a spatula underneath and flip. Cook about 1 minute longer to brown other side. Transfer to cooling rack and cool completely.
Repeat with the remaining batter.

Tips for Success
Keep the Batter Thin: The batter needs to be thin-ish to make it possible to spread into a 6-inch (15 cm) circle. When I made the batter with the same amount of water as my red lentil tortillas, it was very challenging to make anything other than a very thick pancake.
Use a Nonstick Skillet or Griddle: The tortillas will stick (profoundly!) unless you use a nonstick skillet or griddle. I use a very well-seasoned cast iron skillet (it functions as a nonstick from the years of seasoning). If you are not confident that your cast iron is nonstick, opt for a a different nonstick option.
Skillet Temperature Should Be Low: The temperature for the skillet needs to be set on low after preheating the skillet. The tortillas became over-brown quickly (yet not cooked through; i.e., big mess), with the medium-low heat.
Taste and Texture
The biggest surprise with these split pea tortillas is the unique texture and flavor. They are hearty, as a tortilla should be, but they also have a creamy consistency, somewhat similar to a crepe.
Someone eating them, without knowing how they are made, might think they are made with eggs.
Flavor Variations
Add spices, herbs, and more to the split pea tortilla batter. Here are some ideas:
- nutritional yeast (for a subtle cheese-y flavor, plus addition protein)
- fresh herbs (e.g., parsley, cilantro, dill or basil) Add a handful of herbs into the blender before blending.
- dried herbs (e.g., rosemary, herbs de Provence, Italian seasoning)
- spices and seasonings (e.g., cumin, garlic powder, onion powder, curry powder, turmeric)
FAQ
- Are Split Pea Tortillas Flexible? Yes! The split pea tortillas bend, fold and roll.
- How Should I Store the Split Pea Tortillas? Store the cooled tortillas in a covered container at room temperature for 1 day, the refrigerator for 2 weeks or the freezer for up to 6 months.
- Where Can I Purchase Dried Split Peas? You can find dried split peas shelved alongside other dry beans and legumes at the supermarket.
- Is There a Way to Fast Soak the Split Peas? Yes! ou can fast-soak the split peas in 30 minutes! Cover the dried split peas with 2 cups BOILING water. Let stand for 30 minutes (the peas will absorb the water quickly, and plump up). Do not drain. Blend with peas and soaking water along with 2/3 cup cold water.

Happy eating, everyone!
More Grain-Free & Vegan Tortillas to Love:
- 1-Ingredient Red Lentil Tortillas
- 2-Ingredient Chickpea Flour Tortillas
- 3-Ingredient Sweet Potato Tortillas
- 1-Ingredient Black Bean Tortillas
- Grain-Free Spinach Tortillas {2 ingredients}
- 2-Ingredient Coconut Flour Tortillas

1 Ingredient Split Pea Tortillas (Grain-Free, Vegan)
Equipment
Ingredients
- 1 cup dried split peas (yellow or green), rinsed and drained, (rinsed and drained; use yellow or green split peas)
- 2.67 cups water, (I use filtered tap water)
- Optional: 1/4 teaspoon salt
Instructions
- Combine the rinsed split peas and water in a medium bowl or other container; loosely cover. Let stand, at room temperature, for at least 6 hours or up to 12 hours. (See notes for fast soaking)
- Do not drain split peas.
- Add the entire contents of bowl (soaked peas and remaining water) and optional salt to a blender. Blend on HIGH speed until completely smooth (no tiny bumps) stopping multiple timesto scrape down the sides of container (it will take 2 to 3 minutes). The batter should be very smooth. Scrape into a bowl or measuring cup.
- Heat a nonstick skillet (or very well-seasoned cast iron skillet that is nonstick), or a nonstick griddle, to medium heat (no hotter).
- Once warm, reduce heat to LOW. Add 1/3 cup of batter to the center of the pan. Using a metal spoon, spread the batter into a 6-inch (15 cm) circle.
- Cook 2 to 3 minutes until surface of tortilla appears dry. Slide a spatula underneath and flip. Cook about 1 minute longer to brown other side. Transfer to cooling rack and cool completely.
- Repeat with the remaining batter.
These are brilliant. Added teaspoon sugar and Cajun spice. Any her/spice mix can be added. Sugar just helps pea flavour.
Fantastic, Ceit! The flavor additions sound delicious!
I just made these. I used an immersion blender so my liquid had very tiny pieces in it rather than being totally smooth. Didn’t seem to be a problem. Cooking them was quite a steep learning curve. I re-seasoned my cast iron to be sure it would be non-stick, and that helped. Though my plastic spatula was useless. I had to move to a sharp-edged metal spatula so I could get the tortilla off the skillet to flip without sticking or tearing. I also had to wait long enough to flip or it would rip and fall apart. After about 5 failed tortillas I had it down! The rest worked great and I made about 10-15 tortillas for freezing. They taste earthy but good. I used a tsp of olive oil in the skillet for each, so that adds flavor, and 1/2 tsp salt in the batch. The color is beautiful. I’m still figuring out how they’ll do in the freezer. Thanks for the recipe!
Becca! Three cheers for you! I am so glad you stuck with it (oh my, no pun intended). Most of all, I am glad you like the taste, I love the flavor of these, too. I’ve had success freezing them, I hope you do, too.
Hey Becca ….how did they last in the freezer?
I am currently attempting these after soaking overnight… If I put the heat above 2 (out of 10) they start cooking faster than I can spread the batter and rip apart. With the heat on 2 they seem to be working, but it’s taking at least 20-25 minutes each before I can turn them. I don’t understand how you do this with higher heat… I’m going to be here all day lol.
Hi Stephie,
I am so sorry the recipe is causing some problems. How about trying this next time: Heat the skillet, but then remove it from the heat (momentarily) while you quickly spread the batter. You can always spoon on more batter into some thinner areas after you do your initial spread of batter. Then you can turn the heat up a little bit higher than low setting. It should only take a minute or two for one side to set. It will be much easier on round two, it can just take a while to get used to it 🙂
These are really tasty ! I added more salt pepper garlic and onion powder and about 3x the yeast…I like them a little bit browned and I’m spraying olive oil in the pan to help! I’m making a triple batch now !!
I am so happy you like these, Diana! The browning sounds really yummy. Enjoy!
I thought split pea soup was all that I could make with split peas! These tortillas, and the Split Pea Nuts you shared, are blowing my mind. Thank you!
Hi Camilla, I add more water when I pre-soak so it would not be an accurate measure after. Any idea what volume of batter you end up with after everything is blended? I can go by that since the blender has markings for cups and milliliters. Thanks
Hi Denise–I’ll remake today and let you know 🙂
Camilla, Would it be ok to drain the water after soaking in order to reduce/remove the lectins from the peas? Would they turn out well if fresh water was added afterward? Maybe the issue is how much water to add back in? Maybe if I measured what I poured out? Or weighed the whole batch before and after draining? I know it makes extra work, but when one has gut issues, need to do what is best. Thanks for all the inspirational recipes!
Hi Denise! Yes, you can definitely do this, it will work just as well. Drain off the liquid into a measuring cup so that you know how much fresh water to add back in (I think that would be the simplest method–it really would not add much trouble to do that). Cheers!
These definitely require patience and the sacrifice of a few practice tortillas. I tried turning over too quickly and spreading too thin. I used the recipe but had not looked at your photos. Once I looked at the post photos, it worked! They are great.
Hi, I cooked them in my waffle iron, and they came out great!
No offense but as a non-vegan, this was absolutely disgusting. It lacks any flavor other than mushy green stuff and it never solidifies on the inside of the “tortilla” even cooking it 3x longer than the directions. Trust me, I followed the directions exactly and soaked for 12 hours and measure everything extremely precise. I’ll be adding spices and turning this into a soup at this point I suppose
No offense taken, Christopher. I am sorry you did not like these. Based on your description of the “inside” of the tortilla not cooking and remaining mushy, as well as needing to cook these for 3x as long as specified, it sounds like the the batter was spread far too thickly. There should not be an “inside” to the tortilla, as the batter is spread thin. It is ok if it sticks a bit as you spread it (as pictured), but you need to keep spreading out the batter (as pictured) to thinly cover the skillet. As one side cooks and becomes dry, the other side also becomes dry from the heat (since they are thin). You flip over merely to brown the other side. When spread thin, the cooking time is quite short. I hope you will consider tryng them again.
Thank you, a delicious recipe! I am curious though whether this process would work the same if I soak chickpeas instead?
Hi Asiya, yes that will work. However, I advise that you follow my black bean tortilla recipe and sub dried chickpeas (same weight) for the dried black beans. The proportions will match better. Here is the link: https://www.powerhungry.com/2018/07/09/1-ingredient-black-bean-tortillas-grain-free-vegan/
I made these and they were great! Held up very well and so good with curry
Wonderful, Kate!
My first batch was touch and go, but finally got it! This second time around went great. I love the texture from the split peas, delicious!
Making these is a bit like making crêpes, the first one often gets stuck. At least that’s what happened the first time I made thes. the first one stuck horribly because I was impatient and didn’t follow all of the directions for waiting until I could lift it to flip. But it’s worth staying with it because after the first disaster, the remaining ones came out great. This is such a great way to use split peas and the texture is really good.
Great recipe! Everyone, you need to be patient with these. Let em set up before flipping over and definitely use a nonstick pan. They are worth it, so delicious!
How well do these hold up? Would like to make Migas filled tortillas for a soup kitchen meal, so it could be a couple hours before they were eaten.
Hi Brenda,
These keep very well, like regular tortillas. They are quite sturdy, you can definitely make ahead of time. You can refrigerate and freeze them too, so you can even make them days weeks or months ahead 🙂
Wow, I’ve been keeping house for 40 years, never knew this existed until just now, and OMG are these DELICIOUS! I’ve found I needed to PAM after cooking each one; small price to pay for DELICIOUSNESS!
Another great recipe! I even used some green lentils (not even split) and they make a really nice version. Not quite as foldable but along with the red split lentil and yellow split pea versions make a stunning stack in the fridge! Thanks again.
Great to hear, Christopher!
Is it possible to make these into tortilla bowls by baking them ?
Hi Karen,
Hmm, I do not know if that would work with these. If you tried it, you would definitely want to add some oil to the recipe. Based on my tests for making chips out of the red lentil tortillas, baking these would probably not yield a crispy bowl unless oil is added.
@Camilla, I was coming to ask and saw that you already tried it. Do the red lentil tortillas make nice chips? I have used corn tortillas for chips and am curious if it might work for the red lentils. Thanks!
Hi Esther! Yes, the red lentil tortillas do make tasty chips. Here is my recipe: Red Lentil Baked Chips