
This post may contain affiliate links. Please read my disclosure and privacy policy.
This post may contain affiliate links. Please read my disclosure and privacy policy.
My 2-ingredient buckwheat pizza crust is the vegan, gluten-free recipe you’ve been waiting for! It is also oil-free, yeast-free. sugar-free, and ready in about 25 minutes (start to finish).

Table of Contents
- Why Make This Recipe
- Ingredients for the Crust
- Step by Step Instructions
- Step One: Prep the Oven & Baking Pan
- Step Two: Whisk the Dry Ingredients
- Step Three: Mix in the Water
- Step Four: Press Out the Dough
- Step Five: Pre-Bake the Crust
- Step Six: Add Toppings & Finish Baking
- Slice & Enjoy
- FAQ & Tips
- Can I Use Other Flours?
- Can I Make the Dough in Advance?
- How Should I Store Leftover Pizza?
- Related Posts
- 2-Ingredient Buckwheat Pizza Crust (V, GF, oil-free) Recipe
Why Make This Recipe
Umm, do you like pizza? If no, I am not sure that we can still be friends.
Just kidding. Sort of :).
If you do, indeed, like or LOVE pizza, then you will love everything about this buckwheat flour crust. It is:
- Made with 2 ingredients (plus water)
- Vegan (no eggs, no dairy)
- Gluten-free (buckwheat, despite the name, is not related to wheat; it is a gluten-free grain)
- Oil-free
- Nut-free
- Yeast-free
- Quick & easy (one bowl and about 3 to 4 minutes prep time)
- Perfect with any and all of your favorite pizza toppings!
Ingredients for the Crust
The exact amounts of each ingredient are indicated in the recipe card at the end of the post. Toggle between US Customary (volume) and Metric (weights) for preferred measurement option.
The ingredient list is short and sweet. Here is what you will need:
- Buckwheat Flour: I used regular (dark) buckwheat flour, which produces a dark brown crust. I am 100% fine with the rich color, but if you suspect that others might rebel (especially wee ones and/or skeptical partners) simply opt for light buckwheat flour. It has a lighter flavor, too.
- Baking Powder: Make sure to use baking powder, not baking soda (they have very different strengths; the crust will taste truly dreadful with an equal amount of baking soda). If you need the crust to be 100% gluten-free, check the label to make sure that the baking powder is certified gluten-free.
You will also need some regular tap water. I like to add salt to the dough (1/2 teaspoon is just right for me), but it is optional (and/or adjustable to your needs and tastes).
Since this is a pizza dough, you can choose whichever toppings your heart desires to top the crust. Think marinara sauce, a cashew cream sauce, dairy-free cheese (or dairy cheese, if you are not vegan), sliced vegetables, olives, you name it. The crust goes well with everything!

Step by Step Instructions
Note that the complete directions are also in the recipe card below.
Step One: Prep the Oven & Baking Pan
Before mixing the dough, preheat the oven to 350F (180C). Lightly spray a 12-inch (30 cm) metal baking pan with nonstick spray. A large baking sheet will also work in place of a pizza pan.
Step Two: Whisk the Dry Ingredients
In a medium or large mixing bowl, whisk the buckwheat flour and baking powder until blended. If using salt, whisk it in as well.

Step Three: Mix in the Water
Set aside your whisk; it is the wrong tool for this step (unless cleaning sticky blobs of dough is your thing).
Add the water to the dry ingredients in the bowl. Using a rubber/silicone spatula, a wooden spoon, or even your hands (that would be me; I love the squish), mix until the dough is completely combined.
The dough will be thick and sticky. If it seems a bit dry, add a splash or two more water until the dough is moistened.
You’ve got dough!

Step Four: Press Out the Dough
Plop the dough onto the prepared pan and use your fingers and palm to press it out into an even layer. Cover all of the prepared pizza pan, right out to the rim of the pan. Lightly moistened hands make this a lot easier.
Plenty of dimples are a good thing.
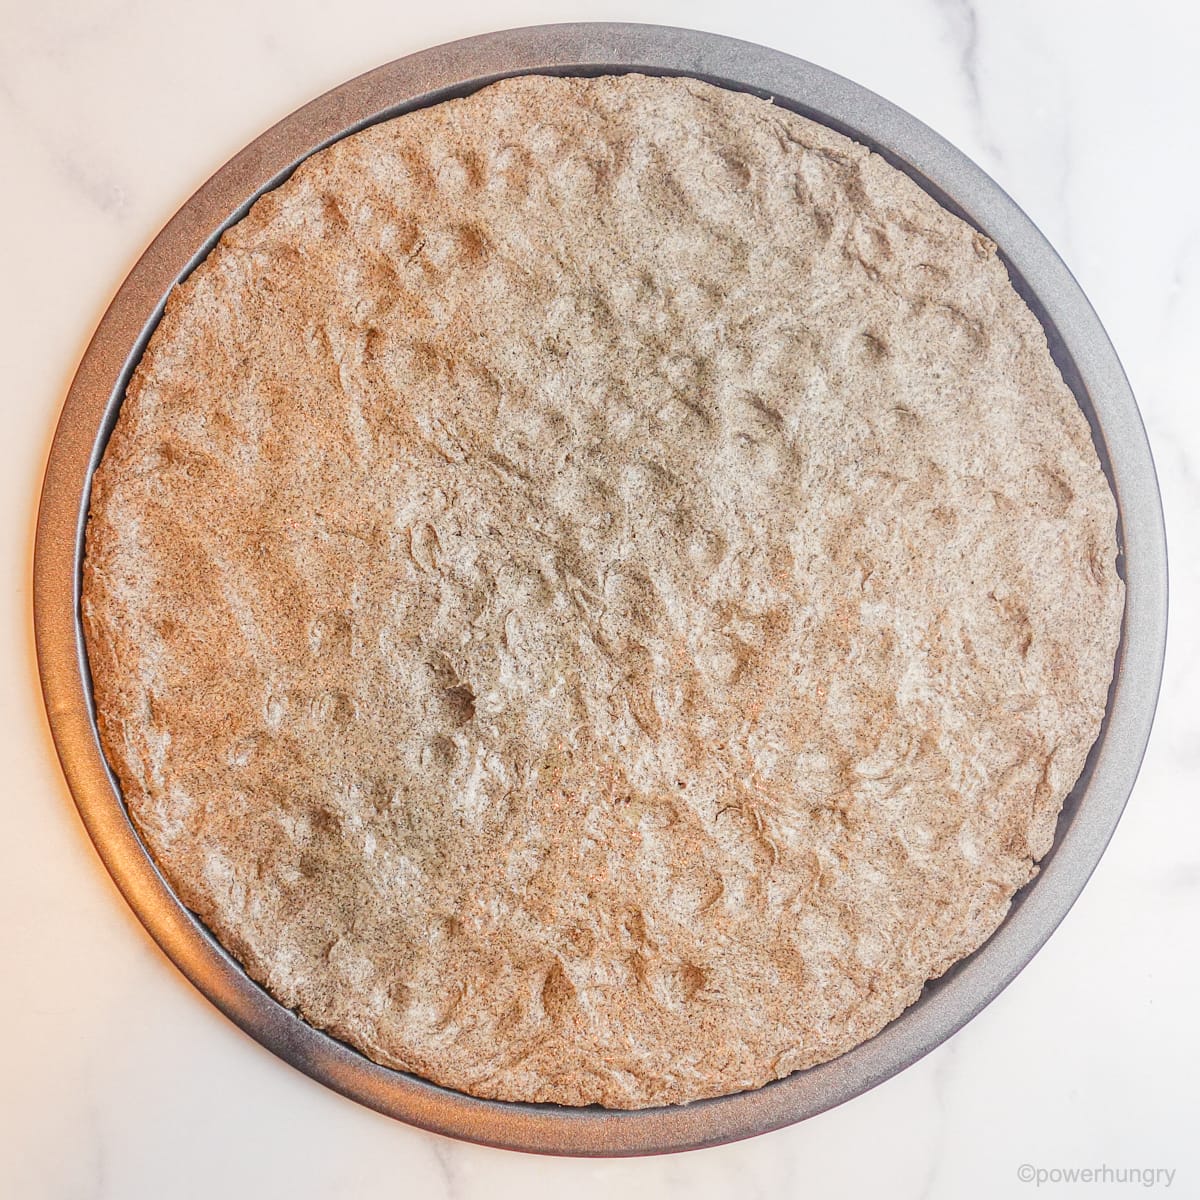
Step Five: Pre-Bake the Crust
Bake the dough–without any toppings–for five to seven minutes until the surface of the dough looks dry and is darker in color. This is an important step for crisping the dough to prevent sogginess from any subsequent toppings.
Remove the crust from the oven for the next step (keep the oven on).

Step Six: Add Toppings & Finish Baking
Add the toppings of your choice–for example, sauces, vegan cheeses (be sure to check out my easy 5-Ingredient Vegan Mozzarella), vegetables, olives, artichoke hearts, etc.–to the partially bake crust. For best results, spread a thin layer of sauce (to avoid sogginess).
Return the pizza to the oven and bake eight to eleven minutes longer until the toppings are melted/cooked to your liking and the crust edge appears crispy.
Hello, yum!

Slice & Enjoy
Transfer the pizza to a cutting board and cut into slices. One 12-inch (30 cm) pizza will yield eight generous slices.

FAQ & Tips
- Do Not Bother Adding Oil: I made several test batches of this crust with oil added, and…it was either (1) not as good (a little bit limp and less crispy) or (2) made no difference at all. All water made for the best crust!
- Preheat the Oven: Make sure that the oven is completely preheated to 350F (180C) before mixing up the crust. It will take 10 to 15 minutes to preheat your oven, but only 3 or 4 minutes to mix and press the crust dough.
- Measure the Flour with Care: The best way to measure flour is to lightly spoon it into measuring cups (do not pack the flour). For the greatest accuracy, using a digital kitchen scale to measure (I have the weight, in grams, in the recipe card below).
- Use Your Judgment: If the dough looks too dry, add a bit more water; if it looks too wet, add a small amount of additional flour. It is a forgiving dough!
- Make Your Own Flour: If you have whole buckwheat groats, and a high speed blender, you can make your own flour in seconds! Add the groats to the blender, cover, and blend on high speed until the groats turn into a fine flour. Buckwheat is a relatively soft grain, so it blends to a flour with ease.

Can I Use Other Flours?
With the exception of light buckwheat flour, I have not tried this with any other flours. As such, I cannot recommend any other substitutes. Gluten-free flours have individual idiosyncrasies, so it is best to stay with the flour specified in this, or any, given recipe.
Can I Make the Dough in Advance?
I do not recommend it. The baking powder will lose its potency if the dough is made too far in advance. The dough comes together very quickly (literally 2 to 3 minutes), so there really is no advantage to making the dough ahead of time.
How Should I Store Leftover Pizza?
Completely cool any leftover pizza to room temperature. Store in an airtight container (easier if you slice the pieces) in the refrigerator for up to 2 days. Rewarm in the oven, toaster oven or air fryer.
Happy Baking!
Related Posts

2-Ingredient Buckwheat Pizza Crust (V, GF, oil-free)
Equipment
- 1 12-inch pizza pan
Ingredients
- 2 cups buckwheat flour, (light or dark)
- 1 1/2 teaspoons baking powder, (gluten-free, as needed)
- Optional/Adjustable: 1/2 teaspoon salt
- 3/4 cup water , (more, as needed)
- Desired toppings, e.g., tomato sauce, dairy-free cheese (see note, vegetables, etc.)
Instructions
- Preheat the oven to 350F (180 C). Lightly spray a 12 inch (30 cm) pizza pan (or a baking sheet) with nonstick cooking spray (alternatively, use a piece of parchment paper, cut to fit)
- In a large bowl, whisk the buckwheat flour, baking powder and salt. Mix in the water until completely blended (use your hands to mix, as needed). If the dough is too dry, add a splash or two more water.
- Evenly press the dough onto the prepared baking pan, pressing to the edges of the pizza pan (if using a baking sheet, press out to 10.5 inch square).
- Bake the crust in the preheated oven for 5 to 7 minutes until surface appears dry.
- Top with desired toppings. Return pizza to oven and bake for 8-11 minutes longer or until toppings are melted/browned and edge of crust is browned and crispy.
- Transfer pizza to a cutting board and cut into slices.


Judging by the comments, this recipe looks brilliant and i will try it in the next week.
Just a bit of feedback, when selecting 2X or 3x, tsp, Tbsp and cups update correctly, but nut not weights such as grams (g). Perhaps your website maintainer can fix this issue as other recipe websites work perfectly when multiplying the servings. Thanks. John
Thank you, John, for letting me know about the metric measurements. They are now corrected! I hope you give the crust a try 🙂
Very good recipe. It’s not like “traditional” pizza crust, but that’s why I chose to make it. It is delicious with differnt roasted vegetables on top. I eat dairy so I also add high quality buffalo mozzarella.
Thanks, Herbert! I am with you, a roasted vegetable pizza tops my list of favorites.
Is it OK to grind Kasha buckwheat up to make your own flour
Hi Cher,
Yes, definitely!
I love this crust. It’s not like traditional pizza crust, of course, but that’s why I like it so much. I eat some dairy so I used buffalo mozzarella and roasted vegetables on top. Outstanding! Crispy edges but thin, stable (supported my heap of veg and cheese on top) and tender. Thanks for this brilliance, I will make it regularly!
Wow, that pizza sounds so goid, Deanna. I’m delighted to know that you love the crust. Cheers 😊
Hello. Can this dough be handled like regular pizza dough? I press pizza dough into a round on my marble counter. Then I pick it up and transfer to a cornmeal dusted peel. Then I slide it from the peel to pre-cook the crust on a heated pizza stone in my Big Green Egg. Is this dough going to hold together for this type of handling? Thanks, Tobin Clark
Hi Tobin,
I think you could make it work with a few simple adaptations. I would (2) press the dough out on a piece of parchment paper (dusted with buckwheat flour or cornmeal). Since this crust does not have gluten (to make it more elastic), I worry about it holding together + not sticking between the transfer from counter to peel. The parchment will give it a bit more stability during the transfer; (2) here is the different part: invert the crust onto your pizza stone and carefully peel/ease off the parchment paper. Hope this works for you, Tobin!
What would happen if I took out the baking powder? Would the crust be too tough? Thanks!
Hi Cami,
I would not recommend it, you will pretty much have a hard tack cracker.
This is a delicious crust option! I used light buckwheat flour. It held together beautifully (crisp at the edge, and firm enough to pick up a slice but still soft enough to be pizza-crust like). I used a 12-inch pizza pan. I love the taste of buckwheat flour in baking, so I recommend it, but if you do not like the flavor of buckwheat, then this probably isn’t for you.
I am glad you like it, Fatima!
I was very very skeptical that this would be good, but I am trying new things for health reasons, plus I have a lot of buckwheat flour on hand, so…I made it. And loved it! I used Daiya mozzarella, fresh sliced tomatoes and then topped with basil leaves. The crust is crispy with a little bit of chew and has a delicious earty flavor that I really like with the cheese and vegetables. I will be making this again, very soon!
I wasn’t sure if this would work, but it did! I used light colored buckwheat flour and added some garlic and oregano. Delicious! Will make often, thanks.
This crust is delicious even without toppings! That said, if I had to choose I think I’d go with abundant garlicy kale and vegan cheese. Next time I’m thinking of adding roasted butternut squash. Thank you for this amazing and easy recipe! This website is honestly the best!
Oh my good ness Iggy, the topping ideas sound INCREDIBLE! Yum! An thank a million times over for the kind words! xo
This was really easy to make and tasted great with vegan cheese and toppings. I love the earthy taste and knowing I’m getting a lot more fiber than regular pizza dough.
I am so happy you like it, Matt!
The crust was easy to make and delicious to eat. I has to raise the temperature in the last baking stage as the toppings were not browning. After several trials I feel as if I have finally found a gluten free crust that tastes like the real thing. Thank you!
I am absolutely THRILLED to hear it, Evelyne! Kudos to you for sticking with it to get the toppings and crust to your liking 🙂
The pizza was yummy! But i wasn’t sure if the inside was fully cooked? i don’t know if i’m just not used to the texture but it seemed a bit doughy. Had to take it out the oven though as it was cracking!
Hi Amelia! I am glad you liked the crust. Oh no, sorry yours came out a bit doughy. You definitely do not want that. It may have just needed a few more minutes of precooking before adding the toppings? Also, just checking that it was pressed out into a 12-inch circle? If your pan is smaller, or not pressed out to a full 12-inches in diameter, the crust will be thicker (and will take longer to cook through.
What did I do wrong? This crust had a weird,tasteless dry, texture kind of like dirt.( I used a good quality organic buckwheat flour from the health food store. )
Hi Melanie,
Gosh, I am not sure what the issue might be. Since you mention it is dry, perhaps you r oven runs hot and it got overbooked? Have you baked with buckwheat flour before now? You may not like the flavor–it is definitely stronger than other flours (I love it, but it is not for everyone). This is a super-basic recipe, but you can always add flavors, such as herbs, garlic powder, etc, if you do not want a neutral crust on your pizza.
Thanks for this recipe! It’s so easy and delicious. I’m glad I have a gluten free go to pizza crust rather than expensive store-bought ones.
So happy you like it, Santana!
So happy you like it, Sanjana 😊
Camilla, I made your pizza crust this weekend and we really enjoyed it! I used buckwheat groats and made flour for the milder taste. It was so quick and easy…could not be simpler!
Thank you!
I am so glad you liked it, June! 🙂
Do you have to use tap water? Can it be bottled water?
Hi Esther,
Certainly! I just use tap water because it is right there and I wanted to emphasize that it does not need to be any kind of special water.
Sounds yummy. Thank you for sharing! I’m wondering why you don’t use oil. Healthy fats are sooo good for the body. Any suggestions how to incorporate olive oil in this?
Hi Cory,
You can definitely swap in oil for some of the water. I know a lot of reader have mentioned that they follow the WFPB diet (Whole Foods plant based) , which excludes oil. So I try to accommodate everyone to some degree 🙂
@Cory, Actually they are not, check out Dr. Michael Greger, Joel Fuhrman and Caldwell Esselstyn they all discuss oils and advise strongly against there consumption. Here’s one such link: https://nutritionfacts.org/topics/oils/