
This post may contain affiliate links. Please read my disclosure and privacy policy.
This post may contain affiliate links. Please read my disclosure and privacy policy.
A remarkable loaf of delicious, nutritious, 1-ingredient flourless buckwheat bread ! Made with whole buckwheat (plus water and salt), it is flourless and naturally oil-free, gluten-free and vegan.

Table of Contents
- Gluten-Free Bread Made with 1 Ingredient: Buckwheat
- Recipe Benefits
- Ingredients for the Bread
- How to Make 1-Ingredient Buckwheat Bread
- Plan Ahead
- Step 1: Soak Buckwheat Groats
- Step 2: Drain (But Do Not Rinse) the Buckwheat
- Step 3: Process the Groats in a Food Processor
- Step 4: Let the Batter Sit for Several Hours (2 options)
- Step 5: Bake the Bread
- Can I Add Flavors to the Bread?
- More Great GF & Vegan Buckwheat Recipes:
- 1-Ingredient Flourless Buckwheat Bread {vegan, GF} Recipe
Gluten-Free Bread Made with 1 Ingredient: Buckwheat
A loaf of bread, made with nothing more than buckwheat, plus some water and salt? It is difficult to believe, but 100% true. Moreover, it is delicious and nutritious, too.
I do not know who first developed the recipe for buckwheat bread made with whole buckwheat and little else, but she was a genius.
The first version I had was back in my graduate school days. A friend made such a loaf–she called it sourdough buckwheat bread–and shared half with me. I was not much of a bread maker back then, save for quick breads and muffins, so despite loving the loaf, I didn’t get the recipe.
But now I have a version of my own, and I am thrilled to share it with all of you. You do not need to be a bread baker to make it, either, because it is a cinch to make.

Recipe Benefits
- Vegan (egg-free, dairy-free)
- Gluten-free
- Oil-free
- Sugar-free
- High in fiber
- 1 ingredient (plus water and optional salt)
- Easy to make
- Flourless
Ingredients for the Bread
The exact amounts of each ingredient are indicated in the recipe card at the end of the post. Toggle between US Customary (volume) and Metric (weights) for preferred measurement option.
- Buckwheat groats (whole hulled buckwheat)
I love a recipe list with one ingredient.

It is true, all that you need to make this bread is whole, hulled buckwheat, plus some tap water. You can also add salt, if you choose.
Whole hulled buckwheat is available at natural food stores, online, and in the natural foods sections of some really well-stocked grocery stores.
In grain lingo, these are groats. Despite the wheat in its name, buckwheat is not a true grain, and has no relation to wheat.
Rather, buckwheat is the naturally gluten-free, alkaline seed of a plant related to rhubarb. It is PACKED with nutrients, including protein, fiber and flavonoids (antioxidants) and is also very low on the glycemic level.
How to Make 1-Ingredient Buckwheat Bread
Note that the complete directions are also in the recipe card below.
Plan Ahead
A quick caveat: you need to plan ahead. Although the steps are extremely simple to follow, you will need unattended time to soak both the buckwheat and the batter.
Step 1: Soak Buckwheat Groats
To make the bread, first rinse the buckwheat through a mesh sieve (to remove any residue).
Place the drained buckwheat in a large glass bowl and fill with enough water to cover the groats by about 2 inches. Place a napkin or kitchen towel over the top and soak for at least 2 hours, or up to 24 hours, in the refrigerator.

Step 2: Drain (But Do Not Rinse) the Buckwheat
Drain the buckwheat, and then place the sieve over a bowl to allow the groats to drain for another minute or so. DO NOT RINSE. I know, the water will be gooey and slimy (it is tempting to rinse it all off), but you need the goo for the success of the bread. Discard all of the soaking water.
Step 3: Process the Groats in a Food Processor
Place the drained groats into a food processor or blender, along with 1 and 1/4 cups of fresh water and (if desired) salt. Process until the mixture is blended, and comes together into a cohesive batter, but still has some texture.

Step 4: Let the Batter Sit for Several Hours (2 options)
Scrape the batter into the same large glass bowl and cover once again with a cloth napkin or dishtowel.
Option 1 (Refrigerate): Refrigerate the batter for at least 2 hours or up to 24 hours.
Option 2 (Ferment): Let the batter stand in a cool, dark place for at least 8 hours or up to 24 hours in order to ferment. Using this method, the batter will be slightly frothy or bubbly near the surface. It will also have a slightly sour smell as a result of the fermentation.

Step 5: Bake the Bread
Preheat the oven to 425F and grease or oil a 9×5-inch loaf pan. Pour the batter into the prepared pan, taking care not to deflate all of the bubbles.
Slide the pan into the oven and bake for 35 to 40 minutes until golden brown, especially at the edges, and the center is set and firm. Cool the bread in the pan completley before removing it.

This is a dense, German-style loaf. It is especially good toasted, but I am also a fan of very thin slices topped with all kinds of sweet and savory spreads, vegetables and fruits. You cannot go wrong, it is delicious any way you slice it!
Can I Add Flavors to the Bread?
Yes! You can add in all kinds of extra flavors. The first loaf I tasted, way back when, had chopped nuts and seeds added for extra crunch and nutrition. Herbs (dried or fresh) and spices are great too.
For a sweet loaf, consider making my Vegan Cinnamon Buckwheat Bread. You can vary the spices and type of sweetener I used.
Happy baking!

More Great GF & Vegan Buckwheat Recipes:
- Gluten-Free Buckwheat Sandwich Bread (oil-free, yeast-free)
- 4-Ingredient Buckwheat Flax Chia Bread
- Vegan Buckwheat Banana Bread
- Buckwheat Almond Shortbread Cookies
- 4-Ingredient Buckwheat Chia Flax Bread
- Oil-Free Buckwheat Granola (Oat-Free)

1-Ingredient Flourless Buckwheat Bread {vegan, GF}
Ingredients
- 2 and 1/2 cups, 460 g buckwheat groats, rinsed
- water
- optional fine sea salt
Instructions
- Place the rinsed buckwheat in a large glass bowl; fill with water, enough to cover buckwheat by 2 inches (5 cm). Loosely cover with a cloth napkin or towel. Soak in the refrigerator for a least 2 hours or up to 24 hours.
- Drain buckwheat through a mesh strainer; set strainer over bowl and let continue to drain for a minute longer (the liquid will be gooey). DO NOT RINSE.
- In a food processor or blender, place the drained buckwheat, 1 and 1/4 cups (296 mL) fresh water, and optional salt (I recommend 1/2 teaspoon). Process until blended but the batter still has some texture (see photo).
- Pour buckwheat batter back into a large glass bowl and cover with a kitchen cloth.
- Option 1 (Refrigerate): Refrigerate the batter for at least 2 hours or up to 24 hours.
- Option 2 (Ferment): Let the batter stand in a cool, dark place for at least 8 hours or up to 24 hours in order to ferment. Using this method, the batter will be slightly frothy or bubbly near the surface. It will also have a slightly sour smell as a result of the fermentation.
- Preheat oven to 425F (215C). Spray or grease a 9×5-inch (22.5x 12.5 cm) loaf pan; pour in batter, being careful not to deflate any bubbles.
- Bake in the preheated oven for 35 to 40 minutes until browned (especially at edges) and completely firm/set at the center.
- Cool completely in pan set on a cooling rack.


This is great bread. I’ve also made your chickpea flax bread, which was perfect. I’m wondering if you have ever made a sourdough chickpea bread using chickpea flour salt and water. Would that work?
Hi Patricia! I’m so glad you like the bread! This buckwheat bread is my only successful sourdough bread venture. I tried doing a sourdough millet bread, based on this recipe. It did not go well. I am not sure whther a sourdough chickpea bread is possible. I think it is beyond my skills! 😉
Good to know. Because if it’s beyond your skills, (which I believe are extraordinary) I won’t even begin. 🤣
😂
Miss Camilla hi! This recipe is a genius!!! Thank you very much!!! On July 8, 2019 you suggested to Lila Peterson to use flour by adding the equivalent water to this recipe by weight; do you continue after that to follow you recipe or there are other adjustaments to make before Baking? I would appreciate your kind response. Thank you again!! Elizabeth
Hi Elizabeth! I am so glad you like the sound of this recipe. I tried searching for the comment you are referring to but could not locate it (searched comments for Lila Petersen, including variations on spelling). I wanted to see it because I was surprised that I had said something about using flour , since this recipe must be made with whole buckwheat groats. Please send an update to the comment/where I can find it! Cheers 😊
Thank you for this great recipe! I did the refrigerated option as I am not able to have fermented foods right now. I also blended the groats to a smoother consistency. I sprayed my glass loaf pan with avocado oil and baked in my toaster oven for 40 minutes. The edges were crispy from the oil, so yummy! It was a little difficult to remove from the pan and there was a giant hole in the bottom of the bread that happened during baking, not from trying to remove it from the pan. (Wish I could show you pictures, it’s super interesting!) I enjoyed it sliced while it was still a little warm as well as toasted. It’s so nice to have bread on such a restricted diet. Thank you so much! =)
You are VERY welcome, Andrea. Enjoy every slice 🙂
OMG LOOOOVE!!!! I am in love with this bread. And it is very forgiving!
I followed the directions except forgot to add the water to the food processor with the soaked buckwheat :). I was being very careful not to over process the batch and thought it looked a bit drier than your picture. Then when I dumped it in the bowl for the fermenting stage, I saw the measured water sitting on the counter! I just mixed it in, took about 1/4 cup of the mixture and gave it a whiz just to have some mush factor. Mixed it all together and left it in the fridge overnight.
I was not able to wait until it was completely cooled – was cool enough and I have a very sharp knife… The result was perfect and I ate 1/4 loaf already.
Slices very thin and has spring to it. Toasts great. And I am going to make a sautéed mushroom onion dip to serve on top of the bread because that’s how we tend to eat cooked buckwheat so this will be a canapé version.
I am now going to make the almond crackers and cookies and have about 20 more powerhungry tabs open for more goodies. Gluten free is no longer scary cardboard for me! I got those potlucks down now thanks you you Camilla!! Much love and gratitude (and I’m taking pics to post on instagram too).
Sautéed mushroom onion dip??? That sounds INCREDIBLE, Lina, and a fantastic spread for this bread. I am grateful to YOU for trying the recipes and taking the time to comment (especially for sharing your experiences making the recipe) 😍
I really want to make this bread but I don’t have a food processor. Can I use anything else? I have an old basic blade blender and immersion stick.
Hi Zarah! Yes,, either of those will work well! You do not need the bread batter to be perfectly smooth. I’ve used a stick blender when making this at my in-laws house (worked great, and, honestly, cleanup was easier 😉 )
How should I adjust the water if I only have 2 cups groats??
Hi Kristina,
Since 2 cups is 1/5 less groats (from 2.5 cups), you can likewise reduce the added water by 1/5. I call for 1.25 cups added water, so reducing by 1/5 means you will add 1 cup water.
You may want to bake in a smaller pan since you will have less volume overall. It does not need to be loaf pan, it could be almost any shape. Cheers 🙂
OMG! This is amazing! I made it today to go with my chili. I toasted a slice and then crumbled it over the chili to be my “cornbread”. So good. I even ate a piece not toasted, delicious!
I took it out at 35 min, but I will do 40 next time as the very bottom seemed like it could’ve been cooked a little longer. I was afraid I would over cook it as the top was done.
The slices are the perfect size for a snack of nut butter with sliced bananas, open faced tuna fish, and toast with my morning tea.
Thank you for the recipe.
You are so welcome, Debra, I am glad you like the recipe! If you are ok with bread that is a less traditional shape, consider making the bread in a cast iron skillet. It’s my favorite way to make it these days as the bottom gets a lovely crust (no siggy bottoms :)).
I fermented for a full 24 hours and it turned out very well, really delicious with a slight tang, which I love. Thank you for bringing bread back into my life!
So glad you like the recipe, Dawn! I love bread with a tang, too!
Can I use buckwheat flour? Same measurements?
Hi Amy,
I am not sure if that would work. If you did try, you would want to use the same weight of buckwheat flour as buckwheat groats and the same amount of water (let it soak), then whisk before baking. Again, I have not tried it, so it would be an experiment. You might want to experiment with much smaller proportions (say, 1/4 the size of the recipe) to see if it works.
I’m hooked on this delicious bread. I find I need to toast it for a long while to get it to crisp up. Love it topped with cheese, avocado, or almond butter. Thank you!!
I am so glad that you like the bread, Debra!
Can this be made in a bread maker?
Hi Kay,
I have not tried it in a bread maker. If you do try it, perhaps use the breadmaker for the bake function only.
can i ferment for less time ? say 4 hours first then over night ? not the full 24 hours ??
Hi Dipa,
You can, but I recommend using warm water to get started to speed up the fwrmentation.
Why does it have to be a glass bowl?
Will stainless steel be ok?
Is it supposed to rise much?
Hi Selina,
Stainless steel or ceramic will also work–apologies for sounding dogmatic about the glass bowl! You simply need a non-reactive bowl. No, this does not rise much–I slice it lengthwise if I want longer slice of bread.
Is there a version of this using quinoa instead of buckwheat?
Hi Riv,
I have not tried it with quinoa, but I think I need to test it. I did test it with whole millet and it did not work at all.
Im assuming step 2 and step 4 refer to the same bowl?
( 2. Drain buckwheat through a mesh strainer; set strainer over bowl and let continue to drain for a minute longer (the liquid will be gooey). DO NOT RINSE.
4. This is the same bowl as in step 4?
Pour buckwheat batter back into a large glass bowl and cover with a kitchen cloth. )
So the drained goo gets reincorporated with the blended batter?
I made the bread once this way and was surprised by the ‘wet’ texture in the middle; other comments indicate that this is an expected result, but I want to double check I did everything right before making batch 2! The flavor was great, even my husband enjoyed it!
Hi Anneliese!
Sorry for any confusion. Missing in your comment is , what I think is, the clarifying instruction: in a food processor or blender, place the drained buckwheat, 1 and 1/4 cups (296 mL) fresh water, and optional salt (I recommend 1/2 teaspoon). Process until blended but the batter still has some texture (see photo).
So no, do not add the drained water back in, add 1 and 1/4 cups of fresh water. You can then pour the blended mixture back into the same bowl that you soaked the buckwheat in (no need to wash it or dirty another bowl). I am glad you and your husband still like the bread 🙂
TU 4 your gift going to do this and let ferment a little longer I love the Sour Dough taste Blessings 2 U
Sounds wonderful, Geri! 🙂
Hi. We liked the bread but it was a bit too dry- it crumbled when I cut it. Can I add something to help it be a bit more moist? I was thinking maybe flax egg. Any thoughts?
Hi Alison!
Glad that you liked the bread. That’s interesting that it came out dry, often people right to ask why it came out so moist :). But getting to your question, yes, you can definitely add some flaxseed meal or Chia seeds, about 2 tablespoons, and that will keep things from crumbling and will also add Some moisture, because of the fat Contant of the Chia seeds, and or flaxseed meal.
Any idea what would happen if I used warm water with sugar and yeast instead of just water in the recipe and let it rise for a few hours instead of fermenting for 12 to 24 hours? I already started soaking and I need the bread for an event. I’m going to before that.
Hi Morgan! I cannot say I do you know what would happen, but it sounds worthy of an experiment! You might want to try experimenting with a smaller ratio of the ingredients, to see if it works, so that you don’t end up wasting your ingredients. I would love to know if you give it a try!
Can I use roasted buckwheat for this recipe?
I did it years ago, and I don’t remember which buckwheat I used :-(.
Thank you!
I have made it with roasted buckwheat ( the first time was in error!) snd it turned out well. I’ve done it on purpose since— it adds a lively toasty flavor, as you can imagine 😉
I absolutely love this buckwheat bread recipe! It’s truly fantastic. I’ve made it several times now, and it never fails to turn out great. What I appreciate most is how easy it is to follow your instructions. Out of the many wonderful bread recipes of yours that I’ve tried, this one is my absolute favorite. Thank you so much for sharing it. I’ve thoroughly enjoyed making and eating it and my family too 🙂
Would it hurt anything to add an egg and a little oil? I think when I added a little more water during the soak it was sort of like rinsing and I didn’t think about that until afterwards. Also, it must be the buckwheat I was using, but it is so dry. I added water, it still looks nothing like the mushy stuff in the picture after processing it. It looks sort of spongy instead and not any liquid leftover.
Hi Sarah,
Oh no, that does sound unusual — that definitely sounds like an issue with your buckwheat . The groats should not only be softer, but the w soaking water slightly slimy (it sounds weird, it is simply the nature of buckwheat groats). I’m not sure about the addition of an egg, it would have to be an experiment.
This looks great, but includes a lot of extra waiting time in the fridge/on the counter. Can I shorten it, by using your quick soak method in boiling water for 20 minutes?
Hi Angela,
Yes, you can definitely do that!
I made this before and it turned out great, but this time this is a light pink skin on the top. Did it ferment too long? It has been on the counter for 17 hours.
Hi Laurie! Buckwheat has natural colorations of pink/red/purple, so it can sometimes turn the soaking water to have a tint of those colors. It can depend on the particular batch of grains, water ratio, slight differences in water to buckwheat ratio, and more. Not to worry! 🙂
This recipe has been a LIFESAVER for my baby girl’s strict diet. She’s healing from an FPIES diagnoses, and buckwheat was her first ‘passing’ food after lamb and a few veggies. Love making these into muffins for her and can get 2 dozen! They freeze amazingly. Thank you so much for coming up with this recipe! Hoping to try the add-in options soon <3
I am thrilled that your little one can eat this bread, Kelsey! ❤️❤️❤️ Cheers to you, super-mama, for finding and making nourishing foods for her . Have fun with the add-ins!
My mum passed this recipe on to me, I made it the first time exactly as written using the fridge method and the second time fermented with added spices and chia seeds. It is amazing – simple, clean, nutritious, and without a doubt a new staple in my diet. Thank you so much!
Hi Savannah,
Thank you, to you and your mom! I am so very happy that it is a success for you, and I love the sound of your additions 🙂
Mine turned out really mushy after baking – what did I do wrong? Did I overland it? Did I let it drain too much? Please let me know what would cause it to come out mushy in the middle after baking. I even baked it a good 30 minutes longer but it only dried the outside of it to the point of being very hard.
Hi Amy,
The bread is definitely a different texture than regular bread. It should be cooked through— the “mushy” texture may be because you are expecting a drier bread texture. But here is the good news: getting the drier breast texture is easy! Simply toast it! You can do individual slices, or slice the whole loaf snd oven-toast on a baking sheet. I hope this helps!
Very interested to try this. I would like to sprout the groats first? Is that possible will that affect the outcome sprouted groats are easier to digest. Thank you so much. I looked up a recipe for this kind of bread after I saw a Facebook ad for $12 a loaf for the exact same thing.
Hi Lee,
Absolutely, you can definitely use sprouted groats! I have tried it and it works well. I am a novice with sprouting, so it’s not something I write about (yet!). I saw the same bread ad on Facebook and instagram!
This is Fabulous- I only had my mini cuisinart food processor so it was a bit more laborious and I only had a 7 x 2 round cake pan to bake it in..
it is SO good – I look forward to making it again w Walnuts.
Patricia, that sounds wonderful! And way to make it work with the pan you had on hand, I love that 🙂
Hey Camilla, After you blend the groats you recommend letting the batter sit for between 2 hours and 24 hours. Any guidance on the difference? If you only do 2 hours how does it affect the consistency vs letting the batter sit 24 hours. Just curious.. By the way, I sprouted the groats for my last batch of bread and it came out great.. only issue was it was a little too moist.. so I am going to use less water this time. Thanks!!
Hi Bryce! Letting the batter sit for more or less time will affect the flavor, less so the consistency. The bread will have a slight tangy flavor (from fermenting) with the longer sit time. Some people love the tang, some people don’t. 🙂
Hello Camilla, This looks like a great recipe. I sprouted the groats and as part of the sprouting process (24 hours) I washed off the groats as part of the instructions.. So this kind of goes against your instructions. I’m hoping that my recipe will still work. I’ll let you know. Cheers Bryce
I think that should still work fine, Bryce. 🙂
I mistakenly bought groats. Is this a recipe I can use?
Hi Jan! You didn’t make a mistake, my recipe uses buckwheat groats :). So absolutely, uses them for this bread.
Mine stunk SO bad ???????? I wonder what happened.
Yikes, so sorry to hear that Heather. Did it smell before you baked it? I am guessing that you let the bread ferment? That could definitely cause a smell if it was left for too long, or the temperature was, perhaps, warm?
Can I bake this bread in low heat?
If not, do you have a bread recipe that can be cooked in low heat? I am looking for a bread I can bake in 140-170 degrees to preserve the nutrition.
Thank you.
Hi Rachel,
You could definitely do this particular bread at low heat for a long period of time. I am not sure how long it would take—are you using a dehydrator? You might need to experiment to find out how long. You could shorten the baking time by spreading this much thin (flatbread), rather than a loaf. I am intrigued, I would love to know if you try this and how it turns out!
Hi there.
I can’t explain how grateful I am for this recipe! I am quite overjoyed.
For 25 years, I’ve had to avoid so many things, but especially any bread, even gluten free bread.
I think this recipe works because it doesn’t use flour, but the whole groats. And also, because it’s fermented I think it will be easier to digest.
I’m going to pass on this recipe to my sister who’s coeliac.
Also, I saved some of the mixture and added a wee bit more water. This made lovely little drop scones that I’m also very excited about.
Many many thanks x
R Brown—my heart is filled with joy reading your comment. I am so happy that this is such a success for you! And what a smart idea to make drop “scones” the way you did–I am going to have to try that!
@R Brown, Drop Scones!! I cant wait… this is a treasured recipe already
You are so sweet, Patricia 🙂
@R Brown, Scones! What a great idea. I am just now embarking upon this Buckwheat Adventure. Since I am in Florida, I will ferment it in the fridge. I’ll keep you posted!
Is there anyway I can do this without the texture ? Would rather a smooth texture, any suggestions ? Thank you !
Hi Tiffany,
Yes! In the step where you blend the soaked buckwheat groat for a little bit, go ahead and blend until completely smooth. Then proceed as directed for baking the bread 🙂
Thank you for this wonderful recipe!! We couldn’t wait for it to cool so sliced and tasted and WOW….so excited to have such a simple, delicious new gluten free,vegan bread option! Can’t wait to have toast!!
A wonderful recipe, I shared it with my friends. Thank you so much!
Thank you and thank you, Julie!
Hi, thanks for the recipe. Will it get spongy ( breadlike with the usual tiny wholes) if I don’t leave it out to ferment?
I want to avoid the funky smell but scared it won’t rise as much as if I let it ferment.
Thanks in advance
Hi Anju,
The texture is pretty much the same either way. This is not like most breads— it is very dense and solid, not spongey.
I made this last night- just in time for an evening snack! Added lots of mixed seeds to the top. It’s good but overly damp. I cooked it for 15 mins extra . It tastes lovely but is fairly solid- not bendy.
Hi Amanda,
I am glad you gave the recipe a try! This is definitely not a typical bread recipe because of the whole groats and no leavening. I like the unusual texture, but my favorite way to enjoy the bread (and to make it more like traditional bread) is to toast it. You can even slice and toast all of the slices at once (on a sheet pan–350F for about 10 minutes) to get drier, crunchier slices. 🙂
Could I use Sprouted Buckwheat flour somehow?
Hi Lisa,
I wish I could say yes, but I do not think flour would work as a direct substitute for the whole groats in this particular recipe.
Reminds me of breads from home in Ukraine. Thank you for this.
Hi, Cami
What’s the water ratio for buckwheat Flour instead of groats??
Hi Tweedypuff! I don’t think this particular recipe will work with buckwheat flour, just the whole groats.
This is delicious!! Thank you for sharing your recipe. Made it plain this time but already planning on adding pumpkin seeds and raisins or cranberries next time.
Wonderful, Paula! So glad you like it 🙂
Can you make the recipe with green buckwheat? Im interested to try it.
Hi Arlene! Thank you for mentioning green buckwheat. I had never heard of it so I searched and found some articles and products. Based on what I have read, yes, this should work just fine with green buckwheat 🙂
Absolutely great! Thank you for sharing this recipe. My first bread ever and is so tasty and gluten free!
Yay! So happy you like it, Patricia!
Amazing. This bread has changed my life!
Omg, this is amazing, I’m in danger of gobbling it up before it cools. Thank you thank you thank you. My digestive system thanks you, as it doesn’t like grain.
(b.t.w, I baked it 10min longer than your recipe says – it seemed to still be sticky in the middle)
Thank you so much for this nourishing recipe. I love it!
Just started this, groats soaking in the fridge. I have a metal loaf pan (Aluminized Steel Loaf Pan) and only just saw in the comments about needing a glass loaf pan (should have clicked on the link in the recipe…) Will this cause a problem? It’s pretty new, not rusted or degraded in any way. Otherwise, I’ll have to bake it in the glass Pyrex casserole that it’s soaking in right now. One less thing to wash, but…:-[
Hi Rachel,
I think you should be fine with the pan your described 🙂
Which of the two buckwheat types do you use the American or kasha?
Does it matter?
Hi Karen, I typically use the American type since it is what is most commonly available (I don’t know that I have ever seen toasted buckwheat –kasha–for sale ). But I have toasted my own buckwheat groats and used them in this bread. So either will work!
@Camilla, I am confused. So unfamiliar with buckwheat! My DIL buys buckwheat from the Russian store. It’s toasted so I was thinking it wouldn’t work. Should I be looking for raw buckwheat groats for this recipe?
Hi Anne! Toasted buckwheat groats (kasha) will workin this recipe, too, same as the raw 🙂
Hi Camilla, do you know the shelf life of this bread?
Hi Jac! Sorry, it is buried at the bottom of the recipe under Storage. Here it is: Store the cooled bread wrapped in a cloth at cool room temperature for 2 days, in an airtight container in the refrigerator for up to 2 weeks or the freezer for up to 6 months.
Hello Camilla,
I am worried about the physic acid content of this bread if the groats are not rinsed after soaking. What do think about using psyllium husk as a binder if the groats are rinsed?
Thank you!
Hi Mathilde,
There are pros and cons to phytic acid, so it is entirely up to you. Specifically regarding the soaking water: soaking activates phytase (an enzyme) which works to break down phytic acid. The phytic acid is broken down within the grains (from the activation of phytase), not transferred to the water. Phytic acid is further broken down by cooking the bread. I am certain you can add some psyllium husk! It would definitely hold this bread together even better , regardless of the method you choose with the soaking water.
Hi Camilla.
Do you know if I can use toasted buckwheat groats? The untoasted ones are really hard to find in my country?
Thank you! 🙂
Hi Ana, yes, you can definitely use toasted buckwheat groats 🙂
Hello Camilla. Firstly, thank you for this recipe which is great in its simplicity. I wanted to ask you for help – for some reason I’m unable to achieve the bread shape and texture that can be seen on your pictures. The bread I get every time has got a very hard outer skin, while the middle of it is quite soft, and seems rather raw, after it’s taken out of the oven (even if I bake it for very long). Additionally, the skin at the top raises, creating empty space between the top of the bread and its middle. I will be looking forward to hearing from you. Thank you for an excellent recipes.
Hi Bartek,
Thank you so much for your kind words. I am sorry that you are having issues with the bread. I have a quick question: is there a chance that you are using a convection oven or coventction oven setting? The issue you describe can happen with convection ovens. Let me know if that is not the case and I will trouble shoot from there 🙂
I made the fermented version the first time it was not crazy about the flavor, but I love the texture. I did the other version the second time and I love it. Thank you.
So easy and delicious, thank you!
I make this for my wife, who has some food intolerances. We both enjoy it very much. Thank you.
This is the only bread I make. I have made your recipe for years, thank you!
SUPER delicious! Such a delicious, delicate flavor. Keeper recipe. I poured the batter into four mini loaf pans. Loved the crispy, crunchy texture! Cut a mini loaf in half lengthwise and also toasted them, yummmm!
Next time will try adding dried cranberries or raisins. Maybe some flax & rosemary or Italian seasonings.
Wonderful Eve, I am so glad you like it! Yes, you can definitely add flax, dried fruit, or herbs–all tasty and good!
Thank you for this bread, a life changer for my health!
Just made my first loaf of this bread and it is delicious! I think it will wonderful toasted. I might add a bit more salt next time. Will definitely make this again. I like that is it a “slow food” in that you prepare the buckwheat groats over a couple of days. Thank you for sharing this recipe.
Hi, this is the second time I have made this recipe! The first didn’t turn out so well but I only soaked for the minimum of 2 hours and used a flatter sort of tray when baking in the absence of a bread tin. Today I did 4 hours each time and baked in a deeper, smaller dish and the result was absolutely FANTASTIC! Into the blender with the soaked groats I added 1 clove of smashed garlic, herbamare veggie salt, fresh black pepper and some pomegranate molasses. The resulting bread was truly delicious, and I served it smothered in hummus and homemade tabouli. I’m trying to keep from demolishing the rest of the loaf tonight lol but I’ll hopefully save that for tomorrow night. Thank you for the most affordable, healthy and pure bread recipe. I’m so grateful!
So wholesome and satisfying! I love it!
I’m really excited to try this bread, as I’m only able to have buckwheat. Is it possible to do it with buckwheat groats that have already been soaked, activated and dehydrated again, to get rid of phytates? Thank you for your help.
Hi Nicola,
Yes, you can definitely make this with soaked, activated and dehydrated groats 🙂
I love the fact that the bread only requires water and salt besides the buckwheat. And your recipe is not based on the buckwheat flour – but on the groats. This bread is my life now – thanks for sharing!
I am thrilled to pieces, Isabel 😍 I am with you, having a nourishing bread recipe to depend on (and that is easy and frugal) is so reassuring ❤️
I love this recipe!
I am very interested in fermentation and in particular using gluten free grains, pulses and legumes – grinding them to flours and making grain free bread. I was wondering if like this buckwheat recipe, the same could be achieved with other pulses/ legumes such as yellow split peas or green/brown lentils, red lentils, brown rice ( I know it’s a grain), fava beans or or butter beans??? Would they work the same as Buckwheat? what are your thoughts?
I love making bread!! I am keen to try some new gluten free sourdough options.
Cheers,
Penny.
I notice the recipe says glass bowl, I started it already (groats in the fridge right now) in a stainless steel bowl – does this affect anything? should I switch to a ceramic bowl for the next steps? Thanks!
Apologies, Cat, for not getting to your message until now. A stainless steel bowl is fine (non reactive) . I will change that to any non reactive bowl in the recipe 😊
Excited to have found such a healthy and apparently simple recipe! I’m going to make this tomorrow 🙂
I would like to do minimal work and the shortest time possible, so do you think 2 h in the fridge soaking + 2 h in the fridge once drained will turn out fine, which is the shortest time you mention and also fridge (no room temperature fermentation)?
Thanks a lot in advance, I can’t wait to make this!! 🙂
That should work just fine, Lynn!
This bread is so amazing…I just love it! So wholesome and satisfying while being extremely nutritious and great for gluten intolerance. Thank you for sharing this. I will be making again and again for sure! I just made sine bruschetta with tomatoes and basil from my garden on this bread and it is killer yummy!
I love this simple recipe. It’s different from othe4 breads, but once toasted, the slices are superb .
Thank you so much for this recipe – it is amazing! I can’t believe it comes together with just one ingredient, it’s like magic!
I’m wondering if the two options for step four affect the final flavor of the bread (i.e., does letting the batter sit out to ferment result in a different flavor than having the batter sit in the refrigerator)?
Thanks again for sharing, love this recipe and will be making it often!
Hi Stephanie! So glad you like the bread. Yes, letting the batter sit definitely affects the flavor–some love it, others not so much(e.g., my husband finds it “funky”). It is worth trying it to see if it your thin or not (you could make a half or quarter size bread to test it)
Camilla! This recipe has changed my life. Thank you, Thank you. This is my third time making this bread in the span of a few weeks. It is delicious and easy, best of all I don’t look 6 months pregnant after eating it!! I am now devoted to finding new and old ways to work with buckwheat since finding this recipe. At this moment I have a bowl full of batter that perked up substantially overnight. Have you tried fermenting the batter inside the loaf pan instead of transferring it from bowl to pan?? If so what were your findings?
Thanks again and keep on keepin on sister!
Hi Liz,
Oh wow, I am thrilled to know how much this bread means to you! Hooray for bread that does not fight back :)!
No, I have not tried fermenting it right in the pan–sounds intriguing… It might stick initially, but should release once the loaf is completely cool (be sure to use a ceramic or glass loaf pan). Let me know if you give it a go!
This sounds like one of the most authentic bread recipes ever… the way people from eastern Europe would have made bread eons ago. Buckwheat is a grass, allegedly & I suspect it may have been the precursor to bread made from gluten grains which evolved much later. Since I cannot do without bread, I’ve been searching for an easy buckwheat recipe for a few years now. No idea why it’s taken this long, as I knew about buckwheat from the classic Russian blini & that the bread recipe just had to be out there somewhere. Thank you for sharing!♡
You are so welcome, Michelle!
@Camilla,
Have started to make this… will let you know how it went😄
Great, Michelle!
So delicious! I’ve made with raisins and molasses and both so good!
Ooh, raisins and molasses are right up my alley! I need to try, Christine!
@Christine, how many raisins, how much molasses? When to add?
This is the best bread recipe ever! Just made it!
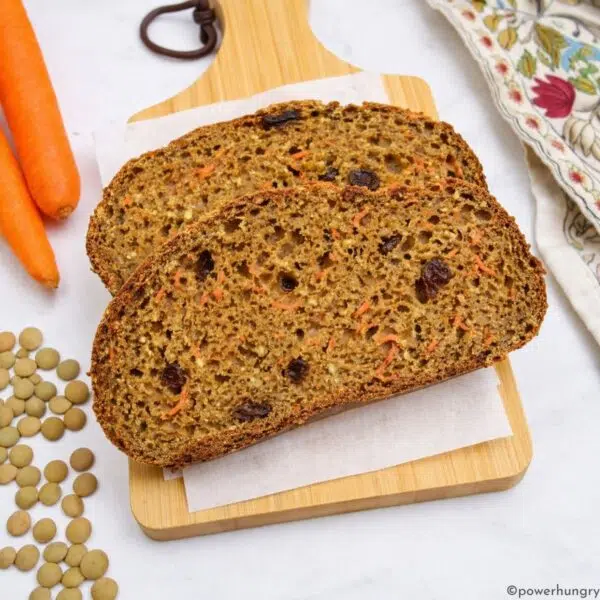
I added pepper, basil, and shredded carrot inside to increase the volume. So good with hummus, avocado, and sprouted greens. Gresh and light, no heavy feeling after commertial bread!
Oh Zeljana, I am so happy this is a success for you!!! 😊
This is the best bread recipe ever! Just made it!
You’ve got some great recipes on here. I make this buckwheat bread all the time. I like adding sunflower and pumpkin seeds. I bake it from a cold oven at 200C. Works every time. Thank you
Ooh, those sound like great additions, Raymond 🙂
@Raymond, put it into a cold oven and heat to 200. How long total?
Do you think I could add in some fresh spinach to the 1 ingredient flourless buckwheat bread? Or will that add too much moisture? Looking to add a little more fiber without extra fat/calories. Thanks.
I think that would work fine, Tena. You could reduce the water by a tablespoon or two, depending on how much spinach you add.
All I have is toasted buckwheat. Will it work?
Can’t wait to try it.
That should work, Dee
If you added baking soda or baking powder. Would it make it a lighter bread?
Hi Pat,
It should rise a bit, but not a lot. I do not think it would render it light, it would still be a dense bread.
Hello Everyone,
I was astonished to find this easy recipe for buckwheat bread. I have been buying buckwheat bread with cherries at my local farmers market which is delicious. I will try making my own very soon. Can’t wait.
I’m beyong excited to try this bread. . My fermentation process is done and I just popped it into the oven. I have a little left over of the fermentaed batter because it could not all fit in my loaf pan. Should I throw it away or save it on the frig as a started for the next loaf? ANy thoughts on this?
Hi Alenna,
You can make pancakes with it! Really, just spoon it onto a griddle or skillet and go (lightly oil the skillet to avoid sticking). You can add spices or a bit of sweetener, vanilla, some fruit, or just plain 🙂
I haven’t tried it yet, but am going to give it a try. Wondering if you think I could substitute some whole millet for some of the buckwheat? Just an idea I had…
I think that would work well, Anna 🙂
I’m wondering how much phytic acid is being consumed since the buckwheat groats are not rinsed before blending with water and salt
I just finished making this bread today. I divided into 2 batches for the second soak/fermentation. I added cinnamon to one half and didnt add salt or anything to the other half, though wishing i would have done some herbs or something for more of an Italian flavored bread. I baked each half in my new instapot vortex air fryer in a medim size loaf pan. It worked perfectly to cut into little sandwich bread sized pieces. Some i had with jelly and then i had some as a toasted turkey and avocado sandwich. It was pretty good. This was a surprisingly easy bread to make and 1 ingredient is just unheard of. I did have a terrible time finding buckwheat so i ended up using bobs red mill buckwheat creamy hot cereal. The loaf certenly seemed moist and kind “hot cereal” textured in the middle. Not sure if this happens whit the regular groats too? I will most likely make it again down the road. Thanks for sharing!
You are so welcome, Ashley! Thank you so much for your detailed reviews and how you used the bread. I have not had the mushy center problem, I am thinking it must be the use of the cereal instead of whole groats.
Excellent recipe! Thanks a bunch!
You are very welcome, Norma!
Thank you Camilla. This is the first gluten free bread I actually enjoyed eating! I found out I am gluten intolerant only half a year ago and it has been a painful road to find something good to eat. Your buckwheat bread turned out beautifully. My husband and I put the batter together last night and baked it this morning. After cooling we toasted it up and slathered on some goat butter! Wow is it good! The only thing we will change for our taste is to put in a little more sea salt, but this can be done when serving it to by sprinkling on a few flakes of Maldon. This is a German/Canadian habit! We are looking forward to try your other recipes now. Jacki & Martin
I am absolutely thrilled, Jacki & Martin! Hee hee, I am with you on the salt, I love some extra salt on or in my bread. I need to ry the large flakes on top as youtwo added. Thanks so much!
Would you recommend using Raw Buckwheat Grouts or Sprouted Buckwheat Grouts for this? My son and I are grain-free and I’m new to grain-free baking. I’m looking to purchase ingredients to make many things from your website. It all looks so delicious! May even get my husband to go grain-free too!
Hi Sarah,
You can use either, they will both work for this bread :). I know that some people prefer sprouted grains for the health benefits (you can google this to read more–it is not my are of expertise :)). Also…buckwheat is still considered a grain by many, even though it does not belong to the botanical family of grains (Poaceae); it is classified as a “pseudo cereal” (quinoa and amaranth are in the same boat). I find it very easy to digest (far more than traditional grains) and it makes very tasty baked goods 🙂
I made this bread today exactly as the recipe stated and it is FABULOUS! Thank you so much for this magic.
That makes my day , Chris! So glad it worked for you!!!
So glad I found this recipe. I haven’t tried it yet, just got the groats. I’ve read all the comments and I’m pretty excited. Thank you.
I am going to try this simple recipe. I think your Sodium content for one slice is off though. One teaspoon of salt is 5.69 grams. Half a teaspoon, which is what the recipe calls for, is going to be 2.85. Even if the buckwheat has some sodium in it, 1/14 of a slice isn’t going to work out to 83.1 grams of salt. We should only be having about 1 teaspoon a day of salt. Thanks for the recipe.
Hi! Thanks for letting me know 😊 it was a tho, should have been mg not g. I have made the correction
If you add some dill weed and carroway seeds, the bread will taste and have the aroma of rye-bread.
Are you sure it’s still that high in carbs? Or is that simply the carbs of buckwheat prior to fermenting? I would think the fermenting process would lower it more. Obviously, it gets hard to determine the carb level on anything fermented because there are a lot of variables such as time and temperature. Looking forward to trying the recipe!
Hi Delanie,,
Yes, I calculated the carbs without any changes due to the fermenting. I cannot find any solid scientific evidence regarding reduction of carbohydrates following fermentation for grains. If you happen to know of any such evidence, I would love to know! Thanks 🙂
Hi ! I’m pregnant and on a serious “bread fix”. I made this a few nights ago – and it turned out super delicious! Unlike many other homemade, healthy and especially gluten free loaves – it didn’t dry out by the next day. I used a 9×9 pan, and sliced it through the middle to fill. I made it into thick and chunky ham and cheese sandwiches to take to work, and a giant tuna sandwich for the following day. The rest got enjoyed smothered in butter and honey.
I’ll definitely be making this again! It’s also really forgiving in terms of soaking times. I had the groats soaking in the fridge for a few days, just because I didn’t have time to bake!
Thanks for yet another reliable, tasty, healthy and simple recipe to add to my regular rotation!
Jessie! So glad to provide a bread fix and very happy to hear that the recipe turned out so well! A 9×9-inch pan is a great idea, thanks for sharing that. I know that will be useful for others (including me! thank you!).
Hearty bread smothered in butter and honey? I think we can be very good friends 🙂
This recipe is awesome! I love dense, German-style bread. Thank you!
Wonderful, so glad you share my affection for hearty, chewy German bread, Liz!
Thanks so much for posting this, Camilla! It turned out great. Would adding chia seeds work? Since they absorb so much liquid; would the water amount be increased & how much?
forgot to add that I read to add 1 Tablespoon ACV per cup of water to reduce phytates. What are your thoughts on this? Thank you, Camilla! 🙂
That sounds like an excellent addition, Paula!
Do you add the ACV to the soaking water or to the water when prepping the batter for baking. Thank you~
Hi Gail,
There is no vinegar in the recipe. We’re you wanting to add it?
Hi Paula, so glad it worked out! Chia seeds would be a great addition. I do not think that the addition of a few tablespoons of chia seeds would require any changes to the liquids since the water is still present in the loaf (albeit absorbed by the seeds)
Hi! Thanks for this recipe. My husband suffers from celiac disease so this is very helpful for us. I got a question,though. can this be baked using a cast iron skillet ? I am trying to achieve a flat bread…
Yes! Should be wonderful baked in a cast iron skillet, lots of crusty edges 🙂
I just put my bread in the oven but after I let it rise all night there is a funny smell ..is this normal ? It’s the first time I do it and I just want to make sure before eating it..thanks
Hi Patricia,
Could you describe “Funny?” Slightly yeasty or beer like funny is good. Funny stanky or spoiled, not good. Did you bake, and if so, how did it turn out?
I am baking my bread today and it also has a funny smell. Not quite like yeast. Will see how it turns out.
Camilla, I already have buckwheat groats in my pantry. I have made cereal out of them by soaking and then whizzing with coconut milk in a blender. It’s very tasty. I’m really excited to try this because I’m such a fan of buckwheat. Thank you for being so brilliant and coming up with this!
Hi there.
Could u perhaps give me a measurement of actual buckwheat flour and watet
Hi Kaushal,
All of the measurements are in the recipe card at the bottom of the post. The recipe uses 460 grams of whole buckwheat groats (not buckwheat flour). The amounts for the water are also n the recipe. 🙂
Camilla, we need to use the buckwheat groats per your instructions…why would the buckwheat flour not work? Because it is more processed? Thanks
I do plan to follow your instructions completely just wondered about the flour…
Hi Lila,
That’s a really good question. I really like the texture of leaving the batter somewhat lumpy (grainy results) but that is a personal preference. I think the main issue for using flour instead of groats here is that the process would need to change: I am pretty sure you can soak and drain buckwheat flour, so the volume of the soaked, drained groats would need to be determined to know how much additional water to add to the batter. Here’s an idea: make the buckwheat bread with whole groats the first time and measure the weight and volume of the drained, soaked groats to determine how much water to add to an equal weight of buckwheat flour (460 g) in addition to the 1 and 1-1/4 cups water. I would love to know if you try it!
BTW, I love your name! I had a favorite great aunt who was a Lila–loads of fun and a fantastic cook, too 🙂
Thank you! I’m beginning to hear more often. Kinda nice to here…Lila!
I made your recipe exactly as you posted. Delicious! Never dried out…front first slice to last.
Thanks for perfect recipe!
So glad to hear it, Lila!
Love the 1 ingredient buckwheat recipe and would like to make it. Cannot get the print button to work. Will try from the desktop tomorrow.
Hi Marianne.
Someone else asked about this and I checked from the desktop and it worked; but your comment is helpful since you indicate that it is perhaps from a mobile device that you tried to print. I just tried from my phone and indeed there is an issue; the formatted page comes up for a moment but then goes back to the main page. Thanks for alerting me, I will try to resolve the problem asap!
When do you add in the extras like nuts and seeds?
Hi Tonia!
You can add large seeds and nuts when blending to chop them to about the same texture as the buckwheat pieces, or stir them in, chopped, to the batter before it stand for the second time. Dried herbs or spices, oily herbs such as fresh rosemary, or flavorings such as the molasses I mention, can be stirred into the batter or blended in (food processor or blender). 🙂
I’m so happy to hear of your bucket wheat bread, can’t wait to try it!!
HI Grace,
I hope you give it a chance, it is really satisfying! Cheers 🙂
I wondered how much buckwheat groats you need to make one loaf.
Hi Sandy,
The exact amounts are all in the recipe at the bottom of the post (2 and 1/2 cups groats or 460 g) 🙂
Your print button appears to be broken.
Hi Jude,
I just tested it and appears to be fine now, I hope it was just a glitch (that stays away!).When you click print, it should pull up a formatted page with the recipe, but then you will need to print that page from your computer; forgive me if you already knew that!
This looks VERY interesting! Now I am off to find some groats!
Yay!
I liked ingredients.I want to see the photo of Buck wheat.
Thankyou.
Hi! The third phot is a close up of the buckwheat groats 🙂
Regular, raw or toasted buckwheat groats? Can yo recommend a brand please. Thank you for this recipe. I am excited to ry this. Is buckwheat flour not appropriate to this?
Hi! I used raw buckwheat groats. Specifically, I used Bob’s Red Mill buckwheat groats, but any brand–or bulk buckwheat groats– will work. I have not tried this with toasted buckwheat groats (kasha); I am not sure whether it would work, but will put it to the test in the future!
How can this have zero carbs? If you ate more than a 1/14 slice would it still have zero carbs? Thank you.
Hi Vicki,
It has 22.9 grams per slice. I think I see how you read it as O g, as the amount for saturated fat , which precedes carbohydrates, is 0g. 🙂