
This post may contain affiliate links. Please read my disclosure and privacy policy.
This post may contain affiliate links. Please read my disclosure and privacy policy.
Dried beans in your pantry? If yes, you are all set to make a batch of my easy DIY dried bean tofu! It is soy-free, high protein, a cinch to make, versatile, & made with 1 ingredient (plus water, and optional salt).

Table of Contents
- Soy-Free Tofu made with Dried Beans
- Recipe Benefits of Easy DIY Dried Bean Tofu
- Ingredients for Easy DIY Dried Bean Tofu
- Step by Step Instructions
- Step One: Rinse the Beans
- Step Two: Quick-Soak the Beans
- Step Three: Drain the Beans
- Step Four: Blend the Beans
- Step Five: Cook the Bean Tofu Mixture
- Step Six: Pour Bean Tofu Batter into Pan
- Step Seven: Chill the Tofu
- Step Seven: Unmold and Cut the Tofu
- FAQ & Tips
- What is the Taste & Texture of the Bean Tofu?
- Can I Vary the Texture of the Tofu (extra-firm or silken)?
- Can I Freeze the Tofu?
- High Altitude
- How Far in Advance Can the Tofu Be Made?
- How Should I Store the Bean Tofu?
- Can I Add Flavorings Directly to the Tofu?
- More DIY Soy-Free Tofu Recipes
- Easy DIY Dried Bean Tofu (1 ingredient, soy-free, high-protein) Recipe
Soy-Free Tofu made with Dried Beans
Many of you asked if my Mind-Blowing Red Lentil Tofu could be made with dried beans.
I did not know. But I put it on my to-do list of recipe testing.
That was (ahem) several months ago. Oops and apologies. But also, better late than never.
Part of what kept my dried bean tofu mission on the back burner is that I wanted to know if I could use my red lentil tofu method with almost any kind of dried beans. That would mean a lot of tofu, and a lot of refrigerator space.
With fair warning to my husband and son, I finally got to it. And (drumroll, or dried bean shaker)…SUCCESS!
With only a few tweaks to my newfangled method, I can state with confidence that you can make tofu–with ease and swift efficiency — from just about any dried beans!

Recipe Benefits of Easy DIY Dried Bean Tofu
A few details regarding this humble recipe include the following:
- Soy-free
- Can be made with (almost) any dried beans
- Vegan (no eggs, no dairy)
- Grain-free
- Gluten-free
- Oil-free
- Nut-free
- Seed-free
- High in protein (on average, 9 to 10 grams per serving)
- High in fiber (on average, 10 to 11 grams per serving)
- Low calorie (on average, 125 to 130 calories per large serving)
- Easy to make
- Frugal
- Made with 1 ingredient (plus water & optional salt)
Ingredients for Easy DIY Dried Bean Tofu
The exact amounts of each ingredient are indicated in the recipe card at the end of the post. Toggle between US Customary (volume) and Metric (weights) for preferred measurement option.

The only ingredient needed to make this tofu is dried beans.
I tested my method using six varieties of dried beans:
- Black beans
- Pinto beans
- Lima beans
- Adzuki beans
- Great Northern beans
- Red beans (smaller than kidney beans; I do not recommend other larger red beans, such as red kidney beans)
Use the dried beans you prefer! I have a favorite, which I will share later in the post.
Making the recipe also requires regular tap water. I recommend adding salt to the tofu, but it is optional (and/or adjustable) depending on your needs and tastes.
Step by Step Instructions
For reasons of simplicity (as well as my own sanity), the steps below feature one type of beans. However, the same steps apply to all of the dried bean varieties.
Step One: Rinse the Beans
Place the beans in a colander or mesh sieve and rinse under cold water. This removes any dust or debris from the dried beans that may be present as a result of processing and packaging.
Step Two: Quick-Soak the Beans

Place the rinsed and drained beans in a medium bowl. Pour enough boiling water over the beans to cover by at least 1/2 inch (1.25 cm). Let stand for 20 minutes until the beans are somewhat plumped and the water has cooled.
Long Soak Option
Alternatively, cover the beans with cool temperature water at least 12 hours (or up to 24) before making the tofu. Drain the plumped beans and proceed as directed.
Step Three: Drain the Beans
Drain the soaked beans through a sieve or colander, discarding the soaking water. If using black beans, the water will be dark and inky; if you are new to soaking black beans, this is completely normal.
Step Four: Blend the Beans
Place the soaked, drained beans, fresh water (I use filtered tap water), and optional salt in the container of a regular or high-speed blender.

Blend the bean-water mixture on high speed until completely smooth, stopping several times to scrape down the sides of the blender container.
It is very important that the blended bean mixture be 100% smooth for it to cook properly. Any larger pieces will not cook properly using this method for cooking and could make you ill. If your blender does not have the power to blend the bean mixture until completely smooth, do not use. Alternatively, if there are only a few small pieces, strain the mixture through a fine mesh sieve and discard the pieces.

Step Five: Cook the Bean Tofu Mixture
Pour the bean mixture into a medium-size, heavy-bottomed saucepan.
Whisk over medium-high heat (whisk the entire time) for 6 to 8 minutes until VERY THICK. Turn the heat down to medium, as needed, especially if the bubbling gets intense :).

After 6 to 8 minutes, the tofu mixture should be very thick, glossy and will begin to pull away from the sides of the pan. It will glob onto the whisk when lifted from the saucepan. If not, continue to whisk for a short while longer.

Note: It is extremely important that the bean mixture be cooked until it is very thick and glossy. It will be sticking to the sides of the pan and will adhere (very thick) to the whisk, as pictured above. If not, it is not cooked all the way through. You must continue cooking until it is very thick. The tofu mixture should start to set up, easily, before it is placed in the refrigerator. If not, it is not cooked, and you should not, under any circumstances, eat it.
Step Six: Pour Bean Tofu Batter into Pan
Scrape and spread the batter into an 8-inch (20 cm) square glass or ceramic baking dish, smoothing the top.

The pan does not need to be oiled or sprayed with nonstick cooking spray. The tofu will release (with ease) from the pan once it is set.
Do not worry if you do not have an 8-inch dish. Use any nonreactive pan of similar shape and size, or divide the mixture between two or more smaller containers (I like the tofu to be roughly 1-inch/2.5 cm in depth, but there are no rules here). I do not advise using a deep pan (e.g., loaf pan). However, you could divide the tofu between two loaf pans
Step Seven: Chill the Tofu
Refrigerate the tofu, uncovered, overnight, or for at least 8 hours, until very firm. Alternatively, leave the tofu in the refrigerator for up to 5 days until ready to use.
The surface of the set tofu will look dry and may have a few cracks. The tofu will look like it is pulling away from the sides of the pan.

Note: If your tofu did not set up, as pictured above, it was not cooked long enough. You must not eat it.
Step Seven: Unmold and Cut the Tofu
The tofu releases some of its liquid as it sets. This means that it will become firmer and firmer the longer it sits (less liquid=firmer tofu).
Drain away some of the liquid by tilting the pan over the sink. Run a silicone spatula or dull knife around the edge of the baking dish before inverting the tofu onto a rimmed plate (to catch any additional liquid) or cutting board.
The upended side of the tofu will be shiny and smooth!
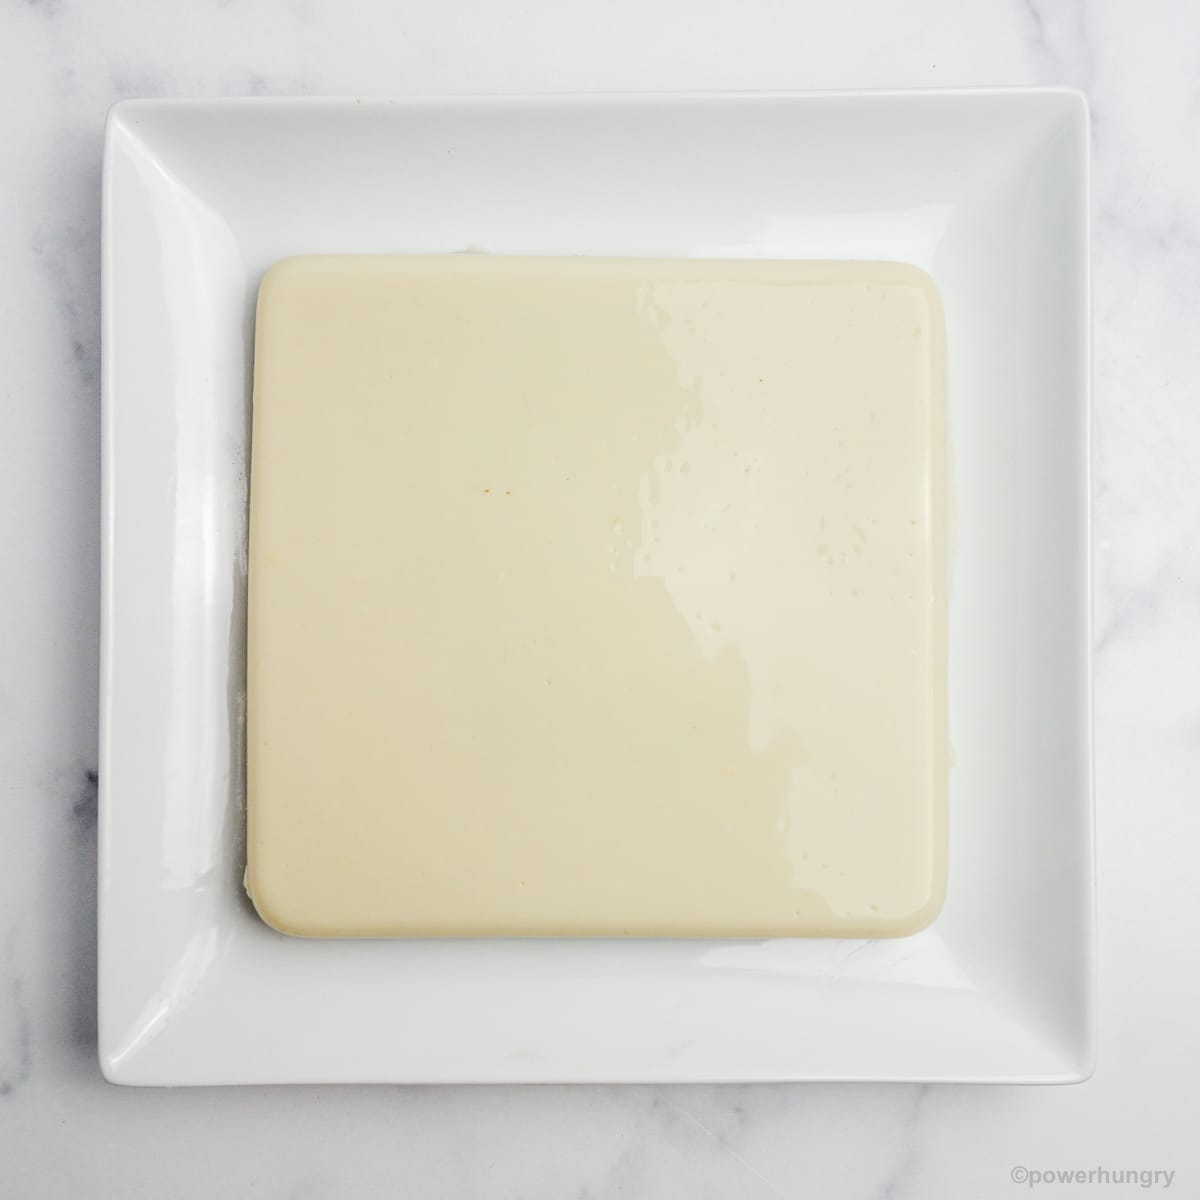
Cut the tofu into the desired shapes and sizes you prefer for recipes and/or storing in the refrigerator.

FAQ & Tips
What is the Taste & Texture of the Bean Tofu?
The bean tofu will vary in flavor and texture depending on the type of dried beans used to make it.
White beans produce a neutral, go-with-anything flavor with a silky, creamy finish.
For example:
- Baby Lima Beans
- Great Northern
- Cannellini
- Navy
You cannot go wrong with any of the above options. But if you want to know which one is my hands-down favorite, it is Baby Lima Beans. It is exceptionally creamy, but it also sets up super-firm. Baby lima beans are the beans featured in my step-by-step photos above.

Use Darker Beans for a Unique Flavor & Texture
Tofu made from beans with darker skins–such as the red, adzuki, black and pinto–is slightly less silky due the thicker, tougher skin of the beans. Though still mostly neutral in flavor, tofu made from these beans has the faint flavor of the beans from which they are made.
Use these unique taste and texture qualities to your advantage! Darker bean tofus pair especially well with bolder flavor profiles and make hearty fried cubes and crumbles. Grill or pan-fry a slab for a newfangled tofu sandwich, slathered with your favorite sauce.
Can I Vary the Texture of the Tofu (extra-firm or silken)?
This recipe produces a firm tofu. The tofu will become more firm with each day it sits in the refrigerator as it drains off water. But you can manipulate the texture at the front end, too.
For Extra Firm Tofu: Reduce the amount of fresh water added to the blender in Step 4 by 1/4 cup (60 mL).
The extra-firm texture holds up better to stir-frying (and sometimes you just want/need a firmer texture).
Keep in mind that frying any protein, including this tofu, works best when it is (a) patted dry (use paper towel or a clean dish cloth), and (b) you allow one side to sear off (get browned) before moving it around/flipping it. A little patience is all that you need!
For Silken Tofu: Increase the amount of water added in Step 4 by 1/3 cup (75 mL). I recommend using white beans for silken tofu because of the finer texture and neutral flavor.
I have notes for these two texture options in the recipe card.
Can I Freeze the Tofu?
Yes. If you are planning ahead, make the extra-firm variety (it freezes best). Cut the tofu into cubes and place in an airtight container. Defrost the tofu in the refrigerator.
The tofu will feel wet and springy once defrosted. Place the cubes between layers of paper towels to remove excess water (very gently press, as needed). Do not press hard or the tofu will fall apart.
High Altitude
Following comments from several readers, this recipe will very likely not work, as written, at higher altitude. Instead of a quick soak, the beans will need to be given a long soak in cool water (12 to 24 hours) for proper water absorption.
How Far in Advance Can the Tofu Be Made?
You can make the tofu up to 5 days ahead. Leave it in the original dish, or unmold it, cut into pieces, and store in an airtight container in the refrigerator until ready to use.
Note that the tofu will become firmer with each passing day due to the release of liquid.
How Should I Store the Bean Tofu?
As mentioned above, simply leave the prepared tofu in the baking dish, or cut and store in an airtight continuer, in the refrigerator for up to 5 days.
Can I Add Flavorings Directly to the Tofu?
Yes! Fresh herbs, dried herbs, spices, chiles, sriracha, pepper, you name it! Simply whisk in the flavorings of your choice in step four (when the extra water and optional salt are whisked in).
Happy Cooking! I would love to know what you think of my new invention!
More DIY Soy-Free Tofu Recipes

Easy DIY Dried Bean Tofu (1 ingredient, soy-free, high-protein)
Ingredients
- 140 grams dried beans, (about 3/4 cup; e.g., dried white beans, black beans, lima beans, chickpeas)
- boiling water , (to cover and soak beans)
- 2.75 cups water, (I use filtered tap water)
- Optional: 1 teaspoon salt
Instructions
- Place the dried in a colander or mesh sieve and rinse under cold water. This removes any dust or debris from the dried beans.
- Place the drained beans in a medium bowl. Add enough boiling water to the bowl to cover the beans by 1/2 inch (1.25 cm). Let stand for 20 minutes until the beans are slightly plumped and the water has cooled.
- Drain and rinse the beans in a mesh sieve or colander, discarding the soaking water.
- Place the drained beans, 2 and 3/4 cups tap water and optional salt in a blender. Blend on high speed until completely smooth, stopping several times to scrape down the sides of the blender container. (see note below about straining the mixture if it is not smooth).
- Pour the bean mixture into a medium-size, heavy-bottomed saucepan.
- Whisk over medium-high heat for 6 to 8 minutes until the mixture is VERY THICK, glossy and begins to pull away from the sides of the pan as you whisk (turn heat down to medium, as needed).
- Scrape the batter into an 8-inch (20 cm) square glass or ceramic baking dish, smoothing the top (the dish does not need to be oiled).
- Refrigerate the tofu, uncovered, for at least 8 hours, or overnight (Alternatively, leave the tofu in the refrigerator for up to 5 days until ready to use.) Note: If your tofu did not set up, as pictured above, it was not cooked long enough. You MUST NOT EAT IT IF IT IS NOT SET.
- Run a silicone spatula or dull knife around the edge of the dish; invert the tofu onto a cutting board. Cut the tofu into the desired shapes and sizes you prefer for recipes and/or storing in the refrigerator.


Fantastic recipe! I’ve made firm white bean tofu 3 times successfully but last time I cooked it a little less to be able to spread it in the pan more evenly (it was setting too fast). After 2.5 days it has cracks and 1 side pulled away but the bottom half is watery, a bit like cream cheese. I flipped it and am going to see if the bottom firms up. Would it be better to just discard it? Thx!
Hi Jessica,
Have you eaten any of the tofu, or has it just been sitting in the pan the whole time? The cracks on top are normal, I usually flip mine out so the smooth side is on top. I worry a little bit that the bottom has not set up (the cream cheese consistency), since this may mean it was not cooked enough (and, hence, why it is not setting up).
My advice is not to chance it and start again. Cook until very firm, even if it becomes difficult to spread. You can use a meal spoon of silicone spatula, dipped in water (keep dipping it in as you go) to press and smooth the tofu into the pan for an even top 🙂
Thank you for responding! I realized that I did a long soak of only 8 hours and also, it didn’t set when I flipped it. I discarded it and made a new batch, which came out perfectly!
I’m so glad you had success on your next batch, Jessica!
Thank you again!
You are welcome, Jessica! 😊
Thoroughly enjoyed this read.. You should write more often.!
Thanks so much, Conrad .
Can I use this receipe to make actual soybean tofu using dried soy flakes? It would have a lot more proteins than other legume pseudotofu and the regular Tofu aswell
Hi Mike,
Apologies, but I really don’t know, I am not familiar with soy flakes. Based on what I’ve seen online, the product sounds similar to TVP. If that’s the case, it seems unlikely that it would work as a substuptitue for beans here. But it could be an interesting way to add texture to the bean tofu. It could be worth experimenting. I would try, but I have never come acrosss soy flakes here. Cheers.
I’ve tried to make this recipe at least twice and both times the tofu has turned out mushy, not firm at all, and with a paste-like consistency. I’m following all of the steps including whisking it until the consistency is right. Wtf am I doing wrong?
Oh no, I’m sorry the recipe is causing so many headaches.
A question: Are you making the extra-firm version? It is the one with the least amount of water. If yes, you may want to try making the original version first. I think it is a little bit easier to get to the glossy stage with the original recipe because the process is slower. With the extra thick version, you have to keep cooking, even after it becomes a paste. This can be confusing since there is less water. But the bean mixture needs to cook longer (you need to keep whisking it, over low heat, even though it is already thick, until it becomes glossy). It is easier to get a handle on this when you start with more water (original version) because it takes longer to thicken, so the beans are cooking longer. You can see when it becomes glossy more easily.
Second, regardless of which version you are making: you want to make sure that the heat is not too high. You want to do a slow, steady cook. Otherwise, the proteins in the beans will seize up and thicken the mixture too quickly. Slow and steady. It still does not take very long to make, but if it is thick after 1 or 2 minutes, the heat is too high. Add more water and continue cooking. You can always keep adding a little bit more water and keep whisking until it becomes smooth and glossy, not just thick.
I hope this helps! You can do it, it just takes a little bit of practice, I promise.
AMAZING! Made some with yellow split peas, worked so well! A bit delicate to fry, will try adding less water next time. So excited! Had tried once before and it had failed…
Whoo-hoo! So glad it was a success second time around, Annemarie Noel 🙂
Hi – I might have missed this in your post or in the responses below, but wondering if I can use frozen fresh baby Lima beans for this recipe or if dry is needed. Asking because my local market has frozen or canned but not dried. Thanks!
Hi Aimee! Alas, no, it needs to be dried beans. Even though dried lima beans are my favorite, other white beans are really great too. My second favorite pick is white Navy beans (the tofu is a little bit stingier than, say cannellini beans, IMHO). But honestly, any dried white beans will work great, Aimee 🙂
can i blend till smooth in food processor? (i don’t have a blender,nor do i know if one is better than other)
Hi AnyWho,
I do not advise it because the food processor blade cannot completely break down the beans–there will still be bean pieces in the mix. This becomes problematic because those bean bits may not cook all the way through, which is dangerous. WORKAROUND (if your food processor is powerful): use your food processor to blend the mixture as best you can. Take a few minutes to blend, breaking down the beans as much as possible. Then strain the mixture through a fine mesh sieve, straining out any remaining bean pieces. Cheers 🙂
Enjoying this recipe turned out great thank you 😊
Also can you use any other type of beans for this recipe?
Like using dry cranberry beans but using same method in this recipe?
Thank you 😊
Hi Michelle,
Wonderful, so happy to hear that the tofu was successful. Yes, you should be able to use just about any dried beans. I tested with 8 different varieties of beans–did not get around to cranberry beans, but they should work fine!
Can soy beans be used for this recipe
Hi Sharon,
I have not tried it, but another reader tried it with dried soybeans and said it come well!
I made this recipe with Fava beans. I did add a little salt. It firmed up perfectly smooth and in my opinion tasted far better than the store bought one I usually have. Super easy and quicker than finding it in the store plus a better flavor! Great recipe, thank you so much for sharing.
I am so glad you like the recipe, Jilly! I have not made it with lava beans. Baby lima beans are my favorite, I think they are similar. Enjoy!
Can I add spices to the mixture without it ruining the texture?
Hi Kelly,
Yes, absolutely!
I love beans but never liked traditional tofu. I’m excited to try this. I’d like to know if you think the result would be the same with sprouted beans? Do you think the addition of seaweed/vegetables would hinder the set up.
Hi Hasani!
Yes, sprouted beans should work fine.
With regard to the vegetables or seaweed, it depends. Dried seaweed such as nori would work great, I do not see that causing any issues. Vegetables are more problematic because of the water content, which could affect the setting. You would have to experiment with different vegetables. I imagine you could add some chopped green onions, or some chopped fresh greens (e.g., kale or spinach), for example, without issues, but larger pieces of vegetables such as cooked carrots or bell peppers would release water and might lead to setting issues.
Hi! 🙂 My tofu set and is pulled away from casserole dish but it doesn’t have cracks. Should it have cracks??
Hi Charlene,
Not to worry, if does not have to have cracks. It can vary somewhat by bean. Cheers.
I agree with you to avoid kidney beans in this recipe. I can’t wait to try this. A word of caution about kidney beans. They are toxic if not fully cooked and I don’t know if this method cooks them long enough. I can’t always get tofu in Baja, MX where I live so this is brilliant. I see that you mentioned not eating under cooked beans in your comments but it’s worth saying again, especially with kidney beans.
Thanks, Tracey
Thanks, Tracey 🙂
Hey there!
I’m vegan and my breastfed baby can’t do soy, so I’ve been experimenting with alternatives for tofu. I’m excited to try out this method! I was curious, though, have you ever dried mixing different beans together for this? Do you think it would cause the cooking or setting to be weird if they weren’t the same? I would think lentils and beans together may not work, but if it was all beans, maybe? 🤔
Hi Sydney! The cooking time for the different beans and lentils all seem to cook at the same rate once they have been soaked and blended into a smooth liquid. So I think you could create your own blends without any issue.
I had the same thought. I’m going to try this. I’m also definitely making chickpea tofu.
How long can the tofu be in the freezer?
Hi Samantha,
I would not store it longer than 3 months. Cheers.
Even if it’s vacuum sealed?
I am not sure how this would work with a vacuum sealer. I am visualizing it completely squashing the tofu into a flat mush (unless you are using a vacuum sealed container instead of a bag)? I have not tried it, so it would have to be an experiment. Cheers.
I regularly store soybean tofu in vacuum sealed bags when there is a lot on sale at the store. If the texture of firm/extra-firm bean tofu is similar, then it will hold together just fine. Can’t wait to try this!
Freeze the tofu first then vacuum seal to keep the tofu from being smashed flat. That’s how I vacuum seal frozen bananas.
That’s brilliant, Belle, I learned something new–thank you! Yes, that could likely work well here!
Hi Camilla,
I want to make fava bean tofu, but I only have fava bean flour in my pantry.
Can I use fava bean flour instead of whole beans?
Thank you!
Hi Rumbl! I suggest using my chickpea flour tofu recipe as a template for using your fava bean flour. Should work great!
I am not a tofu lover as I think I cooked it wrong the first time I made it. So when I saw this decided to give it a try. First attempt was with Navy Beans. PERFECT firmness all through cooking, even in leftovers.
Today trying with black beans. Expecting the same.
This may become a weekly staple.
Thanks Camilla 😉
I am thrilled that this was such a hit, Kay! Happy eating 🙂
Hi, I’m about to give your recipe a go — but was curious if you ever tried pouring the cooked tofu batter into silicon molds that are already sectioned — saves the need to cut into pieces?
Hi Jan,
That’s a great idea! Yes, go for it. It will set up faster, too.
This recipe sounds amazing!
Has anyone tried using canned beans?
Hi Mary! I hope that you give the recipe try 🙂 r regarding using canned beans: alas, no, the recipe will definitely not work with canned beans. You have to bring with uncooked dried beans.
I’m curious as to why canned beans wouldn’t work if you adjusted the water accordingly? Thanks.
Hi Cheryl,
The protein is changed in the beans once they are cooked. So trying to re-cook them into the tofu will not work. Imagine hard boiled eggs— you could not scramble a hard boiled egg, or use it in the same way in a cookie or cake recipe. It’s the same principle here. Cheers.
On the white bean tofu, why do you say you must not eat if it’s not set up? Thank you.
Hi Joyce,
I am erring on the side of caution: if the tofu is not set up, it means that it was not cooked long enough on the stovetop. The tofu should set up very easily (even without refrigeration), so not setting up would mean the bean mixture is not fully cooked (dangerous to eat undercooked beans). I added this information because several reader mentioned eating tofu when it was not set up very much at all (still loose). I wanted to make sure that people do not eat loose, unset tofu , hence the added cautionary words.
Thank you for that information. I appreciate understanding the reason. Also thanks for the great tofu recipes. I bought a bunch of beans and am anxious to make my own tofu. Thanks again.
You are welcome, Joyce!
This is simply wonderful–a real game changer since I can no longer tolerate soy but miss tofu! Thank you thank you!
I am so happy to hear it, Miranda! Enjoy!
Hi Camilla. Why use tap water instead of filtered water? I won’t drink the tap water in my area.
Hi ucity— i use filtered tap water. I’ll add that in. I say tap water to emphasize that I am not using a specialty water to make the tofu 🙂
Dear Camilla,
You have mentioned numerous times to not eat the tofu of it is not fully cooked (thank you). Instead of discarding it, can it be cooked longer in the stove and placed back into the blender. Or do you have any thoughts if a quick cook through the pressure cooker just after the soak would affect the outcome of setting the tofu? I just don’t want to waste the mixture and throw it away – given so many don’t even have food 😉
Finally, one more question, do you find it needs a long soak for bigger brand like kidney beans and chick peas?
Hi Nora,
Yes, you can definitely return the bean mixture to the stovetop if it is not setting up. If the bean mixture is cooked long enough, it should begin to set up at room temperature (especially on spoons, or any mixture remaining in the pan). It should actually firm up entirely without refrigeration, the chilling helps to accelerate the setting of the tofu, and make it even firmer.
I am not sure how the pressure cooking would affect the tofu. I think some people have mentioned they were going to try it for high altitude situations. It would need to be an experiment.
I put the stern warnings on the post because a small number of people mentioned eating the tofu even though it was (1) not set up much at all (a clear sign it was not cooked enough) and/or (b) that they ate the tofu even though they did not puree the beans until completely smooth (for example, they blended in a food processor instead of a blender). After the second person mentioned that they did this, I felt compelled to warn people not to eat the tofu if it still had bits of hard, unblended beans, or was not setting up at all (undercooked). The warnings look alarmist, but I wanted to make sure no one else was eating the tofu under these conditions.
Thank you Camilla for the clear explanations! For now, if it is needed, I will try to return to the stovetop instead of using the pressure cooker. Do you find the level of firmness of the chickpea flour tofu different from that of the chickpea that is been grounded in the blender (or whatever types of beans used)? I found the chickpea flour tofu quite soft in the middle even after frying – I left it in the fridge for at least 5-7 days for the water to release.
Looking forward to trying the blender approach with the various beans!
Hi NOra Lee,
You are welcome! I have made Burmese tofu from both chickpea flour and whole dried chickpeas and they tasted pretty much identical. The only difference is with regard to proportion of water–you can use less , for either, to get a firmer tofu, more for a looser tofu. Cheers!
The baby lima bean tofu is now my go to for all kinds of recipes! I make the extra-firm version, it is so good in stirfries and in the airfryer! I love how cheap it is, I get my limas from a local health food store (bulk bins). Thank you for this!
I haven’t made this yet, but I will! It is a lifesaver. I had breast cancer and my oncologist is very strict. She has put me on a very strict no soy diet , so tofu was out as well as most meat substitutes. Ive depended mostly on beans and legumes. This will be a welcome change. A lot of my relatives are vegetarians and Ive already emailed it. Thank you!
You are very welcome, Evelyn
At the moment, I only have metal pans. We tried it, so we’ll see what happens, but I should ask the question: why do you specify glass pans?
Hi Kimberly,
I’m sure the metal pans will work. My only concern was that metal baking pans might have an exposed area / scratches that might not be good for having something wet sittining in it for an extended period of time.
Do you have to quit soak these or could you soak overnight?
Hi Jennifer,
Yes, you can definitely soak overnight (room temp water) instead of the quick soak 🙂
I’m fairly new to eating plant based and boy is it difficult to get certain foods to support this choice in the area I live.I went to 3 stores with no luck buying soy beans. In desperation, I bought navy beans. If I had found you sooner I would have bought baby Limas too (next time).
I can’t wait to make my tofu today. Thank you!
Hi Jen,
I completely understand! I hope you enjoying exploring some of the recipes here 🙂
Have you ever tried to add agar agar to make it even firmer? Or would that not matter if you were planning on reheating the tofu to eat hot? Meaning, does agar melt when warmed like gelatin?
Hi Keri! I actually use agar in my pepita (pumpkin seed) tofu and hemp seed tofu recipes. You can take a look for ideas to incorporate it into the bean or lentil tofu. It will melt slightly if you blast it in very high heat, but I think it would hold up especially well with the legume-based tofus.
My mind is blown today! Never, ever heard of bean tofu. Have had pumpkin seed tofu, which was delicious. Recently heard of fava bean tofu, but this is just stopping me in my tracks! I can’t wait to make this. Thanks for the helpful tips, too. My father was raised in Burma, so you would think I’d at least have heard about the Burmese tofu… I’m also wondering about using other bean flours to make tofu. I have an ear piercing Blendtec blender that I have to use when everyone is far from the kitchen LOL.
Hi Divya! I am so glad you gave this a try and like it. Yes, you can use other bean flours to make tofu. I have used black bean flour to make it, it came out great. Also, just so you know: I have a pumpkin seed tofu (easy!) recipe on my site, if you would like to try that some time 🙂
Interesting and cool to be able to do it. Then I thought, why make extra work just for making it into a different form. Am I missing something, other than the cool, can do, or cultural view? Still, thanks for sharing the information.
Thank You… This worked!!! Cooked my beans a little more after a 12 hour soak before the blend an cook.. Worked and set within 30 min. Had a Tofu burger and it tasted good and I really enjoyed it and satisfied my taste buds.
Yay! Thank you so much, Victoria, for letting me know it worked out well. And now I am craving a bean tofu burger :)!
I just made this with black beans, then tossed the cubes in 1 T. grape seed oil and 1 T. tamari, then in 1 T. white rice flour, and cooked them in the air fryer, and it’s really good. I wish I could have cumin and spices because that would make them delicious, but maybe next time I’ll add dried coriander. It was simple and cheap and I will definitely be making these again.
That sounds fantastic, Daryl! I was thinking I might be the only one who likes my black bean variation (my family thinks the color is too odd–I say embrace the gray :)) The addition of coriander sounds lovely!
You are not straining the blended slurry/paste?
Everything I read online says without straining you end up with a “poridgy” result. The one reason I don’t make tofu at home is the amount of work. If I can make it with any bean and not have to go through steps straining I’ll make this every week!
Hi DC! Good question. Correct, no straining. This is a different kind of tofu that I based off of the centuries old recipe for Shan tofu (Burmese tofu) that is made with chickpea flour (who ground chickpeas ground into flour. Here is my recipe for Burmese Tofu). It is a different style from tofus made with curds (which involves straining out the solids and coagulating the remaining bean “milk”). I hope that clarifies!
Great information, but unfortunately there are SO MANY video ads cluttering up the page and blocking the content that I’m having a hard time actually reading what you wrote. Very very frustrating and annoying. I don’t know what bloggers can do to clean up excessive ads, though. I do like your site and want to read more, but I can’t.
Hi Jeanette,
I am sorry that video ads are disrupting your reading. You can close any video immediately by clicking the X on the window.
@Camilla,
That works until the next video add decides to pop up which has happened to me after I close one of the video adds. There needs to be a way for you to get rid of these unnecessary video ads and the unnecessary banner ads as well.
I am sorry the ads are bothering you Brittany. The ads are how I earn a living from the work I do while also keeping the content free for everyone. The answer to no ads, like other forms of ad-free content, would be to make a paid subscription version of the website.
Can this recipe be made with dry chickpeas? I know you mentioned its been traditionally done with chickpea flour, but would starting with the whole chickpea, soaking, and blending it work the same way?
Yes, you can definitely make with dried chickpeas as one of the bean options 🙂
I made the bean tofu with kidney beans, I did the long soak and the short soak with the same results… flecks of the red skin remained in the batter before cooking, I went ahead and cooked it and am pleased with the results. Is this common with bean varieties with heavy skins. Any suggestions
Hi there, Carol! Red kidney beans are the one bean I do not recommend (it is in the body of the post–apologies if you did not notice this. It is why I said “almost” any bean. I was not happy with the final texture. ). Mine was very smooth but still had red flecks. I do not think that should be a problem so long as the tofu sets up properly. Smaller red beans (with less thick skins) worked well for me. But yes, the thicker skinned beans , like the red kidney, are not ideal texture-wise.
My mixture out of the blender wasn’t what I would call 100% smooth. It felt like there was some texture, like soft sand. I used black beans. It seemed like it cooked okay, but I’m not sure if I should eat it just because of how it felt in liquid/mixture form. Do you think it will still be okay to use?
Hi Rachel,
That sounds perfectly normal. Essentially you are creating bean flour mixed with water (but in a simplified form–no need to grind bean flour separately). So long as it is finely blended, you are right on track! 🙂
Hi Camila,
The tofu is pulling away from the pan, but the surface doesn’t look like the picture.
Can I still use it?
Hi Rachel! The surface on the exposed side (top of pan, where you smoothed it out) will look dry, maybe bumpy depending on how smooth you spread dit. You will get the glossy smooth side when you turn it out of the pan! I hope this helps.
Hi Camilla,
why soy free, is it harm to our health? or it is the GMO issue, thanks
Hasan
Hi Hasan,
It is just an option, not a commentary on soy, per se. This style of tofu is based on Burmese style tofu (made from chickpea flour–it uses the whole bean, not coagulated milk, which is how soy tofu is made). It’s just fun and delicious to have options, and this is also very easy to make compared to coagulated tofu.
@Hasan, There are people who are allergic/sensitive to soy. In my area it is hard to find affordable soy beans so this is exciting for me.
@DC, I just posted, but some doctors limit use of soy after breast cancer as mine has done. Im not sure about preservatives or additives in tofu, but I’m trying to do as many products as possible homemade to eliminate all of the additives possible in my food due to carcinogens.
after cancer, I was also told to buy as much as possible organic.
I just made this with black beans and added 1 tablespoon of taco seasoning (because why not) and sampled the spoon. I think this recipe is going to be a keeper. If it works out I want to try a white bean with sausage seasonings then use in a tofu scramble.
Um, you are brilliant, Angelia!!! What great ideas!!!! You have inspired me (and, I am sure, many others). I can attest that these ben tofus do work great for scrambles, they come together in no time.
Turned out so amazing, thank you! This is such a great protein source, and so cheap , too! I am so happy and cannot thank you enough for this idea. I made lima bean and cannellini bean versions, by the way. I like them both, but you were right, the baby lima bean version is the best! IT holds up so well in stir-frying.
That is so wonderful, Sarita!
I am wondering if at some point, during either the blending or the cooking, can you put any sort of flavor in it, seasonings, or whatever, so it sets up already with the flavorings I want?
Hi Tricia! Yes, you can add spices, fresh or dried herbs, or other flavorings. You can add them when you blend the beans and water in the blender.
would this recipe work if the beans used are already fully cooked; before blending with the liquid; also would a food processor work to get the smooth texture as my blender tends to get over heated quickly. would this recipe work with dried fully cooked shelled soy beans( the type that used to make soy milk not green shelled edamame beans
Hi Monica! I’ll answer one question at a time 🙂
(1) No, the recipe will definitely not work with fully cooked beans. Think of the beans like another protein, eggs: you could not make scrambled eggs from fully cooked eggs (like hard boiled). The tofu needs to begin with uncooked beans.
(2) A food processor is unlikely to get the mixture smooth enough. You definitely need to use a blender. That being said, I understand about the overheating blender. To avoid overheating, blend for 30 to 60 seconds at a time, then let your blender rest/cool down before repeating. Continue until the mixture is completely smooth (it will take a little bit longer, but not that much, and it will prevent your blender from overheating).
(3) I have not tried this with dried soybeans, but it should work fine 🙂
You probably really want a proper blender for this. Couldn’t get my pinto beans properly pureed with a staff mixer, ended up way too coarse. Settled on cooking them through as is, and puree-ing again for smoother texture. Lots and lots of time wasted heating and stirring.
Hope the result will at least be edible. And compatible with the spicy korean stir fry recipe i’ve set my sights on.
Hi Snow! I am sorry you had to spend extra time blending, but also so impressed that you made it work with the equipment you have. I am not sure what a staff blender (di you mean stick blender?), but if it is not like a regular stand blender, it’s is true, it will not have the power to completely break down the beans. I hope your final results turned out well–a spicy Korean stir-fry sounds so good!
I made this, it set up perfectly, it tastes good, and I’ve baked and seasoned it…..but I’m almost to afraid to eat it after all the warnings about how dangerous it could be to eat if I did it wrong! There was the slightest grit (almost like little sand granules) that settled on the top of my block but otherwise the mixture was smooth. I’m afraid to eat it now though cause I don’t want to die of cyanide poisoning (I used Lima beans as suggested). I would love it if someone could help ease my concerns because tofu doesn’t do well with me and I’m trying to eat a vegetarian diet.
Hi Keeyah,
I am sorry to alarm you with all of my warnings–I really felt I had to after several people mentioned that they tried to eat the tofu even though it had not set up. And same with the bean bits: a few people asked by email if they could coarsely grind the tofu mixture and /or whether it was ok to leave larger pieces of beans in the mix (no and no).
It sounds like you made the tofu perfectly. If the tofu is firmly set, as you describe, it has been cooked properly!
If you need reassurance: people have been eating a version of this style of tofu for centuries (Shan tofu/ Burmese tofu) made from dried chickpeas (raw dried chickpeas that have been ground into raw bean flour). My version allows for most any bean–since not everyone has a high speed blender that can make fine bean flour, I developed my version with the soaking so that beans can be pulverized ultra fine without the separate step of first making them into water. Raw bean flour (chickpea flour) is used in multiple cuisines around the world–it cooks in a fraction of the time as whole beans
Hi!
I am pretty new to plant based and have been to a zillion websites and pouring over cookbooks…but your website is my absolute favorite by far!! What a treasure you have provided! Thank you soooo much for sharing your obvious labor of love!
My newbie question is .. what in the world can make you sick about eating lumps of beans or not thoroughly cooked beans? I had no idea!!
Also, can you PLEASE add me to your newsletter?
Thank you very much!
Lori, Pittsburgh PA
Hi Lori, welcome! I just added you to the newsletter list. Thank you so much for the compliments, I am so happy to hear that you are finding inspiration here.
On to the question of the beans. Yes, raw and undercooked beans can make people very sick. That’s why I am erring on the side of caution with the bright yellow sections in this post. A few people people commented that their tofu did not set up (which is definitely due to not cooking it long enough. It will become very firm so lang as it is cooked until very thick)—but they mentioned that they ate it anyway. I was very concerned, hence the warnings. Similarly, I added the warning abut the pieces of beans: if the beans are not completely pureed and there are pieces of whole beans, those whole bean pieces will not cook all the way in the time it takes to thoroughly cook the pureed beans (so those pieces of not fully cooked whole bean pieces could cause major distress). I hope that clarifies! 🙂
@Camilla, It’s mostly undercooked kidney beans (or cooked at too low temps, as in a crockpot) that present a danger with a protein called phytohaemagglutinin. Soaking most other beans
over night and discarding the water helps get rid of excess antinutrients. Thoroughly cooking the pureed beans assures the best finished product, but I wouldn’t fret over a few bits. I’m sure you know some beans can even be sprouted and eaten raw, but I get where you are coming from… err on the side of caution.
Hi VeggieTBr,
Much appreciated! Yes, I am definitely erring on the side of caution 🙂 It is a direct result of comments posted by readers who wrote that they tried to eat the tofu when it was (a) not set (a sign of undercooking) and (b) not blended until smooth (they used a hand blender or food processor that left significant pieces of dried bean in the mix). I want to make sure that people know not to eat the tofu in either circumstance 🙂
I have been through and come back to your website many times and will be giving this one a go. I know that this is a bit weird but can I use soy beans to make this form of Tofu? Much cheaper than store tofu. Yes I understand they are different products but I prefer a whole food approach. Awesome recipes BTW so thanks.
FYI the phytic acid released by soaking the beans is high in phosphorous so don’t discard it. Pour it onto your plants instead and they will love you back.
Ooh ooh, ooh, thank you for that great tip about saving the water for plants, Julz!!!
Yes, I am sure that would work beautifully with dried soy beans. It will be different than store bought soy tofu regardless (since the latter is a curd style tofu (solids removed, liquids blended with a coagulant); this version is made from the entire beans (inspired by Burmese style chickpea flour tofu). Enjoy!
@Camilla, this is some brilliant work, The baby lima bean tofu is the bomb, I’ve made your lentil tofu many times and look forward to making baby Lia bean tofu many more time, too!
Hello, thank you for the recipe. I tried it with lima beans, but the mixture on the stove never thickened up and globbed onto the whisk. I stood over the pot whisking away for 25 – 30 minutes. Eventually the mixture cooked down to almost nothing and it still didn’t thicken. What did I do wrong?
Hi Rebecca! Oh wow, that is very odd. I apologize , but I am stumped for ideas of why that could have happened. Just checking: you are using uncooked (raw) beans, yes? I can imagine this happening with cooked beans (the recipe will not work with cooked beans).
@Rebecca, Always use dried rehydrated beans, not cooked, canned or frozen.
At first I was thinking, “Oh NO! This is going to kill someone who uses the wrong bean or doesn’t know you have to cook. It appeared in the beginning like take dry beans and water, add to blender, pour into mold, chill, then cut and eat….somehow the cooking part seemed missing…..BUT THEN (thankfully) there were multiple descriptive warnings on when NOT TO EAT this……THE COOKING IS IMPERATIVE (and the soaking helps a LOT) as some beans raw can KILL you if you simply eat 3-5 of them R-A-W…..Soaking and Cooking break down and convert the deadly chemicals.
I will absolutely be trying thiS!!!!!!!!!!!
Thanks PH!
_John
You are very welcome, John!
Have you tried coagulant and not cooking? perhaps using coagulant (Nigari/Gypsum) rather than cooking the pureed bean mix might be healthier? although traditional soy tofu recipes do seriously boil the post-blended, post-strained, soy milk for a long time ~5-10 minutes…..
Hi Kiers,
No, you definitely do not want to skip the cooking for this tofu. Raw bean puree could make you seriously ill, or kill you. I know that there are some traditional style tofu recipe out there (Google) that strains out the solids and use a coagulant (plus pressing). This style of tofu is based on Burmese tofu, made with chickpea flour (which is also nearly identical to the panelle in Italy and pansies in France, before frying. Both of these are also made with chickpea flour). All are made with the solids (no straining) and no added coagulants. I hope that helps!
I am excited to try this! I always make a copycat “just egg” recipe that I immediately bake and then cube up anyways, I plan to just make it this way and see how it goes. Any tips for mung beans?
Hi Patty! This will work great using mung beans. I f you are using whole mung beans (the green ones), use this recipe. If you are using the yellow, split mung beans (chana dal), use my recipe for Red Lentil Tofu and sub the chana dal for the lentils, It will work perfectly 🙂 https://www.powerhungry.com/2021/12/02/mind-blowing-red-lentil-tofu/
Would Using fully cooked beans eliminate the need to strain after blending?
Hi Josephine,
The recipe will not work with fully cooked beans. Sorry.
Hi Camilla, I would like to make sure that the bean tofu is safe to eat, since beans are usually cooked for a minimum of 30-45 minutes in order to degrade lectins. Thanks.
Hi Maor,
There is a lot of controversy regarding lectins, so you will have to make a call whether beans are safe for you. Here they are broken down entirely in the same way as bean flour. When you cook with bean flours, the flour is not cooked for cooked for 30 to 45 minutes. Tofu made with raw chickpea flour (which is the inspiration for this recipe) has been a staple in Burma for a long time.
But everyone has different needs with regard to eating beans, so if you have concerns, you should probably skip recipes that use bean flour , or puréed soaked beans .
@Maor, the lectins, i think, create bloat and gas due to indigestion, but are not lethal….but cooked beans give people gas anyways…you can add asafoetida to reduce this effect right off the top in your cooking (per Indian recipes.)
@Camilla, There is a big difference between cooking whole beans and bean flour. The whole bean requires extra time as the water and heat penetrate the bean through the surface. When cooking bean flour the surface area of the bean is now the sum of all the flour grains so everything happens much faster.
Think of boiling plain wheat flour to make a paste / porridge versus cooking whole wheat berries. The berries take much longer.
Hi there, thanks for your detailed information. I have several bean flours and am wondering whether I can make bean tofu from flour and how. Thank you
Hi Emmanuelle,
Yes, you can definitely make tofu from bean flours! Burmese tofu, which is the inspiration for this tofu, is made From chickpea flour. I have a recipe for it here: https://www.powerhungry.com/2017/10/05/chickpea-flour-tofu-soy-free/ You can use an equal weight of other bean flours in place of the chickpea flour 🙂
Hi there, so just made this recipe and it looks really amazing. I just put it in the fridge. My question is regarding cleanup. Do you have any tips for cleaning the pot? I have a layer of thick bean glue coating the bottom of the pot that I can’t even a scrape thought with a knife.
Patrick–I do! Boiling water is my go to clean up for this and so many stuck on messes. Specifically for the nuked up pot bottom: I fill the pot abut halfway full and put it back on the stovetop. I bring it to a boil and let it boil for a few minutes to loosen the tofu mixture . Remove from the heat, let it sit for about 10-15 minutes and then use a metal spoon or metal spatula to remove the now-loosed tofu mix. Hope this helps!
Just curious why it is inedible if it does not set properly? Thanks
Hi Brittany,
I added that because, if it does not set up, it is most likely because the bean mixture was not cooked long enough. It is best to discard it to be on the safe side since it is not safe to eat undercooked beans. One or two people mentioned that they ate the tofu when it was not set–I wanted to make sure that no one does that!
It is not difficult to cook the mixture to proper doneness–it should be very thick and adhering to the whisk and sides of the pan, as pictured. It will begin to set up before it is chilled.
Thank you Camilla! This is amazing!
I would add to this to soak beans for 24 hours covered in water on the counter helps remove phytic acid from beans (phytic acid can inhibit the body’s ability to absorb minerals). Then dump the water and cook them in a crockpot for 12 hours – while you are at work – with lots of extra water and nothing else.
When you get home you blend and you’ve got your recipes as you’ve mentioned above.
Note, if people have problems with digestion – lentils may be better for many people.
@Jenny, IF you want to make the recipe for this, you cannot use cooked beans (see a comment up above for the author’s explanation). Soaking is great, but not the normal bean cooking part IF you want to make this “tofu” recipe. Just FYI
Thanks for this amazing recipe! I have tried this with bug beans and it turned out very bitter almost raw-ish. Not good at all. Any idea what went wrong?
Thanks Max
Hi Max! I am wondering if autocorrect is at work here and maybe (I hope :)) you meant mung beans, not bug beans. Let me know!
@Camilla, sorry direct translation from Austrian-German. I believe it is called runner bean in english. It is large brown and has a rich taste.
Got it, thanks @Max! Those are not readily available in the US, but looking them up on the web, it looks like they have thick, dark skins. I have had success with smaller red beans, but not red kidney beans. Were you able to get a completely smooth mixture when you blended the beans?
Mighty Gratitude for sharing your wisdom.
I have tried your pumpkin seed tofu,
which inspired me to create a half sunflower/half pumpkin tofu,
& then this evening we tried your lentil ones.
When I first made the pumpkin seed tofu, my daughter may have had a gassy reaction to the agar. It happened two night later when I tried the recipe again..
So we tried the lentil batch today, and not only did they hold up their form more in the oven, but we didn’t have any dietary issues.
I’ll be giving your baby lima bean tofu my next go..
I’m loving these soy free alternatives.
I used to eat sprouted tofu, but noticed it triggered digestive issues..
So this new route is wonderful.
may good vibes find their way to you.
Chris
@gassybubbles
Chris! So happy you are enjoying the alternative tofu recipes. So sorry to hear your daughter had a gassy reaction to the pumpkin seed tofu. I am wondering if it could be the pumpkin seeds rather than the agar? But hooray that the lentil version was a success in all ways (cooking and digestive related :))
I don’t understand why you soak the beans only 20 minutes… they will be still hard,and full of saponins, a long soaking help to get rid of them. Saponins irritates the gut.
Hi Iride,
Thanks for writing. Saponins are also reduced by cooking and processing, both of which occur here. You are welcome to soak the beans overnight if your prefer that to the boiling water quick soak. As a side, despite being labeled “anti-nutrients,” saponins have well-documented, research supported health benefits (e.g., here : https://pubmed.ncbi.nlm.nih.gov/15117556/). Cheers.
How can I make in to dry soya capp or in to dry cube.
Hi Rukhsana! I have not heard of dried cubed tofu, but I am guessing that the best method would be to use a dehydrator of some sort. Sorry I cannot help further.
Do you have to use the quick soak method or can you soak the beans the traditional way, overnight, before blending and cooking? This recipe is amazing and a potential game changer! I can’t wait to try it.
Hi Sangie!
Yes, you definitely can soak the traditional way (overnight, or sprouted). If you choose to drain off the water post-soaking, be sure to measure the amount you drain off (in =to a liquid measuring cup)–dicard the soaking water ad ADD BACk the same amount of fresh water you just drained off 🙂
I made the lima bean version–came out beautifully firm and fries up like a dream!
I am so glad you like the recipe and that it turned out well, Amelia!
I am going to try this, it sounds great…but I live above 6000 ft elevation and beans do not cook the same easy way.. soaking does not soften them the way it does at sea level. Will it work if I pressure cook the beans partially, first?
Hi Dagny,
I was not familiar with high altitude bean soaking, so pressure cooking sounded odd. But after some brief internet “research,” you clearly know what you are talking about! This article from Colorado State University has guidelines, inc are anyone else is the same situation as you. I think that will work great for this recipe 🙂 https://foodsmartcolorado.colostate.edu/cooking-beans-at-high-elevation-using-an-electric-pressure-cooker/
@Camilla, I also live at altitude- I tried it and it absolutely did NOT work for me. In the 20 min the beans did not get to the point that they would break down in the blender. I was left with a chunky/gritty paste that I did try to cook, but the stuff just was never done. The finished product even after the cooking tasted raw, and chunky/gritty, and gave me a belly-ache. I threw it out.
My thoughts: I could soak longer, perhaps with a change of boiling water and or actually cook them a bit as you two have said.. I can try with a different bean (I used a small white bean). Oh, and I do use a pressure cooker all the time…
Hi Kaden,
I am sorry the tofu did not work out. I am just wondering: you mention you had a chunky gritty PASTE after blending. I just want to make sure you added the 2 and 3/4 cups water after soaking. I am not sure how you could have a paste with 3/4 cups of soaked, drained beans and 2 and 3/4 cups water. The mixture should be very liquidy, not anything close to a paste in consistency. I have added some additional notes to the recipe to emphasize that the tofu mixture needs to be completely smooth and must be cooked until very thick and glossy, and must set until firm (the last point: if it is not firm, then it was not cooked long enough). If the finished product was “never done”, as you mention, definitely do not eat it! It would be best to give the beans a long soak in cool water (12 to 24 hours) or follow Dagny’s advice about pressure cooking the beans (I have not tried this since I do not live at high altitude).
Has anyone tried this with garbanzo brand by any chance?
Hi Lara! You can definitely make this with garbanzo beans. This tofu, and my Red Rentil Tofu recipe are inspired from Burmese Tofu, which is made with chickpea flour (which is also called garbanzo bean flour). Here is the link to the Burmese Tofu recipe, in case you are interested in that, too.
Looking forward to trying this. Does it absorb marinade flavors like regular tofu?
Hi Margie! It is different from curd style tofu (it is skin to Burmese tofu which is made with chickpea flour). You can add flavors directly to the tofu in the making of it or add sauces after cooking, but marinating is not ideal.
I tried this with fava and black beans which is ehat i have on hand. My expectations were low but wow the results made this my favorite new recipe. Thanks for sharing and the work you out in fine tuning the technique. I preferred the flavor of the black bean version. It actually turned out kinda purplish/black marble in color. Tastes great!
I’m following ginger hulltin’s 6 week anti inflammatory meal prep book. Several meals have tofu but soy is not my thing. Your recipe is a perfect substitute!
Oh wow, I am so thrilled to hear that New Chef! Hooray that it fits with your new program, that is wonderful 🙂
I read that a lot of people get poisoned by lectin and that it’s due to not cooking beans long enough. So what if I used thoroughly cooked beans for this recipe?
Hi Lisa! The recipe will not work (at all) with cooked beans. You might want to consider some of my other easy tortilla recipes instead of this one, such as my sweet potato tortillas, cassava flour tortillas, or oat-chickpea flour tortillas 🙂
@Camilla,
Lisa Ready does not want to make any tortillas of any kind. Instead she wants to make soy free tofu instead.
Camilla! Wow! I am over the moon excited about every “ tofu” you have created! Really appreciate all the work you put into this project! I love beans and have a super stash of every variety you mentioned you tried! Looks like I know what kitchen fun I will be having today! Thank you so much for writing the easy to follow directions and helpful hints! I adore tofu so having this version will be extraordinary! You are a STAR !
Thank you so much, Mariana! You made my day (my week, month). Enjoy the many tofus 😊😍
Hey, thanks for posting. I was wondering if you’ve experimented with using a cheese cloth to filter the proteinous water from the extra gunk.
Hi Alberto! I have not tried it. This method is akin to Burmese tofu/ Shan tofu (which uses chickpea flour, no filtering of liquids and solids). It is fundamentally different than the filtered, coagulant- style of tofu.
Hi, thank you so much for this recipe, you are and it is brilliant! Does covering the tofu while it’s in the fridge keep it from releasing water? Do you think you can use those tofu presses made for soy tofu? Thanks again.
Hi Kimberly, thank you so much! Covering the tofu does not make a difference. A tofu press will not work with this type of tofu (which is similar to Burmese-style tofu, not traditional coagulated tofu. You can control the thickness at the front end (more for silkier tofu, less for firmer tofu).
Anyone tried it with canned beans?
Hi Chelsea,
I experimented with canned beans in some early tests— it does not work. It just tastes like refrained beans.
Wowza!!!!!!! I made the lime ben tofu per your recommendation as your favorite and it is amazing! So firm, so tasty, I made a simple teriyaki and broccoli stir-fry with it and it came out so good. Even my partner , who is so-so on regular tofu (he does not like soy, thinks it is bad for men), loved it.
Thank you ofr this GREAT recipe!!!!
I am so glad you and your partner enjoyed the recipe, Mira! 🙂
Wow you come up with some great ideas for recipes XX
Thanks, Debra! This one took a lot of time, but it was worth it 🙂